Transcription of THANK YOU for purchasing an Oceanic AIR XS II Regulator ...
1 2 THANK YOU for purchasing an Oceanic AIR XS II Regulator /Inflator system. With this system, you have - 2 methods to inflate the BC 2 methods to deflate the BC automatic venting of excess BC pressure an Alternate Air Source Regulator Be sure to read and understand the instructions in this Owner's Guide describing how the AIR XS II System operates before attempting to dive with BUTTONPOWER INFLATORBUTTONMANUAL INFLATE/DEFLATEBUTTONMOUTHPIECECORRUGATE DHOSE TOUPPER UNITPROTECTIVECAPINFLATOR ,. TWO-YEAR WARRANTYR efer to the Warranty Registration form provided by your Authorized Oceanic Dealer or register on-line NOTICEThis Owner s Guide is copyrighted, all rights are reserved.
2 It may not, in whole or in part, be copied, photocopied, reproduced, translated, or reduced to any electronic medium or machine readable form without prior consent in writing from Oceanic / 2002 Design. Oceanic AIR XS II Owner's GuideDoc. No. 12-2116 2002 Design, 1998 San Leandro, CA USAWhen using Air with this Regulator equipment, the Air used must meet EN132 Annex A standards. The AIR XS II Regulator /Inflator System' is designed for - minimum working pressures of 120 PSI ( BAR) nominal working pressures of 140 PSI ( BAR) maximum working pressures of 160 PSI (11 BAR)5 COMPATIBILITY AND INSTALLATIONThe AIR XS II low pressure inflator hose is compatible with all Oceanic first stage regulators.
3 It may not be compatible with other manufacturers' first stages (thread size = 3/8-24 UNF). Have your AIR XS II installed on your BC, and the low pressure inflator hose attached to your Regulator first stage, by an Authorized Oceanic the quick disconnect (QD) end of the inflator hose to the AIR XS II using the QD coupling. To at-tach it, grasp the coupling on the end of the inflator hose between the palm of your hand and fingers, and pull back the coupling release with your thumb and forefinger. While holding back the coupling release, press it onto the quick release fitting on the AIR XS II, and let go of the coupling release while continuing to hold the hose onto the quick release fitting.
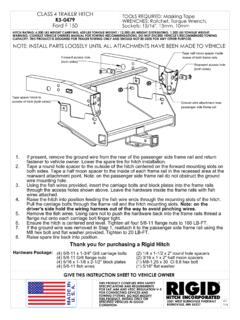
4 Ensure they are firmly attached prior to pressurizing the Regulator /inflator : Refer to the illustration on page 2 for identification of components. FEATURESOPERATING BUTTONSThe three operating buttons, one located on each side of the mouthpiece and one above the mouthpiece, can be differentiated by look, position, and tactile feel. Become familiar with their use to minimize the possibility of confusion. Top - Regulator purge button Left - power inflator button Right - manual inflator/deflator button6 CORRUGATED HOSES/PULL CONNECTORTwo corrugated hoses are joined by a Pull Connector.
5 By pulling on the rounded Pull Connector you can operate the Rapid Exhaust Valve located in the upper (shoulder) unit while you are using the AIR XS II Regulator without having to remove the Regulator from your mouth. The extended length of the Hose As-sembly prevents any resistance during head OVERPRESSURE RELIEF VALVE (OPV)The integrated OPV, located in the upper (shoulder) unit, automatically vents excess pressure from the BC during ascent or if over pressurized with the Power Inflator. This component of the AIR XS II operates auto-matically so no instructions for its use are : The OPV integrated into the upper (shoulder) unit is set to operate at a lower relief pressure than the OPV located on the back of the BC to prevent damage to the material of the BC air cell.
6 It is imperative that only Oceanic inflator assemblies be used with Oceanic BCs. QUICK DISCONNECT CAP (SEE ILLUSTRATION ON PAGE 2)The rubber Cap secured to the corrugated hose is provided to cover the quick release inlet fitting of the AIR XS II Power Inflator Assembly. The Cap must be installed any time the Inflator Hose is disconnected to prevent entry of OPERATIONWARNING: If you ever hear air, or see bubbles, escaping from the area around any of the AIR XS II's connectors, or if the BC fails to hold air, immediately terminate or postpone the dive until the BC and AIR XS II can be serviced by an Authorized Oceanic Dealer.
7 You must not dive with an AIR XS II or BC that exhibits any signs or symptoms of INFLATION USING THE POWER INFLATORWith your Regulator connected to an appropriate cylinder, slowly open the cylinder valve to pressurize the Regulator /Inflator system. Press the Power Inflator Button, located on the left side of the AIR XS II Mouth-piece, until you hear air flowing into the BC. Minor compressions of the Power Inflator Button will initiate airflow into the BC and allow small adjustments in buoyancy. WARNING: If you depress the Power Inflator Button fully, the BC will inflate rapidly.
8 Be careful not to overinflate the BC during a dive causing an unwanted rapid rise toward the the Power Inflator and Overpressure Relief Valve (OPV) prior to each dive to ensure they are function-ing properly. Depress the Power Inflator until the BC fills completely, forcing the OPV in the upper (shoul-der) unit to open. You will hear the sound of air venting from OPV, indicating that it is working properly. While the BC is still inflated, listen for any undesired air leakage around the AIR XS II. The BC should stay inflated until you deflate it DEFLATION USING THE RAPID EXHAUST VALVE (REV)The Rapid Exhaust Valve (REV) is located inside the upper (shoulder) unit of the Inflator Assembly.
9 It is con-nected to the lower (power) unit by two Cables located inside the Corrugated Hose and coupled together inside the Pull Connector. The REV is operated by grasping the Pull Connector, or the lower (power) unit and pulling it down (away) from the upper (shoulder) unit. The Cables pull the Exhaust Valve open, venting air from the BC through the Vents of the upper unit of the Inflator Assembly. The amount of air vented depends on how far open the Exhaust Valve is, the distance you pull the inner Cable, and how long the Exhaust Valve is open. Short tugs vent small amounts of air for minor changes in buoyancy, and a long pull will vent the entire BC in a matter of seconds.
10 8 Use of the REV eliminates water entry even if the Exhaust Valve remains open after all air is vented from the INFLATION USING THE MANUAL INFLATE/DEFLATE BUTTONThe Round Button located on the right side of the Mouthpiece is an Inflate/Deflate manual actuator that al-lows air flow in to, or out of, the BC. To inflate orally, place the Mouthpiece in your mouth, and after you begin (and continue) to blow in, press the Button with your thumb. This procedure purges the mouthpiece cavity of water, resulting in less water entering the BC, potentially prolonging Bladder life. Some air may continue to leak in to the surrounding water when you are orally inflating the BC, even after you have released the Inflate/Deflate Button.