Transcription of The 3 Basic elemenTs of PlumBing
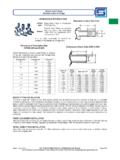
1 Advanced fluid transfer systems70nitroushose endshosesadapter fittingsfuel managementbrake hosesindexplan-o-gramstech tipsaccessoriestransmissionnew productscrimp-on programtech tipsTechnical informaTionMale aN adapter IdeNtIfIcatIoN chartThe line drawings to the right depict actual sizes of the various common AN thread sizes by dash number. Lay your fitting over the appropriate drawing to determine what size fitting you thread sIze chartUse the diagram to the right to find pipe thread size. Place fitting against base line; read fitting size where it intersects the vertical sIze chartThe line drawings to the right depict actual sizes of the various common types of fittings, hose ends and adapters. The number in parenthesis is SAE wrench size 3 Basic elemenTs of PlumBingIn order to plumb your vehicle with a minimum amount of time, effort and money, you should know the basics about hose, hose ends and adapter diameters are assigned AN numbers.
2 Using your automotive hose size, choose from the chart below to find the AN equivalent for hose, hose ends and adapter fittings. For example: a 3/8" standard hose equals -6 AN. 1- choose hose sIze2- choose hose eNd styleStraight, 45 , 90 , 120 , 150 , 180 In same AN size as hose= fINIshed product3- choose adapterAdapt AN to NPT Example: -6 AN to 3/8 NPTANNPTA nother easy method to convert AN size to fractional is to remember that each AN number represents 1/16". For example: -8 AN = 8/16" = 1/2". Male AN Adapter Chart(9/16")(11/16")(7/8")(1")(1-1/4")(1 -1/2")BASE LINE3/43/81/41/81/2B-Nut Charthose coNversIoNsStd. Automotive HoSeAN equivAleNt1/4"=-43/8"=-61/2"=-85/8"=-103 /4"=-121"=-161-1/4"=-201-1/2"=-24AN SizemetAl tube Size-33/16"3/8" - 24 SAE-41/4"7/16" - 20 SAE-55/16"1/2" - 20 SAE-63/8"9/16" - 18 SAE-81/2"3/4" - 16 SAE-105/8"7/8" - 14 SAE-123/4"1-1/16" - 12 SAE-161"1-5/16" - 12 SAE-201-1/4"1-5/8" - 12 SAEaN thread endshosesadapter fittingsfuel managementbrake hosesindexplan-o-gramstech tipsaccessoriestransmissionnew productscrimp-on programtech tipsRightWrongAvoid installing the hose in a twisted position.
3 RightWrongAllow slack in your hose assembly for changes in length that occur under pressure. RightWrongWhen routing the hose assembly, provide a smooth bend radius. Avoid sharp bends, which will collapse the hose and could restrict flow. hose insTallaTion TiPshose assemBly ToolThis handy tool separates the steel braid from the Teflon inner liner making insertion of the olive To assemBle Proflex & Prorace hose wiTh full flow hose endsstep One: Wrap hose tightly with race or electrical tape at the point determined for cut. Clamp the hose loosely in a vise close to the tape. Use a hacksaw with two blades opposing one another or abrasive cut-off wheel. Remove the tape when you are finished two: Unscrew the red socket of the hose end from the nipple. Hold the socket in a vise using soft jaws and insert the hose into the socket by turning it counterclockwise.
4 The hose will stop at the bottom step of the socket. step three: Position the nipple assembly of the hose end in the vise using soft jaws. Apply assembly lube to the threads of the socket as well as to the nipple Four: Start the socket over the nipple by hand and tighten as far as possible by hand. Using an AN wrench, tighten until it reaches the nipple hex or when there is no more than 1/16" gap between the nipple/socket assembly. Be sure to wash & pressure test the assembly before To assemBle Proclassic hose wiTh Proclassic crimP hose endsstep One: Cut hose to length, as straight and square as possible, with razor blade-type hose cutter or two: Install the ProClassic Crimp Collar onto three: Apply Russell Assembly Lube (or oil) onto barb assembly. Start barb assembly into hose; grasp hose behind collar & push hose onto barb assembly until it has fully bottomed out at collar's Four: Check collar/barb assembly to insure there is no gap (as shown by the arrow).
5 If collar moves freely between hose and end fitting repeat step Five: Make sure your die number is correct for hose you are crimping. Lift handle to top position opening dies. Place end assemble in dies. Align edge of the collar (at hose) with back face of dies, using over center action push down on handle until assembly releases from crimper. Inspect assembly, be sure to wash & pressure test prior to six: Completed hose #-3 & -4651970-6 & -8651971advanced fluid transfer systems72nitroushose endshosesadapter fittingsfuel managementbrake hosesindexplan-o-gramstech tipsaccessoriestransmissionnew productscrimp-on programtech tipshow To assemBle TwisT-lok hose & hose endsstep One: Cut hose to length using a sharp knife or two: Liberally oil inside of hose & barbed end of hose end. Insert barbed end into hose using a twisting action. Put the swivel end at center hex in a vise.
6 Use a twisting motion make bottom of hex even with hose edge, rubber insulator will cover end of three: Completed hose To assemBle Proclassic hose wiTh full flow hose endsstep One: Cut hose to length, as straight and square as possible, with razor blade-type hose cutter or two: Unscrew socket from hose end. Push hose into socket, turning counter-clockwise, until hose is seated against step in socket. Make sure rubber part of hose does not protrude into socket three: Apply Russell assembly lube to threads on nipple assembly and in socket. Insert nipple into socket/hose and start threads by hand (clockwise).step Four: Hold socket/hose in vise. Turn nipple with wrench until there is less than 1/16" between nipple hex and socket. Repeat Steps 1-3 for other end of hose. Then, flush hose assembly with solvent or soapy water and blow clean with compressed air or let air To assemBle Powerflex hose & hose endsstep One: Wrap the hose tightly with electrical or racers tape.
7 Hold the hose firmly in a vise without crushing and cut through the tape. Make sure you make a straight cut. Remove the tape slowly and deburr the PTFE edges. Install the socket on the hose and slide it back out of the two: Insert the nipple portion of the PowerFlex hose end in a vise. Slip the hose over the nipple using a twisting motion to size the of the Teflon. Separate the wire braid from the of the PTFE tube with a small screwdriver. Be careful not to crush the three: Push the olive sleeve around the PTFE and between the braid. This can be done by pushing the olive sleeve against the side of your workbench or vise. Be sure the PTFE liner is square to the bottom of the olive. With the nipple in the vise, lube the threads and the nipple portion of the hose end sparingly. Insert the hose over the nipple making sure the olive does not pop off the PTFE Four: Start the socket onto the nipple by hand.
8 Tighten with a wrench until the gap between the nipple and the socket is no more than 1/16". Clean the hose assembly and pressure test before using.