Transcription of The Therma Gauge—Type H
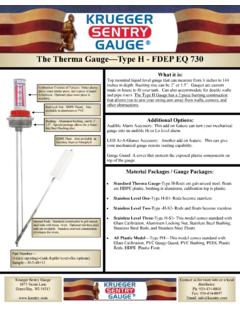
1 The Therma gauge Type H Calibration: Consists of 3 pieces. Outer plastic piece, inner plastic piece, and a piece of paper in between. Optional glass inner piece is available. Red Lock Nut: HDPE Plastic. Also available in aluminum or PVC. Bushing: Aluminum bushing, can be 2 , . Special package allows for a Stain-less Steel Bushing also. HDPE Float: Also available in Stainless Steel or Nitrophyll. Internal Rods: Standard construction is galvanized steel rods with brass rivets. Optional stainless steel rods are available.
2 Stainless steel rod construction eliminates the rivets. What it is: Top mounted liquid level gauge that can measure from 6 inches to 144 inches in depth. Bushing size can be 2 or . Gauges are custom made in house to fit your tank. Can also accommodate for double walls and pipe risers. The Type H gauge has a 2 piece bushing construction that allows you to aim your swing arm away from walls, corners, and other obstructions. Additional Options: Audible Alarm Accessory: This add on feature can turn your mechanical gauge into an audible Hi or Lo level alarm.
3 LED At-A-Glance Accessory: Another add on feature. This can give your mechanical gauge remote reading capability. gauge Guard: A cover that protects the exposed plastic components on top of the gauge . Material Packages / gauge Packages: Standard Therma gauge -Type H-Rods are galvanized steel, floats are HDPE plastic, bushing is aluminum, calibration top is plastic. Stainless Level One-Type H-S1- Rods become stainless. Stainless Level Two-Type -H-S2- Rods and floats become stainless. Stainless Level Three-Type H-S3- This model comes standard with Glass Calibration, Aluminum Locking Nut, Stainless Steel Bushing, Stainless Steel Rods, and Stainless Steel Floats.
4 All Plastic Model Type PH This model comes standard with Glass Calibration, PVC gauge Guard, PVC Bushing, PEEK Plastic Rods, HDPE Plastic Float. Krueger Sentry gauge 1873 Siesta Lane Green Bay, WI 54313 Contact us for more info or a local distributor: Ph: 920-434-8860 Fax: 920-434-8897 Email: Part Number H-(size opening)-(tank depth)+(ext)-(list options) Sample H-2-48+12 Therma gauge Accessories and Replacement Parts Accessories LED At A Glance Remote Display-Turns the direct reading Therma gauge into a wired remote reading gauge .
5 (part # add -Ledaag) Direct Mount Alarms- Audible alarm that mounts directly to the gauge and provides your choice of overfill or low level warnings. (part # add -Dalarm) Remote Mount Alarms- Audible alarm that can be remotely wired and provides your choice of overfill or low level warnings. (part # add -Ralarm) Aluminum Lock Nut- Replace the red lock nut for added durability. (part # add -ALN) gauge Guard- Protective Cover that replaces the red locking nut providing protection from physical damage and weathering damage.
6 Also helps with passing fire inspections. (part # add -ALG) Glass Calibration- The internal piece of the calibration becomes glass. Provides protection from heat, fumes, weathering, and also helps with passing fire inspections. (part # add -GLC) Replacement Parts H-Kit- Replaces all the top components with standard materials. HG-Kit Replaces all the top components with standard materials and a glass calibration. HALN-Kit- Replaces all the top components with standard materials and an aluminum lock nut.
7 HGALN-Kit- Replaces the top components with a glass calibration and aluminum lock nut. Krueger Sentry gauge 1873 Siesta Lane Green Bay, WI 54313 Contact us for more info or a local distributor: Ph: 920-434-8860 Fax: 920-434-8897 Email: Glass Calibration gauge Guard Aluminum Lock Nut Led At A Glance Direct Mount Alarm Remote Alarm Ordering, Installation, Maintenance and Operation Maintenance: The Therma gauge can fail in one of three ways. The calibration assembly on the outside of the tank can become weathered, unreadable, or broken.
8 The connecting rods that extend into the tank can come apart or become damaged. The float that sits at the bottom of the gauge can come off or become saturated with product (leak). Recommended Maintenance Procedures: Once per month: Inspect the top of the unit once per month to ensure that the calibration is visible, readable, and unbroken. (these top pieces can be easily replaced without having to replace the whole gauge ) Once every 6 months: Unthread the unit and carefully remove it from the tank.
9 Be sure all rods are connected as one piece from the red indicator all the way down to the float. Also inspect the float for damage or leakage. To ensure proper working order, manually raise the float arm from empty to full to be sure that the red indicator freely moves up and down with the motion of the float rod. When performing maintenance, be sure to follow the installation instructions above to prevent damaging the gauge Krueger Sentry gauge 1873 Siesta Lane Green Bay, WI 54313 Contact us for more info: Ph: 920-434-8860 Fax: 920-434-8897 Email: Installation Instructions: When installing, unthread the red nut and remove the calibration and bushing.
10 Thread in the bushing first. Drop the gauge through the center hole, make sure your swing arm is facing in the direction you want. Replace the calibration and tighten down your red locking nut. Instructions for Operation: The top of the red indicator is an indication of your approximate fuel level in your tank. Once installed, you simply view the calibration to monitor your tank level. Indicator is calibrated in eighths of a tank on one side, and quarters of a tank on the other as well as Gallons and Liters.