Transcription of This “How To” guide will help those creating events or ...
1 This How To guide will help those creating eventsor parties get the most out of it in a safe andprofessional setting. It will also help dancersbecome more skillful and entertaining as shadowdancers. One thing people love about ShadowDancers is that it leaves something to the imagination!You may think it is simple to do, I guaranteeafter you read this - it will be!For Free DistributionShadow Dancers is a Trade Mark of the Global Creative Group,All Rights Reserved. Copyright 2009 DISCLAIMERThe information herein is for reference purposes only. Please consult a professional before building a stagingarea. Get professional advice regarding lighting and consult with your physician before commencing anyphysical activity including Shadow Dancers TM and GCG are not Liable for any injuries that may be caused by your engaging in theseactivities and all the advice herein is to be used with common sense and with the advice of you do not wish to be held to this disclaimer do not reference this document.
2 Otherwise enjoy yourself! beautiful, sensual and fun art of shadow dancing isan entertainment option for bars, pubs, clubs and partyplanners around the world. If you are participating orwatching, shadow dancers events create a celebrativevibe that captivates any the iconic Shadow Bar in Las Vegas to home parties,this sensory candy art form is being Dancers is a Trade Mark of the Global Creative Group, All Rights Introduction to Shadow Dancing Building Your Own Shadow Dancing Set Up Lighting Set Up & Options For Live Shadow Dancing Dance Techniques Behind The Screen Costumes and Props Safety Using Projectors To Project Shadow Dancers Shadow Dancers DVDsWelcome to this How To guide to the beautiful, sensual andfun art of shadow dancing. It has become an entertainmentoption for bars, pubs, clubs and party planners around theworld.
3 In this presentation you will learn how to: Build your own shadow dancing set up in your place ofbusiness or in your own home. We will discuss lighting set up & options for live shadowdancing Dancers will learn techniques to make the most out of theirroutine behind the screen We will discuss costumes and props and give tips on thingsthat work and things that don t. Safety for dancers and for event planners to lessen thedanger of injury, fire and general safety. If you simply want to get the best results using projectors toproject Shadow Dancers we will discuss that to Shadow Your Own Home or BusinessShadow Dancing Set you want to set up to host a shadow dancing party orevent. There are many ways to build your stage from the sim-plest set up to a professionally built out set.
4 We are going topresent three different ways to do Working with a simple white sheet 2. Building a custom DIY set up3. Working with professional rear projection first thing you want to think about before purchasingmaterials is What size do you want your screens to be basedon? Your dancers heights and the physical setting are fac-tors you have to work with. If you want your dancers to beseen in windows, then that will give you the dimensions foryour screen. If it is in a home setting in a living room or bed-room then think about what you will attach your screen toand provide enough room for safe lighting behind you. If it ison a stage then the size of your stage is going to be a crit-ical factor, you don t want to buy a 10-foot wide screen ifyour stage is under that width as the professional rear pro-jection screens are not adjustable.
5 (In our next section we cover lighting options in depth.)Working With a Simple White s first look at home use using a simple white sheet. In thishouse we have an arch which is 7 feet wide that we will useas our staging area, our sheet measures 6 x6 it is made outof 100% cotton. Our audience will watch from over are going to suspend the sheet in a simple yet effectiveway using two very inexpensive microphone boom standsthat can be purchased from any music store. We want tosuspend the sheet so it will not fall over easily and will notdamage the walls, ceiling or anything surrounding it. Now if you have the ability to hang the sheet from rafters youcan use rope tied to the corners to get it at the right heightand use a broom handle or something with a little weight init to hold the bottom of the sheet on the yourstands straight up as high as the sheet is long, taking carenot to reach the ceiling, lights, chandeliers or fansattached above.
6 Using a safe step stool, attach one cor-ner of the sheet to the stand with your choice of fastener,we are going to use bag clips, most households have themkicking around in the kitchen, clothes pins or large bullclips will work also. Attached the other top corner to thetop of the other stand. Adjust the stands so that they arejust wide enough apart for your area being used or thewidth of your sheet and make sure one leg runs horizontal-ly under the sheet on either side, this way you won t trip onit while dancing. Add more clips on each stand to make the sheet somewhattaught. Now remember with a set up like this, your dancersare going to have to be careful not to push on your screenor it may fall your light behind you. We are going to use a utility cliplight and attach it to the back of a chair.
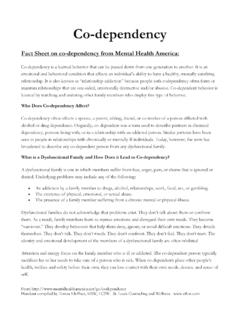
7 Turn out the room lights, put on your dancers favorite music,turn it up and let the show a Custom DIY Set Up. Now lets say you want to build yourown custom set up to go into a veryspecific space say 8 feet high by 15feet wide, like this example (see pic).There are materials out there that youcan pick up easily and quite afford-ably that will complete your customsetup. From a fabric store purchase curtain backing , now there are quite a few options but testfor light penetration, you want material that lets a moderateamount of light through. The best material captures and dis-perses the light. Take a piece 9 feet long by 5 feet wide. Froma lumber yard or hardware store purchase pieces of wood8 long by 2 wide by 3/4 these will make your frame. Make sure they are as straight as you can find.
8 You will alsoneed a staple gun with 1/8 wood staples with the angledhead. Take 2 of your 8 lengths of wood and cut them tofit the across the frame. Lay out your frame on a flat evensurface and button them together with a nail gun and asmall amount of wood glue (or use corner angle brackets).Once the frame is fixed, lay out your material over theframe and staple once in the middle of the end stretch your material and staple either corner. Thenpulling slightly, staple in the middle on the opposite end,Next go to the middle of the long side and be careful notto pull the material so it will warp the long side of thewood, put one staple either side and check for pull the corners and staple each corner removingsome creases. Then add a few staples in between, abouta couple of inches apart evenly gently pulling out creases,trim the edges of the fabric and your screen is ready foraction!
9 Dancer behind Rear Projection ScreenWorking with Professional Rear Projection is a professional rear projection screen it is 10 wideby 7 tall, it comes with a folding and locking aluminumframe and side stands. Mostcome in a hard case withcasters. It takes 2 people tosafely set this up. Be carefulof overhead lights and fix-tures when expanding theframe. When it is set up andin place, these screens arevery durable and a dancercan really use them the rubup against and keep closeto the screen without itfalling Projecting Shadow Dancers in PortugalDancer behind the Rear Projection ScreenLighting Set Up & Options For LiveShadow it comes to lighting there are many options, things tokeep in mind are, safety, as lights get hot and will burn youor surrounding materials if you are not careful.
10 Wattage ofyour bulbs, only use the power you need. Too higher wattagecreates more light and heat than you need. Having Uni-Directional light, light that can be focused will create a bet-ter silhouette image. Most importantly though, you are onlygoing to use just one light source. If you use more than onelight source you will get multiple shadows and that s no and height wise, mount the light source around midtorso to spread the light across the entire body. Every lightspreads its corona a different size so try to have it about aminimum 6 feet behind the are some easy lighting options. At home, you can use a desk lamp with a directional head,check with the manufacturer for maximum safe wattagebulbs that can be used in these lights can be purchased at stores like Home Depot andwork great and can provide enough light to do the job.