Transcription of This Mopar Performance Parts Exhaust System part numbers ...
1 7/20/09 Page 1 of 4 2009, Chrysler, LLC. Mopar is a registered trademark of Chrysler, LLC. All rights reserved This Mopar Performance Parts Exhaust System part numbers P5155280/P5155281 has been designed for the 2009 Dodge Ram 1500 Crew Cab, Short Bed, equipped with the Hemi V-8 engine and an automatic transmission. Mopar Performance recommends your dealership or other professional after market Parts installers, which have all the necessary equipment, tools and ex-perienced personnel that will do the installation properly, should perform the in-stallation of this System .
2 However, if you decide to perform this installation, we recommend someone should help you. Ensure that the installer uses all safety precautions whenever working under any vehicle, including eye protection. Caution!!! Never work on a hot Exhaust System . Serious injury in the form of burns can result If the vehicle has been in use and the Exhaust System is hot, allow vehicle to cool for at least 1 hour. Always wear eye protection when working under any vehicle. Note: It is our recommendation that you use a hoist or hydraulic lift to facilitate the in-stallation of your new Mopar Performance Parts Exhaust System .
3 Taking all under car safety precautions, lift the vehicle using a hoist or hydraulic lift. Once this has been done, you may begin the removal of your old Exhaust System from your vehicle. Note: Before removing the original Exhaust System from your vehicle, please compare the Parts you have received with the bill of materials provided on the next page to as-sure that you have all the Parts necessary for the installation of your new Mopar Per-formance Parts Exhaust System . 7/20/09 Page 2 of 4 2009, Chrysler, LLC. Mopar is a registered trademark of Chrysler, LLC.
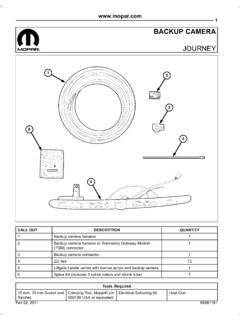
4 All rights reserved Mopar Performance Parts Long Tube Header Assembly Components 1. 1. Muffler assembly 2. R/H tail pipe assembly 3. Over axle pipe 4. L/H tail pipe assembly 5. clamp (qty 1) 6. clamp (qty 3) 7/20/09 Page 3 of 4 2009, Chrysler, LLC. Mopar is a registered trademark of Chrysler, LLC. All rights reserved Mopar Performance Parts - System Installation Original Header System Removal Note: With a used vehicle, we suggest a penetrating spray lubricant to be applied liberally to all Exhaust fasteners and allowing a significant period of time for the chemical to lubricate the threads before attempting to disassemble.
5 1. Unbolt the clamp (figure 1) located behind the rear muffler assembly. 2. Lubricate all the hangers and rubber isolators. 3. Using a muffler stand or an additional person to hold the tail pipe up in place, remove the hanger from the rubber isolator and then remove the tail pipe from the vehicle (figure 2). 4. Unbolt the clamp located just behind the catalytic converter. Using a muffler stand or an additional person to hold the Exhaust up in place, remove the hanger from the rubber isolator and remove the rear muffler from the vehicle. 5. Unbolt the clamp (figure 3). The clamp may have grooved the pipe and it may require cutting for removal.
6 Using a muffler stand or an additional person to hold the re-maining Exhaust up into position, remove the hangers from the rubber isolators and remove the remaining ex-haust from the vehicle. Fig. 1 Fig. 2 Fig. 3 Caution!!! Never work on a hot Exhaust System . Serious injury in the form of burns can result If the vehicle has been in use and the Exhaust System is hot, allow vehicle to cool for at least 1 hour. Always wear eye protection when working under any vehicle. Note: It is our recommendation that you use a hoist or hydraulic lift to facilitate the installation of your new Mopar Performance Parts Exhaust System .
7 Taking all under car safety precautions, lift the vehicle using a hoist or hydraulic lift. Once this has been done, you may begin the removal of your old Exhaust System from your vehicle. Note: Before removing the original Exhaust System from your vehicle, please compare the Parts you have received with the bill of materials provided on the previous page to assure that you have all the Parts necessary for the instal-lation of your new Mopar Performance Parts Exhaust System . Warning: Use extreme caution during installation. Torque all fasteners according to manufac-turer s torque values and tightening sequence.
8 DO NOT use air impact tools to tighten fasten-ers on Mopar Performance Parts Exhaust systems. Use of such tools may result in bent flanges or gasket contact areas leading to Exhaust leaks. 7/20/09 Page 4 of 4 2009, Chrysler, LLC. Mopar is a registered trademark of Chrysler, LLC. All rights reserved Mopar Performance Parts - System Installation Stainless Steel Exhaust System Installation 1. Place a clamp over the expanded end of the front muffler assem-bly and set it into position (figure 4) making sure to install the hanger into the rubber isolator.
9 Do Not tighten the clamp. 2. Place a clamp over the expanded end of the muffler assembly and set it into position (figure 5). Do Not tighten the clamp. 3. Place a clamp over the right tail pipe assembly and set it into position (figure 6) making sure to install the hanger into the rubber isolator. Do Not tighten the clamp. 4. Install the Hanger/Bracket assembly at the rear of the vehicle on the driver side just behind the leaf spring using the bolt already existing on the vehicle (figure 7). Install the rubber isolator onto the hanger. 5. Place a clamp over the expanded end of the left tail pipe assem-bly and set it into position (figure 8) making sure to install the hanger into the rubber isolator.
10 Do Not tighten the clamp. 6. Check your Exhaust System for proper clearance under the vehi-cle and also for tip alignment. 7. Once position has been determined to be correct, tighten the Accuseal clamps to 32-35 ft. lbs. 8. Before starting your vehicle, make sure to check all wires, hoses, brake lines, body Parts and tires for safe clearance from the Exhaust System . 9. Start vehicle and check for any leaks. If any leaks are found, determine cause (such as loose or incorrectly positioned clamp) and repair as necessary. Fig. 4 Fig. 5 Fig. 6 Fig. 7 Fig.