Transcription of Tips on getting the best results from SUBLIMATION
1 Tips on getting the best results fromSUBLIMATIONL arge parts will require a longer dwell time to produce optimal color. For any pieces that are larger than 9"x12", we recommend increasing the dwell time by 15 seconds over the recommended setting for that substrate. If necessary, increase the dwell time in 10 second increments until you achieve optimum exercise extreme caution when removing finished items from your heat press. We recommend using an oven mitt or rag when removing products from your heat press. Warping can be minimized by allowing products to cool face down on a firm surface, and by placing a weighted object on the back of the product. If warping is severe, the sublimated piece can be heated a second time from the back side and allowed to cool. Do not bend products while they are still hot, as this can damage the substrate and your sublimated blowout refers to an image whose colors have been blown out of its borders and appear smudged.
2 The primary causes of blowouts are uneven heating, overheating and excessive pressure. heat press accessories, such as a rubber pad or a Teflon sheet covering a transfer held in place with heat -resistant tape will prevent a blowout of your image by lessening the variance in temperature across the surface. Anytime you choose rubber pads instead of a Teflon sheet to prevent a blowout, increase the tempera-ture 25 degrees and the dwell time in 15 second increments until you achieve optimum SUBSTRATESW hile it is possible to sublimate both sides of certain materials at same time, it is not recommended on any Unisub material except aluminum. Sublimate the first side of the material as normal. Allow it to cool com-pletely before taping your transfer for the second side. Use an oversized sheet of paper for the second side, and try to attach heat -resistant tape only to the paper.
3 CUTTING RECOMMENDATIONSA lthough pre-cut blanks can be purchased through your distributor, FR Plastic sheet stock can be cut, routed or beveled either before or after SUBLIMATION using carbide tooling. We recommend using either a router bit designed for acrylic or a multi-tooth saw blade designed for plastic. Ask your engraving supplier about bits designed to cut FR Plastic do not recommend shearing for FR Plastic. The fiberglass content of this material will damage your shear blade. Also, we do not recommend laser cutting because the edges of the plastic will be charred. Hardboard products may be cut using laser engraving equipment. The peel coat or masking should be left on the product until after cutting. Consult your user manual or laser engraving equipment manufacturer for power settings for your FINISHED PRODUCTSS pecial care must be taken when storing or packaging finished sublimated products.
4 If sublimated pieces are placed in direct contact with other sublimatable materials or with any type of synthetic material, the inks will migrate from the sublimated piece to the synthetic material over time. Do not stack finished pieces face-to-face, either hot or cool. Do not wrap finished pieces in shrink-wrap or place them in plastic bags for shipping. We recommend that you use a paper sheet between stacked items, or wrap pieces in paper for shipping. JEWELRY ASSEMBLYOnce cool, jewelry pieces can be assembled by hand or with needlenose pliers. The pieces can be attached to a necklace or charm bracelet with a bale (included with these pieces). Open the pointed end of the bale with your fingernails or pliers. Put the pointed end through the mounting hole on the jewelry piece, and hang the wide end over the necklace or a charm bracelet link.
5 Pinch the bail with your fingers or pliers to close it shut. Earring hooks attach directly to the jewelry pieces without additional hardware. The loop on the end of the earring hook is opened slightly to allow you to slip it through the mounting hole on the jewelry. The point of the hook should point away from the sublimated face of the THE TRANSFERV arying storage conditions may have an effect on the moisture content of transfer paper. To eliminate moisture from transfers, place the printed transfer 2 -3 below the heat platen for 20-40 seconds. The colors of the SUBLIMATION transfer may appear washed out. This is normal, and the desired result of color adjustment for the transfer THE SUBSTRATER emember to peel the transparent protective film off of the surface of the substrate (if applicable) and check to see that you are working with a clean, lint-free surface.
6 Adding a "bleed" to your artwork will help you to align your transfers. To create a bleed, enlarge your background artwork so that it is 1/16" to 1/8" larger than your blank piece. Place your blank product face down over the transfer. You will know that the blank piece is properly aligned when you can see an even amount of ink all the way around the edge. Fold two edges of the paper over to the back of the product, and attach it to the back with heat resistant tape to hold it in position. Sometimes a "double image" results when the transfer moves across the sublimatable surface while it is still hot, usually when the press is lifted or while removing the transfer from the SUBLIMATION surface. To prevent this, it is recommended to always use a transfer sheet that is larger than the surface you are sublimating onto. Ideally, the paper should be large enough to secure it to the backside of your sublimatable blank with heat resistant tape.
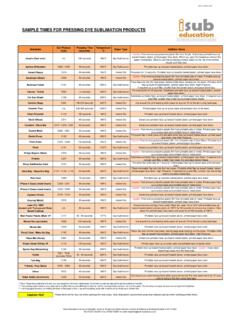
7 A small amount of edge foil will be left on the edges of plaques, paper-weights and picture frames after the peel coat is removed. This should be removed from the sublimatable surface by scraping the edge with your fingernail, or by using a mild household cleaner and a paper towel. Do not tape to the foiled edge of a plaque or paperweight as it may pull the foil off when removed. If possible, allow the piece to cool slightly before removing the transfer and AND DWELL TIMESA temperature of 400 F is recommended for all products. Use moderate to heavy pressure it should require some effort to close your heat press. Time and temperature may vary depending on your heat press and the thickness of the blank material. Dwell times can be increased or reduced in 5-10 second increments until you find the time that results in the clearest image.
8 The times shown below will provide a general starting point. Please refer to the documentation from your ink supplier for more information on temperature and dwell time. FR Plastic (name badges, bag tags, etc.):60 - 70 secondsFR Plastic for outdoor use (license plates):80 - 90 seconds*Hardboard (clipboards, coasters, etc.):60 - 70 secondsMDF (plaques, paperweights, etc.):80 - 90 secondsPhenolic:45 - 55 secondsAluminum (sheet stock and jewelry):45 - 55 secondsAluminum (bookmarks, face down):60 - 70 secondsCar Flags:25 - 35 seconds*Laboratory research has shown that using a longer dwell time can extend outdoor life. It is possible to damage the edge of a blank part if one picks at the corner or edge with a fingernail or sharp instrument to try to remove the protective film. We have found the best way to remove the film and minimize the risk of damage is to use the tacky side of a piece of protective film recently removed from another part.
9 Drag the tacky side of the film along the top surface of the tile starting at the corner and moving towards the center of the tile. If you do not have an extra piece of film handy, you can use the pad of your thumb or forefinger in the same manner to peel back the these sublimatable products feature UV absorbers to extend outdoor life, they are not intended for permanent outdoor use. Fading will occur over time depending on the brand of SUBLIMATION ink used and outdoor environment. Contact your SUBLIMATION ink manufacturer for data on expected outdoor life.


