Transcription of TLC200 Pro User Manual - Brinno
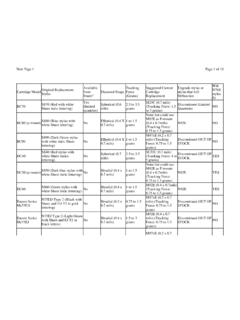
1 TLC200 Pro user Manual Never miss a shot SEE the UNSEEN. HDR Time Lapse Video camera TLC200 Pro user Manual 01. WELCOME. TO. THEBRINNO. FA M I LY ! Welcome to Share your awesome Time Brinno !!! Lapse videos with other Brinno fans on our facebook page !!! contact us: more information: 03. Optional Accessories Weather Resistant Housing Brinno Reader (ATH120) (ABR100). Bike Cam Holder Shutter Line (ABH100) (ATS110). Camera Wall Mount Motion Sensor (AWM100) (ATM110). Pan Lapse Pouch (ART100) (ATP100). Micro Scope Brinno Lens Adapter(AMH100) (BCS 18-55 & BCS 24-70). CONTENT. 09 Package Contents 10 Before You Begin Taking Photos 10 Parts of the Camera 11 Display Icons 12 How Our Power Saving Technology Works 13 First Steps 15 Mode 16 Time Lapse Mode & Setting a Time Interval 17 To Begin Recording 18 To Stop Recording 19 Storage status 20 Focus Mode 21 Basic settings 21 Setting the Time Lapse Frame Rate 22 White Balance Mode 23 Image Quality 24 Scene 25 Timer 26 HDR Range 27 Exposure 27 Custom Image 28 More Settings 28 Time Stamp 28 Low Light Recording 29 Set Date & Time 29 LED Indicator 30 Band Filter 30 Firmware Version 31 Reset 32 Reference 32 CS-mount lens 33 Extensional accessories 34 External Power 35 Micro USB connector-File transfer 36 Micro USB connector-Webcam 37 What Settings Should I Use 38 Scene Setting & What Size SD Card Should I Use 39
2 Battery Life 42 Specification OK. START. on Settings SD Storage Focus Set the Time Interval Time Lapse Frame Rate 1 FPS/ 5 FPS/ 10 FPS/ 15 FPS/ 20 FPS/ 30 FPS. ASAP 30 Sec White Balance Mode 1 Sec 1 Min Auto/5000 Day/ 7000 Shad/ 6000 Clou 2 Sec 5 Min 4000 Fl-C/ 3300 FL-W/ 2800 Inc 3 Sec 10 Min 5 Sec 1 Hr Image Quality 10 Sec Custom Best/Better/Good 20 Sec Scene Daylight/Twilight/Night/Moon/Star Timer You can set start and stop time. HDR Range High/Medium/Low Exposure MENU TIME. Custom Image Saturation Contrast OK. START. Sharpness on EXIT. If the screen goes to sleep, press OK to wake up. OK. START. Subject to change without notice, please refer to EXIT for latest information. Package Contents 4. 1. 5. 6. 2 AA 7. AA. 3 AA. SD AA 8. 1 HDR Time Lapse Camera ( TLC200 Pro). 2 4 AA Batteries 3 SD Card 4 Lens cover 5 BCS 019 Lens (comes mounted on the camera).
3 6 Lens cover 7 Screwdriver 8 Screw 09. Before You Begin Taking Photos Parts of the Camera 6. 7. 1. 8. 2. 9. 10. 3. 11. 4. 12. 13. 5. 1 BCS 019 Lens (Page 32) 8 LCD Screen 2 SD Card Slot 9 MENU ( ) Button 3 Connector for Accessories (Page. 33) 10 TIME ( ) Button 4 Connector for Micro USB cable (Page. 34~36) 11 OK/ START Button 5 Battery Door 12 Power Switch 6 Strap Eyelet 13 Tripod Screw Hole 7 LED indicator 10. Display Icons Set Up screen At Set Up screen 1 1 Capture mode : Time Lapse mode 2 ASAP Shutter: Stop Motion mode Motion: Motion Activated mode OK 2 Time interval 2013/03/01 Select a pre-set time inter- 3 val or customize yourself. 22:58:32. 4. Preview screen 3 System date and time 4 Battery level 5. Icon Description 6. (green). Battery fully charged. 7 (green). Battery partially charged.
4 Low battery. (yellow) Replace as soon as possible. READY (red). Out of battery. Replace battery immediately. 8. At Preview screen 5 Scene mode BATTERY 6 White Balance mode EMPTY 7 Preview image capture window 9 Status icon 8 Battery Empty SD Please replace battery immediately. FULL 9 SD Card Full Please download files to clear SD card space. 10 11. 10 SD Card Error Please replace SD card. SD SD 11 No Card ERROR NO CARD Please Insert SD card. 11. How Our Power Saving Technology Works Set up screen Preview screen Turn off LCD. 720P. 1 Sec 10 sec. 50 sec. OK. 2013/03/21. 22:58:32 READY. At The Set Up Screen After 10 seconds without activity on the set up screen, the camera will go to Preview screen automatically. You can press the MENU or TIME button to go back to the set up screen. At Preview Screen After 50 seconds without activity on the set up or pre- view screen, the LCD screen will turn off automatically to save power.
5 You can press the OK button to wake up camera. 12. First Steps Initial Step-1 Installing the Batteries 1 2 3. 1. Open battery door. 2. Insert 4 AA batteries. 3. Close battery door. Be sure the battery cover is locked into place. Initial Step-2 Installing SD Card 1 2 3. 1. Open SD card cover. 2. Insert SD card until it clicks into place. 3. Close SD card cover. 13. First Steps Initial Step-3 Turning on the Camera 1 2 3. SD 1 Sec OK. 2013/03/01. on 22:58:32. 1. Rotate the Power switch to the ON position. 2. Process screen It may display other information on screen, please refer to page 7. 3. Set Up screen Initial Step-4 Setting the Time and Date 1 2 3. Setting More Date & Time Set Date 2013/ 03 /01. 22 : 58 : 32. & Time OK OK OK : Next 1. Press the MENU button to go to Setting -> MORE. 2.
6 At MORE Setting, select Set Date & Time, and press OK. 3. At the highlight field, press MENU ( ) to decrease value, press TIME ( ) to increase value, press OK. to confirm and go to the next field. When finished press OK to exit set up. 14. Mode Start Screen ASAP. OK. 2013/03/01. 22:58:32. MENU TIME. MENU TIME. Settings Set the Time Interval Settings (Refer to Page21-31). Setting the SD Storage Time Interval Display the SD. (Refer to card capacity Page16). (Refer to Page19). Focus Enlarge the preview image, so you can easily adjust the lens focus. (Refer to Page20). 15. Mode Time Lapse Mode In Time Lapse Mode, the camera will take one photo at the time interval you selected. When you are finished recording, the camera will convert those photos into a time lapse video! Before you begin recording, you can change the Time Lapse Frame Rate.
7 For more information please refer to page 16. Output file format: AVI. (Without audio). Resolution: 720P. Time Lapse video length: The maximum size of each single AVI file ranges between 8,192 to 20,480 frames, depending on the time interval setting. 1. Setting a Time Interval: 1-1 1-2 TIME TIME. 2 Sec 10 Min 1 Sec OK OK OK. TIME 2013/03/01. 22 : 58 : 32 22:58:32. CUSTOM. Set up screen OK OK : Next 1-1 Press TIME button to enter time interval set up. 1-2 Press MENU ( ) and TIME ( ) to select a pre-set time interval or customize it by yourself. When complete, press the OK Button to confirm and return to the Set up screen. Time Interval range: from below 1 second to 24 hours. 16. Mode 2. To Begin Recording 2-1 2-2. 1 Sec 10 sec. OK. 2013/03/01. 22:58:32. Set up screen READY. Preview screen REC.
8 Recording 2-3. Recording period 2-1 After selecting the time interval, press OK to pro- ceed to the Preview Screen. 2-2 On the Preview screen, hold the OK button for 2. seconds to start recording. Preview Screen will show REC at the bottom bar. 2-3 During the recording period, the LCD panel will turn off to save power. 17. Mode 3. To Stop Recording 3-1. Processing Preview screen 3-2. SD. 3-1 When recording, hold the OK button until the LCD panel turns on and shows the text Process- ing , this means the camera is processing the AVI and closing the file. When the processing is completed it will display the text Ready . This indicates the recording session is finished. 3-2 Remove the SD card from the camera, and insert it into your computer or laptop to enjoy your amazing Time Lapse Videos!
9 18. Storage Status In this mode, the LCD will display the SD card capacity, so you will know how much free space remains on the SD card. SD Storage S i z e =4GB. Used =27%. F r e e =73%. OK. 19. Focus Mode In this mode, the camera will enlarge the preview im- age, making it easier to focus the lens. 1 2 3-1. Focus Page 5. OK. Page 5. 3-2. Adjust the lens focus 4 5. 1. Select and enter Focus mode. 2. See the enlarged preview image. 3. Use the screwdriver to loosen the screw on the (BCS. 019) lens. Adjust the lens focus. 4. Once finished, use the screwdriver to tighten the screw. 5. Press OK to exit focus mode. 20. Basic settings Setting the Time Lapse Playback Frame Rate: You can change the videos FPS (frames per second). playback with this setting. 1 2. Setting Frame Rate 10 FPS. 15 FPS (Frames Per Time Lapse Second) means: Frame Rate 20 FPS.
10 10 frames are 30 FPS played in 1. OK OK second. 1. Press MENU button to enter Setting mode. 2. Select and enter Time Lapse Frame Rate . 3. What frame rate should I use? Generally, 10 FPS is suitable for Time Lapse video, but depending on your needs you can use 1 - 30 FPS. 1 FPS: If the video plays at 1 frame per second, the video will not look smooth, and the video length will be longer. 30 FPS: If the video plays at 30 frames per second, the video will look smooth, and the video length will be shorter. Option Video playback speed Shooting subject 1 FPS Very slow Slide show Stop motion, Face time 5 FPS Slow lapse 10 FPS Medium Biking 15 FPS Flowers growing, Medium Educational endeavors 20 FPS. Parties, Sunrises, 30 FPS Fast Sunsets, Natural settings. 21. Basic settings White Balance Mode 1 2.