Transcription of Trailer Electrics For Idiots/Dummies - derosaweb
1 2018 John H. DeRosa 1 Trailer For Idiots/ Made Wiring of Trailers Electrics Dummies Easier This document is updated quite often! Be sure to download the latest version! Issue Date: Nov 28, 2018 2018 John H. DeRosa1 TrailerFor Idiots/ MadeWiring of TrailersElectricsDummiesEasier This document is updated quite often! Be sureto download the latest version!Issue Date: June 20, 2018 2018 John H. DeRosa 2 Trailer Wiring 101 Many thanks to all the individuals (known and anonymous) that have provided information for this document 2018 John H.
2 DeRosa US Trailer Wiring Information Wiring Diagrams Separation of turn signal and brake wiring 2018 John H. DeRosa 4 Trailer wiring and harness plugs are available in a variety of sizes and configurations. The most common and basic of designs is the color coded 4-wire system. The "Flat-4" harness plug is found on almost all boat trailers and many smaller utility trailers that do not have electric brakes. Green Right Turn+Stop Yellow Left Turn+Stop Brown Tail+Marker White - Ground Vehicle Trailer 4-Flat or Flat-4 Wiring Typical Trailer 4-Flat Wiring 4-Flat Cable 2018 John H.
3 DeRosa 5 Side Marker Lights License Plate Light Left Turn/Brake/Tail/Marker Light Assembly Right Turn/Brake/Tail/Marker Light Assembly Typical Trailer 4-Flat Wiring Ground Brown Tail + Marker Green Right Turn+Stop Yellow Left Turn+Stop White Ground Right Turn + Stop Left Turn + Stop Tail + Marker Ground 2018 John H. DeRosa 6 Converting 4-Flat Brake/Turn Signal Wiring Into Separate Brake and Turn Signal Wiring Curt Model C56196 Right Brake/Turn Left Brake/Turn Ground Vehicle 4-Flat Wiring Right Turn (amber) Left Turn (amber) Brake (red) To Trailer Lights Source: Ground Trailer Wiring Green White Yellow 2018 John H.
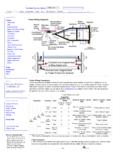
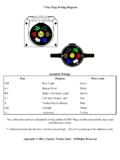
4 DeRosa 7 Trailer Wiring US 7-Way One step up from the 4-Flat system is the 7-Way round (flat pin) connector found on many US vehicles with factory installed Trailer wiring. The two main changes are the addition of a connection for a backup (reverse) light and for an electric brake system. Converters are readily available to change this connector arrangement to a 4-Flat system. Source: 2018 John H. DeRosa European Trailer Wiring Information Connectors Functions Pinouts Tables 2018 John H. DeRosa 9 Trailer Wiring European 7-Way N-Type The 7-Way (round pin) Trailer connector (ISO 1724) is found on most European made trailers, in particular the Cobra Trailer line.
5 Each pin has a number associated with it - see the labels at right and the chart on the next slide. It is primarily distinguished from the US 4-Flat connector by the separation of wiring for stop and turn lamps. There is no designated backup or electric brake wiring. When an European Trailer is delivered to the US, the Euro connector is often replaced with a common US 4-Flat connector using the conversion detailed in the following slides. The Blue Aux terminal (2/54G) is not used on Cobra trailers 1/L Yellow Turn Left 2/54G Blue Aux 3/31 White Ground 4/R Green Turn Right 5/58R Brown Clearance 6/54 Red Brake 7/58L Black Clearance 3/31 White Ground 7/58L Black Clearance 1/L Yellow Turn Left 2/54G Blue Aux 4/R Green Turn Right 5/58R Brown Clearance 6/54 Red Brake Euro Connector Source: 2018 John H.
6 DeRosa 10 Trailer Wiring European 7-Way N-Type Pin No. Pin Label Wire Color Function 1 1/L Yellow Left Hand Turn Light 2 2/54G Blue Auxiliary 3 3/31 White Running, Clearance, Tail, License 4 4/R Green Right Hand Turn Light 5 5/58R Brown Right Hand Running Light 6 6/54 Red Brake Lights (Left/Right) 7 7/58L Black Left Hand Running Light Source: Not typically used 2018 John H. DeRosa Cobra Trailer Wiring Information Wiring Diagrams Conversion to US 4-Flat Separation of turn signal and brake signals US to Euro adapter Bulb replacement with LED 2018 John H.
7 DeRosa 12 Trailer Wiring European 7-Way N-Type Cobra Trailer (Typical) MARKERS (4) Wiring is along aft-top Trailer body Wiring is internal to Trailer body/frame Connectors are at aft-top Trailer body Yellow Turn Left Blue Aux White Ground Green Turn Right Brown Clearance Red Brake Black Clearance 1/L 6/54 5/58R 4/R 3/31 2/54G 7/58L Connector to Vehicle Not typically used 2018 John H. DeRosa 13 European Cobra Trailer Wiring Conversion to 4-Flat Step 1 *Note: Insulate and tie back the Cobra red & blue wires; they won't be used. Ground Right Turn + Brake Left Turn + Brake Tail, Running, License To Cobra Green Wire (Pin 4/R) To Cobra Brown & Black Wires (Pins 58L & 58R) To Cobra White Wire (Pin 3/31) To Vehicle To Cobra Yellow Wire (Pin 1/L) Function of Cobra Trailer Lights Cobra Trailer End Pin - Colors Vehicle End Four Flat Plug Colors (Ground)
8 3/31 - White White Left turn & Brake 1/L - Yellow Yellow Right turn & Brake 4/R - Green Green Running, Clearance, Tail, License 7/58L - Black 5/58R - Brown Brake 6/54 - Red* No Connect Auxillary 54G Blue* No Connect Brown 2018 John H. DeRosa 14 European Cobra Trailer Wiring Conversion to 4-Flat Step 2 (Courtesy of Wings & Wheels) All should be well, except you will notice that the signal and brake lights are amber instead of red. Go turn off the lights, get your Phillips head screwdriver and needle nose pliers, go to the rear of the Trailer .
9 The rear light lenses are held on by two Phillips head screws each. Remove the screws, and remove the lenses. You will notice that the wires are connected to the light bulb sockets with spade connectors. Carefully reach in with your needle nose pliers, and pull the two (2) spade connectors off the two (2) light sockets (one on each socket, top and bottom), and reverse them, That is, the spade connector which came off the top light socket (amber light, yellow and green wires), must now be attached to the lower light socket (red light).
10 The wires from the lower light socket (red) might be too short to attach to the top socket, but no matter, as it won't be used. You can wrap that (unattached) red wire spade connector with electrical tape, or just push it back somewhere, it won't matter, as that one is powered by the red wire, which was not hooked up at the 4-flat plug. Now, do the same thing on the other side. Source: 2018 John H. DeRosa 15 Alternate Instructions from unknown source; the tail light lenses with the screw driver the left hand and right hand flat plug (red wire) of the light bulb in the center of the lights the wires of the light bulbs in top of the lights (left hand yellow, right hand green) and plug this wires on the light bulbs in the center of the lights.