Transcription of TRANSPARENT TRAILER VIEW - GMC
1 TRANSPARENT TRAILER VIEWCUSTOMER SETUP GUIDE Before you buy a vehicle or use it for trailering, carefully review the trailering section of the Owner s Manual. The weight of passengers, cargo and options or accessories may reduce the amount you can tow. GM reserves the right to make changes at any time, without notice, in prices, colors, materials, equipment, features, specifications and availability. Product information is preliminary and reflects approved content at time of publishing. Copyright 2019, General Motors. All rights reserved. All text and images in this Guide are subject to the copyright and other intellectual property rights of GM.
2 These materials may not be reproduced, distributed or modified without the express written permission of GM. The marks appearing in this catalog including, but not limited to: (i) GM and the GM logo, (ii) Chevrolet and its respective logos, emblems, vehicle and part names and vehicle and part designs, and (iii) other marks of third-party suppliers are trademarks and/or servicemarks of GM, its subsidiaries, affiliates, or third-party supplier : October 2019 OVERVIEWT ransparent TRAILER View1 allows you to virtually see through your connected, compatible TRAILER when your truck is properly equipped.
3 Using cameras mounted on the rear of your truck and on the back of your TRAILER , it pieces together a view of the area behind the truck and TRAILER as if your TRAILER is invisible. You can see the image on your infotainment screen while you ll need to complete a setup process before you start using it. This guide will help you complete the process and troubleshoot problems. Here s what you need to set up TRANSPARENT TRAILER View: A properly equipped truck that includes: Technology Package An available Accessory TRAILER Camera A compatible TRAILER that meets the following criteria: Conventional hitch type Box- or camping -style TRAILER No more than 32 feet in length Tools for installing the available Accessory TRAILER Camera (Installation requires: ladder, hand drill and bits, wrenches, wire cutters, pencil.)
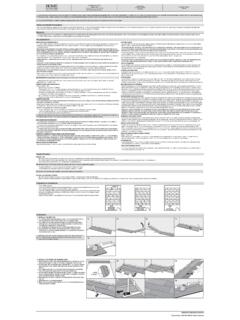
4 Not included) A tape measure or detailed list of your TRAILER s dimensions Before you buy a vehicle or use it for trailering, carefully review the Trailering section of the Owner s Manual. The weight of passengers, cargo and options or accessories may reduce the amount you can Read the vehicle Owner s Manual for important feature limitations and information. Some camera views require available accessory camera and installation. Not compatible with all trailers. See your dealer for in. 8 in. (200 mm) (200 mm) (200 mm) (200 mm) 8 in. 8 in. Level groundRear of TrailerIdeal PositionTarget AreaDiagram BDiagram CDiagram ASTEP 1: INSTALL THE ACCESSORY TRAILER CAMERAYou have to install the available Accessory TRAILER Camera on the back of your TRAILER in order to use TRANSPARENT TRAILER View.
5 Follow the steps in the camera installation instructions provided at purchase, which are summarized here for quick reference. The Accessory TRAILER Camera must be mounted in a specific zone on the back of your TRAILER to enable TRANSPARENT TRAILER View. The ideal position to mount the camera lens is: Horizontally centered on the back of your TRAILER 4 inches (100 mm) higher than the rear truck tailgate camera Measure the height from the ground to the rear truck tailgate camera (your TRAILER should be hitched), then add 4 inches (100 mm) to find the ideal vertical position on the back of your trailerImportant: Your target for mounting the camera should be no more than 8 inches (200 mm) away from this ideal position (see diagram A).
6 Angled 35 degrees downward from the horizontal (see diagram B) Markings on the mounting unit can help you find this position Mount the camera; then route and secure the wiring harness on the outside of the TRAILER Note: For routing guidelines, read the camera installation instructions provided at purchase. Connect the camera to the connector at the TRAILER hitch. It should be connected to the rear TRAILER camera port (see diagram C)Tips for camera installation: Make sure the truck and TRAILER are on a flat surface when measuring and mounting the camera If you re using more than one accessory camera, make sure the wiring harness for the camera on the back of the TRAILER is connected to the rear TRAILER camera port (make sure they re not swapped at the hitch connector)STEP 2.
7 ENTER THE TRAILER S DIMENSIONS INTO YOUR TRAILER PROFILESet up or select your TRAILER Profile in the in-vehicle Trailering App2 using the TRAILERING icon on the Home screen of the infotainment system. To set up TRANSPARENT TRAILER View, enter your TRAILER s detailed dimensions in your TRAILER : If you select an incompatible TRAILER type ( , a fifth-wheel hitch or flat TRAILER ), you can t continue setup. From your TRAILER profile screen, select Towing Assistance Setup TRANSPARENT TRAILER Yes, Get Started Follow the prompts on screen to enter the seven required dimensions, using the diagrams to find the right place to measure 1.
8 Center of coupler to furthest rear point2. Center of coupler to middle of tires3. Left edge to right edge of the trailer4. Ground to tallest point of TRAILER 5. Ground to top of coupler6. Center of coupler to TRAILER front wall7. Hitch receiver to center of ball Once all dimensions are entered, select Save and Continue Begin the calibration steps detailed in the next sectionALTERNATE METHOD: ENTER DIMENSIONS USING THE MYGMC MOBILE APP3 You can also use the myGMC Mobile App to enter your TRAILER s dimensions on your compatible smartphone. This way, you can avoid going back and forth between the TRAILER and the in-vehicle Trailering App with measurements.
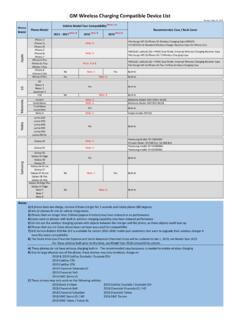
9 If your TRAILER s dimensions are available online, you can look them up and then enter them into the mobile app. Then, you can sync profile information between your truck and myGMC Mobile App functionality and features vary with vehicle equipment and trim level. Data connection may be required. Some features require active service plan and working electrical system. 3 Available on select Apple and Android devices. Service availability, features and functionality vary by vehicle, device and the plan you are enrolled in. User terms apply. Device data connection required. See for details and for accurate measurements: Enter the dimensions in inches Round up or down to the nearest inch If you prefer to use metric units, you can change this preference in the vehicle s Settings menu Measure to the far edges of the TRAILER surface, even if your TRAILER has rounded edges Your TRAILER s width measurement (#3) determines the width of the TRAILER overlay.
10 You can adjust this measurement to make the TRAILER overlay image narrower If you can t complete all measurements at one time, save your entries and return to the screen later to complete themSTEP 3: CALIBRATE THE VIEWThe last step in setting up TRANSPARENT TRAILER View is a calibration process. This helps validate the dimensions you entered to ensure a clear and accurate view behind the TRAILER . The process involves driving forward in a straight path with your TRAILER attached and your TRAILER profile active. Calibration begins automatically, but you can monitor the progress by tapping the CAMERA app icon on your infotainment system Home screen.