Transcription of Tutorial - How to interpret an approach plate
1 Tutorial - How to interpret an approach plate 1. Introducion Every real life pilot, flying either a small prop or a heavy jetliner, have to be constantly using approach Plates. approach Plates are widely used in large airports: they are great way to ensure airplanes are always clear of obstacles and they also reduce the ATC workload, as they know just what the pilot will do next. It is a must that virtual pilots who seek for complete realism be familiarized with them - they not only make landings more easy, but also a lot more realistic. There are many types of plates that pilots use in real life, some are displayed eletronically and can even be merged into the panel - in this Tutorial , only approach Plates (those which directly preceed the landing) will be discussed.
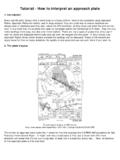
2 Plates of US airports are easily found for free on many websites, the quality is very good and you can print them if you want to. 2. The plate 's layout To download this plate , in PDF format: This is how an approach plate looks like. I chose for this first example the ILS RNW 28R procedure for San Francisco International Airport. It might look very complicated at first, but a closer look with more attention will reveal that it's not such a big deal, at least not in a beautiful sunny day .. Next, all sections of this approach plate will be discribed: - The header This is the header, where all important information about the approach is published. Reading from left to right/top to down, you have: First column 1. City and state in which the airport is located 2.
3 The navigation aid (ILS in this case) identifier, frequency and course. This will be used to set up the ILS. for the approach . 3. Aiport and Touchdown Zone elevation 4. The procedure type, runway and airport name Second column 1. Additional notes 2. Type of runway lighthing for runways 28R and 28L. 3. Missed approach prodedure explanation Third column The third column provides all the communication frequencies that will be used and its respective frequencies. - approach , plan view This is perhaps the most complicated part of the plate , concentrate and don't give up if you can't understand it at first. This section provides the plan view of the approach , along with navigation aids, heading, altitudes, radials, etc - everything you need to complete a safe landing is there.
4 This is how you should interpret an ILS approach plate : First of all, you should recognize the Initial approach Fixes (IAFs) - they must be the initial waypoint of your approach . In this example, you have three IAFs available: FAITH, DUMBA and MENLO - you may also notice that if you follow radial 036 from WOODSIDE VOR for nautical miles, or radial 138 from OAKLAND VOR for nautical miles, you'll end up in DUMBA. The numbers inside the semi-cricle shows the distance to the localizer and those inside the parentheses represent the distance between two waypoints. It is very important to notice that there are minimum altitudes for each waypoint (4100ft for FAITH/DUMBA, 3200ft for CEPIN, etc.) that must be strictly maintained. The MSA circle, printed on the top right side of the plate , shows minumum safe altitudes for aircraft within 25 nautical miles of a given navigation aid (in this case, SFO VOR).
5 It is only used in VFR flights or emergencies and to provide obstacle clearance of at least 1000ft. From now on, I'll assume you have set your ILS (freq. / course 283). Let's say you have started your approach in FAITH, at 4100ft. Now, it's only a matter of following the thick lines and being at the correct altitude and speed. Let's say you have started the approach from FAITH - maintain the altitude at 4100ft for nautical miles, where DUMBA is located. There is a holding point above that waypoint - you should enter it if you are asked by ATC, if you are too high, too fast or both; if none apply, just ignore it and continue the approach . As soon as you cross DUMBA, start a descent to 3200ft and continue to CEPIN. Don't enter a dive if you can't get to the next altitude in time, the values provided in the plate are just minumum altitudes - there's no problem (as long as you can safely capture the glideslope later) to be above those altitudes by a little.
6 At CEPIN, start a descent to 1800ft and continue for another nautical miles. Now, you only have miles before the runway treshold, so it's recommended that you be on the glideslope and localizer. Finally, accomplish normal landing. The missed approach The missed approach procedure is represented by the dashed line. When you decide to go around, you should follow the missed approach instructions of the plate 's header and also see its visual representation on the plan view of the approach . In this example, you should climb to 6000ft on present heading, then turn left to heading 279 and start a climb to 3000ft and finally intercept radial 180 from SAN FRANCISCO. VOR and hold at OLYMM. Simple, isn't it? Now, let's look at this same plate merged with satellite images: Familiar with Google Earth?
7 Download the image overlay file by clicking here: - approach , vertical profile The vertical profile of the approach is a simple summary of the approach and missed approach procedures. It usually takes less time to check the altitudes in the vertical profile than in the plan view. On the top left part of this section, there is the missed approach summary: 1. The up arrow indicates a straight ahead climb to 600ft; 2. The left arrow indicates a 279 degree turn with a climb to 3000ft; 3. The VOR. information indicates a 280 radial interception; 4. The white triangle indicates the final missed approach fix, OLYMM. Right below the missed approach summary, there is a sumamry of all waypoints and altitudes in the approach : 1. The approach initiates at an altitude of 4100ft, a 1 minute holding pattern is available at DUMBA; 2.
8 A descent to 3200ft (or above) should be initiated after DUMBA; 3. A descent to 1800ft (or above) should be initiated after CEPIN; 4. The glideslope must be captured and followed after AXMUL, and normal landing accomplished. On the bottom of this section, the minimums for this approach are displayed accordingly to the approach condition and the aircraft type. Let's start by discussing three new terms: minimum descend altitude (MDA), missed approach point (MAP, MAPT) and decision height (DH): 1. The minimum descent altitude is the lowest altitude an aircraft can descend without having the runway in sight. It is only used for non-precision (VOR, NDB, ..) and circling approaches, and should be maintained until either having the runway in sight or executing the missed approach (at MAP).
9 2. The missed approach point is equivalent to the decision height, and is the time to decide whether to land of to execute the missed approach - it is also used only for non-precision and circling approaches. MAP is determined by either a DME distance or timing from a determined fix. decision height is the lowest altitude an aircraft performing a precision approach (such as ILS) can go without having the runway in sight, it is also the time to decide whether or not to land. The decision height will be exactly at the same place as MAP if the glideslope is correctly followed. Now, use the chart below to determine your aircraft category: Aircraft Category A B C D E. Speed on final 0 90 91 120 121 140 141 165 165+. In this example, there are three approach conditions: full ILS (both LOC and GS), LOC only, sidestep runway 28L and circling - all of them have different minimas.
10 To detemine MDA/DH use the table provided on the plate . For example, a category C aircraft performing a full ILS approach will have a DH of 213ft and a minimum RVR (runway visual range) of 1800ft while a category D aircraft performing a circling approach will have a MDA of 1160ft with a minimum visibility of 3 statute miles. Please ignore the small numbers, they are radio altimeter settings and are normally used only on CATII/CATIII ILS approaches. A sidestep approach consists of landing on a parallel runway when the runway being approached is in sight. In this example, you would descent to 460ft and wait until you have the runway in sight, then turn left and land on the parallel ruwnay. - Airport plan view The airport plan view provides airport information such as runway lighting, touchdown zone altitude, airport altitude, and the most important: MAP location and timing, based on the final approach fix.