Transcription of Ultra Pure Water System Model 3000 Installation Guide ...
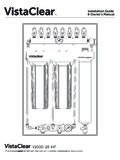
1 Installation Guide & owner s ManualSpecialized Water fi ltration for autoclaves, dental bottles, ultrasonic cleaners & instrument washersModel Box 321, Ashland, Ohio 44805-0321 FromCity WaterToDrainTo/FromStorageTankInjectionP ortToWandToFaucetPolishing Installation DateReplace this filter annually or as neededbased on local Water ElementR3254 Replace whenever System -mountedTDS meter IN displays number > 10%of source Water Installation DateDeionization FilterR3253 Replace this filter and R3252 when System -mounted TDS meter OUT displays number 4 Installation DateDeionization FilterR3252 Replace this filter and R3253 when System -mounted TDS meter OUT displays number 4 Installation DatePrefilterR3251 Replace this filter annually or as neededbased on local Water Installation Date2 Installation Guide & owner s ManualTMTable of ContentsIntroduction 3 Important Information
2 3 Preparation 4 System Overview 5 Installation 6 System Maintenance Monitoring TDS 10 Filter Life & Replacement Thresholds 11 Changing Filter Elements 11 Checking Tank Air Pressure 12 Sanitizing the Tank and Faucet 13 Filter Performance Record 14 VistaPure Limited Warranty 15 VistaPure System Information
3 16 Pelton & CranePelton net11727 Fruehauf Drive Charlotte, NC 28273 United States of AmericaCUSTOMER SERVICE (800) 659-6560 TECHNICAL SUPPORT (800) 659-5922 DistributionSciCan com701 Technology Drive Canonsburg, Pennsylvania 15317 United States of AmericaPHONE (724) 820-1600 FAX (724) 820-1479 TOLL FREE (800) 572-1211 SciCan com1440 Don Mills Road Toronto, Ontario M3B 3P9 CanadaPHONE (416) 445-1600 FAX (416) 445-2727 TOLL FREE (800) 870-7777 VistaPure systems are sold through dental and medical dealers throughout North America by:VistaPure is a trademark of Vista Research Group, LLC (419) 281-3927 1244 County Road 1475, Ashland, Ohio 448053 2000-2017 Vista Research Group, LLC. All rights is designed to produce two grades of high-purity Water : distilled-quality Water for use in autoclaves, and non-corrosive, low-TDS Water for filling dental bottles, ultrasonic cleaners and for final rinse cycles in instrument washers Water used in autoclaves must be virtually free of dissolved solids in order to protect the heating chamber and to prevent buildup of contaminants that can create hard deposits and necessitate more frequent cleanings Water used in self-contained dental bottle systems should be of a high quality, but not distilled-grade Water , which is corrosive to metals used in the construction of dental units The VistaPure System is designed to be built in to sterilization center cabinetry, and can also be installed in an equipment room The System provides up to 4 25 gallons of treated Water in its pressurized storage tank (based on city Water pressure)
4 , and automatically replenishes this supply as Water is drawn from storage The System does not require electricity it needs only a potable supply of cold Water and a drain To maximize the life of the System filtration elements, we recommend that the Water supplied to the System be free of sediment, and softened if the source Water is very hard IntroductionPlease read this entire manual before proceeding with Installation and operation, and always follow local plumbing VistaPure System can be installed nearly anywhere in the typical dental, medical, lab or hospital setting, typically near a faucet and sink in a sterilization center The System and tank are designed to fit in a base cabinet, but can be installed anywhere there is a quality cold Water supply and drain connection The System board is designed for horizontal Installation Please keep the System board and Water storage tank at the same level The System should be installed no farther than 10-12 from where the wand and faucet will be used Please locate the System label on the corner of the mounting board and record the Installation date using a fine-tipped permanent marker or some other writing instrument that will not smear IMPORTANT INFORMATION For System InstallersWe recommend that a professional technician or plumber familiar with dental/medical offices perform the Installation since interface with a cold Water line and drain is involved He/she should be familiar with local plumbing codes and techniques for successful dental/medical equipment installations Please keep the Installation Guide & owner s manual handy for future reference and
5 Ensure that anyone responsible for operation and maintenance of the System is familiar with all details contained in this manual Please return the registration form or register online at vrg support/register immediately upon Installation IMPORTANT INFORMATION For System OwnersWe recommend turning off the System at the end of each work day by closing the valves on the System board, Water storage tank, and autoclave wand 4 Installation Guide & owner s ManualTMPreparationEvery VistaPure comes in two (2) cartons Box 1 of 2 contains the System Box 2 of 2 contains all other items, including the Installation Guide & owner s manual , warranty registration card, Water storage tank, dispensing wand, faucet, drain fitting, TDS meters, colored tubing and all other accessories Make sure all items needed for Installation are present and undamaged If damage is evident, contact the shipping company or your distributor immediately Box 1 VistaPure SystemBox 2x2x3x2S6112 1/4 Swivel ElbowsS6114 3/8 Swivel ElbowsS6119 3/8 x 3/8 x 1/4 Tee UnionS6133 3/8 Tube x FaucetS6135 3/8 Angle Stop Adapter x 3/8 Compression x 1/4 TubeS6161 3/8 x 1/4 Tank ValveS6310 3/8 x 1/4 UnionS6588 Cable TiesS6589 Mounting Cable TieS9035 SyringeS9111 Water Storage TankS9117 Economy TDS MeterS9146 Drain Tee Line Adapter (with Stem Reducer)S9155 VistaPure Chrome FaucetS9300 VistaPure Wand (with clip, wrench, screws)TubingBlack (1/4 )Blue (1/4 )
6 Red (1/4 )Natural (3/8 )White (3/8 )Blue Coil (3/8 )12 12 12 12 12 10 5 2000-2017 Vista Research Group, LLC. All rights Box 321, Ashland, Ohio 44805-0321 FromCity WaterToDrainTo/FromStorageTankInjectionP ortToWandToFaucet106101 FromCity WaterToDrainTo/FromStorageTankInjectionP ortToWandToFaucetFromCity WaterToDrainTo/FromStorageTankInjectionP ortToWandToFaucetHFDDGBCEATo DrainTo TankTo WandTo FaucetFrom H20 SupplyR3253 Deionization FilterR3252 Deionization FilterR3251 PrefilterR3254 Hyperfiltration ElementR3255 Polishing FilterKJMNIS ystem ManifoldA1 From City Water to Prefi lterA2 To Drain from PumpA3 To and from Storage TankA4 Injection Port to Tank LineA5 To Autoclave WandA6 To Bottle FaucetAAutomatic Shut-Off ValveSystem Water Shut-Off ValveCheck ValvesInjection Port AssemblyFlow RestrictorPermeate PumpDual TDS MeterBCDEFGHD rain Fitting (see page 7)Storage Tank Shut-Off ValveWater Storage TankTank Air ValveVistaPure WandVistaPure Chrome FaucetIJKLMLN6 Installation Guide & owner s ManualTMInstallationIf the System is not already mounted in another product (sterilization center, etc ), mount as desired near a cold Water source and drain Provide for a 1/4 connection to the cold Water supply This is usually accomplished using a compression fi tting or one of the supplied fi ttings on the cold Water line Check local codes 122A2BS61193/8 x 3/8 x 1/4 Tee UnionFor 3/8 O D smoothsupply tubingS61353/8 Angle Stop Adapter x 3/8 Compression x 1/4 TubeFor 3/8 braided supply lineswith prefi tted compression nuts2A2 BNOTE: Use either 2A or 2B method to supply cold Water to the VistaPure Where can it be installed?
7 The VistaPure System and included tank are designed to fi t in a base cabinet, but can be installed anywhere there is a quality cold Water supply and drain System board is designed for horizontal Installation typically on the right side of the inside of a base cabinet and can be fl ipped to be installed horizontally on the opposite side, if necessary. Ideally, the System board and Water storage tank should be installed at the same level, and located no farther than 10-12 from where the wand and faucet will be 2000-2017 Vista Research Group, LLC. All rights a drain connection using 1-1/2 material with trap as shown below A 1-1/2 utility Tee with both 3/8 and 1/4 push-in type fittings are included with each VistaPure Various optional configurations are available 341-1/2 w/ TrapDrain Linefrom VistaPure3 BDrain Linefrom VistaPure1-1/2 w/ Trap3 CDrain Line from VistaPure1-1/2 Pipe3 ADrain Line fromInstrument WasherDrain Linefrom VistaPureTo BranchTailpieceCountertopAirgap aboveFlood Rim3D3 ATypical Installation of drain Tee (S9146) using existing sink drain System Included with unit Alternate Installation of drain Air Gap (S9145) using existing sink drain System Order separately Alternate Installation of drain Air Gap (S9145) using separate riser and trap Order separately Alternate Installation of dual inlet drain Air Gap System (S9147) using branch tailpiece Order separately 3B3C3 DNOTE.
8 Local codes vary greatly, so be sure to verify the preferred method prior to Installation Every VistaPure has a pressurized drain discharge and multiple check valves in the System to prevent backflow from drain connections If additional backflow measures are required, a 1/4 VistaCheck Dual Check Backflow Preventer (VC250-A) can be installed on the red Water supply line VistaCheck is CSA-certified for supply lines in the USA and Canada Mount the faucet on the sink or countertop deck in the sterilization center, lab or kitchenette as desired The faucet & 3/8 push-type faucet connector fitting are included in the accessory kit If it is necessary to drill a hole through the countertop surface, the hole needs to be 5/8 (or 1 5cm) wide 8 Installation Guide & owner s ManualTM If the System is mounted inside a cabinet, under a sink or on a sliding device, be careful that tubes are not crushed or crimped If the System is on a sliding device for easy access, make certain to create a coil with the tubes that will allow the System to move in and out without causing damage or restriction If the VistaPure System is to be installed remote to the autoclave(s)
9 And/or in a cabinet, fish the solid blue tubing behind cabinetry to the autoclave center Join the solid blue tubing and the coiled blue tubing with the white 1/4 x 3/8 push-type union that is already attached to one end of the coiled tubing Make certain to provide a restraint at the straight end of the coiled tubing near the union so that when pulling out on the autoclave wand and coiled tubing the union connection is not stressed Extra lengths of tubing are included with each System A mounting zip tie is provided with System REDFrom Cold Water SupplyNATURALTo and From TankBLUE (STRAIGHT)To Autoclave AreaBLACKTo DrainWHITETo FaucetBLUE (COILED)To Autoclave Filler WandAttach colored tubing to the proper segments on the System manifold and the appliance/device as shown below and on page 5 When attaching tubing to the push-type fittings, make certain all tubing cuts are straight and free from burrs Tubing must be firmly inserted into the fitting (11/16 plunge) to avoid leaks 56 Wand Installation6A6B6 CUSE: To use the wand, remove it from the clip holder, turn the blue valve handle so it s inline with the tubing, then press downward on the mushroom button Water will flow from the spout STORAGE.
10 To store the wand after use, turn the blue handle so it is 90 to the tubing and press the wand into the clip holder Push wand assembly valve onto the end of the 3/8 O D coiled tubing Firmly push and twist the tubing to make certain it engages into the O-ring in the valve Attach the white 3/8 x 1/4 union adapter on the opposite end of the coiled tubing to the 1/4 tubing that runs to the Autoclave Wand port on the VistaPure System manifold Secure the union adapter to a solid surface using the included mounting zip tie Attach the small wand holder clip to the desired location using the two screws provided The clip may be oriented in any direction and mounted in any location 9 2000-2017 Vista Research Group, LLC. All rights the Water storage tank as near to the VistaPure System board as possible, at the same lev