Transcription of Useful Links I Liens utiles I Nützliche Links CAN ...
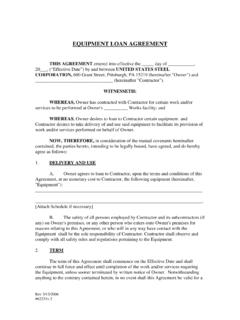
1 Services and Support PORT 2 PORT 1. T1 PORT 2. TO. PORT 1. GND. USB-8502. NI-XNET. CAN Interface xnet T1 NI-XNET Driver READY. T0 (2-Port Only). GND. xnetgs Connector Plug USB-8502. Getting Started with NI-XNET. COM NC. CAN_H CAN_L. COM. NC NC Local Interconnect Network (CAN) Overview NC NC. 8502 Documentation NI-XNET DVD. USB-8502 Documentation I I I I I I . Pinout I Brochage I Pinbelegung Useful Links I Liens utiles I N tzliche Links Contents I Contenu I Inhalt CAN Interface Device Caution Before installing your device, read all product documentation to ensure compliance with safety, EMC, and environmental regulations. USB-8502. Attention Avant d'installer votre p riph rique, lisez toute la documentation se rapportant au produit pour vous assurer du respect Quick Start des r gles concernant la s curit , la CEM et l'environnement.
2 D marrage rapide Achtung Lesen Sie vor der Inbetriebnahme des Ger ts die Erste Schritte Produktdokumentation, um die Einhaltung der Sicherheitsvorschriften, EMV-Vorschriften und Umweltrichtlinien sicherzustellen.. EMC . EMC . EMC . Refer to the NI Trademarks and Logo Guidelines at for more information on National Instruments trademarks. Other product and company names mentioned herein are trademarks or trade names of their respective companies. For patents covering National Instruments products/technology, refer to the appropriate , location: Help Patents in your software, the file on your media, or the National Instruments Patents Notice at You can find information about end-user license agreements (EULAs) and EMC,, . third-party legal notices in the readme file for your NI product.
3 Refer to the Export Compliance Information at legal/export-compliance for the National Instruments global trade compliance policy and how to obtain relevant HTS codes, ECCNs, and other import/export data. NI MAKES NO EXPRESS OR IMPLIED WARRANTIES AS TO THE. ACCURACY OF THE INFORMATION CONTAINED HEREIN AND SHALL NOT BE LIABLE FOR ANY ERRORS. Government Customers: The data contained in this manual was developed at private expense and is subject to the applicable EMC limited rights and restricted data rights as set forth in FAR , DFAR , and DFAR 2016 National Instruments All rights reserved. 376701A-01 Dec16. Services and Support PORT 2 PORT 1. T1 PORT 2. TO. PORT 1. GND. USB-8502. NI-XNET. CAN Interface xnet READY. T1 NI-XNET Driver T0 (2-Port Only).
4 GND. xnetgs Connector Plug USB-8502. Getting Started with NI-XNET. COM NC. CAN_H CAN_L. COM. NC NC Local Interconnect Network (CAN) Overview NC NC. 8502 Documentation NI-XNET DVD. USB-8502 Documentation I I I I I I . Pinout I Brochage I Pinbelegung Useful Links I Liens utiles I N tzliche Links Contents I Contenu I Inhalt CAN Interface Device Caution Before installing your device, read all product documentation to ensure compliance with safety, EMC, and USB-8502. environmental regulations. Attention Avant d'installer votre p riph rique, lisez toute la documentation se rapportant au produit pour vous assurer du respect Quick Start des r gles concernant la s curit , la CEM et l'environnement. D marrage rapide Achtung Lesen Sie vor der Inbetriebnahme des Ger ts die Erste Schritte Produktdokumentation, um die Einhaltung der Sicherheitsvorschriften, EMV-Vorschriften und Umweltrichtlinien sicherzustellen.
5 EMC . EMC . EMC . Refer to the NI Trademarks and Logo Guidelines at for more information on National Instruments trademarks. Other product and company names mentioned herein are trademarks or trade names of their respective companies. For patents covering National Instruments products/technology, refer to the appropriate , location: Help Patents in your software, the file on your media, or the National Instruments Patents Notice at You can find information about end-user license agreements (EULAs) and EMC,, . third-party legal notices in the readme file for your NI product. Refer to the Export Compliance Information at legal/export-compliance for the National Instruments global trade compliance policy and how to obtain relevant HTS codes, ECCNs, and other import/export data.
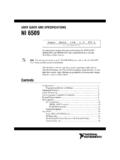
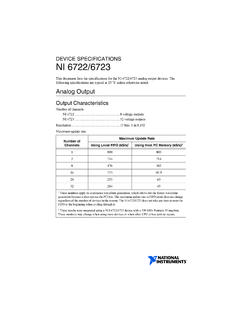
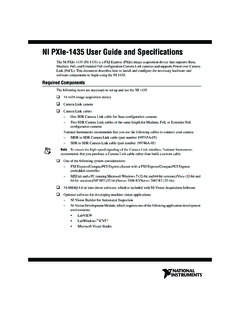
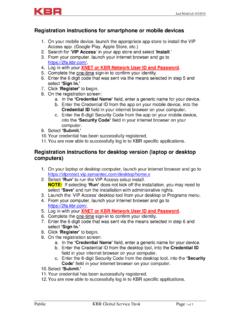
6 NI MAKES NO EXPRESS OR IMPLIED WARRANTIES AS TO THE. ACCURACY OF THE INFORMATION CONTAINED HEREIN AND SHALL NOT BE LIABLE FOR ANY ERRORS. Government Customers: The data contained in this manual was developed at private expense and is subject to the applicable EMC limited rights and restricted data rights as set forth in FAR , DFAR , and DFAR 2016 National Instruments All rights reserved. 376701A-01 Dec16. 1 2 3. R. EA. D. Y. PO. RT. C. PO. 1. A NI -85. RT. N -X 0. 2. In NE 2. NI LabVIEW. te T. U. SB. rf ac e PO. RT. R. 1. EA. D. Y. G. N. D. TO. T1. PO. RT. 2. PO. RT. C. PO. 1. A NI -85. RT. N -X 0. 2. In NE 2. te T. U. SB. rf ac e PO. RT. 1. G O. N. NI-XNET. D. T. T1. PO. RT. 2. Install application development software (if applicable).
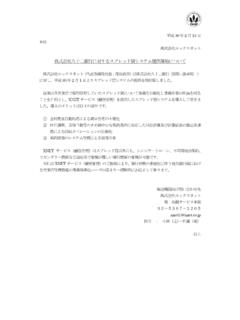
7 Then install NI-XNET driver software. Connect the device to a USB port or higher on your computer. Connect from the DB9 connectors to the CAN bus through shielded cables as described in the NI-XNET Hardware and Software Help. Installez le logiciel de d veloppement d'application (le cas ch ant) puis installez le driver Connectez le p riph rique un port USB ou version ult rieure de votre ordinateur. Connectez les connecteurs DB9 au bus CAN via les c bles blind s comme le d crit l'aide NI-XNET. NI-XNET Hardware and Software Help. Installieren Sie zuerst die Entwicklungsumgebung (sofern zutreffend). Installieren Sie dann Verbinden Sie das Ger t mit einem USB-Anschluss des Computers, der USB oder Stellen Sie entsprechend den Angaben in der NI-XNET Hardware and Software Help ber den NI-XNET-Treiber.
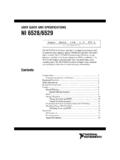
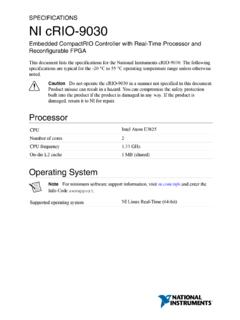
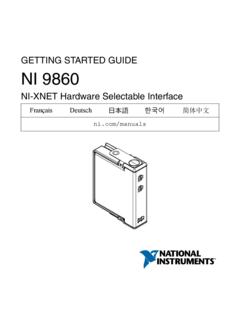
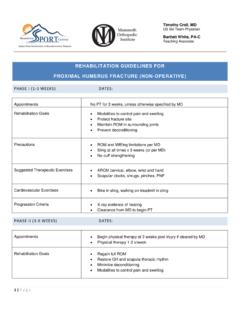
8 H her unterst tzt. abgeschirmte Kabel eine Verbindung zwischen dem DB-9-Stecker und dem CAN-Bus her. NI-XNET USB NI-XNET Hardware and Software Help DB9 CAN .. NI-XNET USB . NI-XNET Hardware and Software Help DB9 .. CAN . NI-XNET USB USB NI-XNET Hardware and Software Help DB9 . CAN . RE. AD. 4 5. Y. MAX. PO. RT. PO 1. RT. C. A NI -85. 2. N -X 0. In NE 2. te T. U. SB. rf ac e PO. RT. 1. GN. D. TO. PO T1. RT. 2. Optional: Attach the synchronization connector plug to the device. In Measurement & Automation Explorer (MAX), right-click the CAN interface under the device and select Bus Monitor. After selecting network parameters, click the start button to verify functionality. Optionnel : Fixez le connecteur de synchronisation au p riph rique.
9 Dans Measurement & Automation Explorer (MAX), cliquez avec le bouton droit sur l'interface CAN sous le p riph rique et s lectionnez Bus Monitor. Une fois les param tres r seau s lection- n s, cliquez sur le bouton D marrer pour v rifier la fonctionnalit . Optional: Befestigen Sie den Stecker f r die Synchronisationsadern. Klicken Sie im Measurement & Automation Explorer (MAX) mit der rechten Maustaste auf die CAN-Schnittstelle unter dem Ger t und w hlen Sie Bus-Monitor . Klicken Sie nach Auswahl der Netzwerkparameter auf die Startschaltfl che, um zu pr fen, ob die Schnittstelle richtig funktioniert. : Measurement & Automation Explorer (MAX) CAN .. : . Measurement & Automation Explorer (MAX) CAN , . , .. MAX CAN (Bus Monitor) . 1 2 3.
10 R. EA. D. Y. PO. RT. C. PO. 1. A NI -85. RT. N -X 0. 2. In NE 2. NI LabVIEW. te T. U. SB. rf ac e PO. RT. R. 1. EA. D. Y. G. N. D. TO. T1. PO. RT. 2. PO. RT. C. PO. 1. A NI -85. RT. N -X 0. 2. In NE 2. te T. U. SB. rf ac e PO. RT. 1. G O. N. NI-XNET. D. T. T1. PO. RT. 2. Install application development software (if applicable). Then install NI-XNET driver software. Connect the device to a USB port or higher on your computer. Connect from the DB9 connectors to the CAN bus through shielded cables as described in the NI-XNET Hardware and Software Help. Installez le logiciel de d veloppement d'application (le cas ch ant) puis installez le driver Connectez le p riph rique un port USB ou version ult rieure de votre ordinateur. Connectez les connecteurs DB9 au bus CAN via les c bles blind s comme le d crit l'aide NI-XNET.