Transcription of USER GUIDE - Channel Master
1 USER GUIDECM-4220HD CM-4220 MHDCM-4221HD CM-4228 HDU H F P e r f o r m a n c eantenna seriesGU A PARA EL USUARIOMODE D EMPLOIThis page intentionally left of Contents Product Overview ..3 Package Contents and Accessories ..3 Danger Information ..4 Installation InstructionsCM-4220HD ..6CM-4228HD ..8 Mounting Instructions (CM-4220 MHD) ..10 Operating Instructions ..11 Technical Data ..11 Product Return Policy and Warranty ..12 IndexPr sentation du Produit ..26 Contenu et Accessoires de L' de S curit ..27 Instructions D'installation CM-4220HD ..29CM-4228HD ..31 Instructions de Montage (CM-4220 MHD).
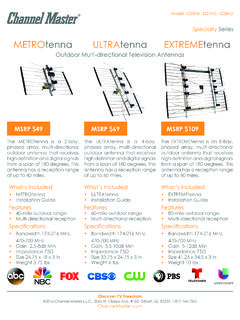
2 32 Mode D'emploi ..34 Donn es Techniques ..34 Politique de Reprise de Marchandise et Garantie ..35 ndicePerspectiva General del Producto ..14 Contenido del Paquete y Accesorios ..14 Informaci n Sobre Peligros ..15 Instrucciones de Instalaci nCM-4220HD ..17CM-4228HD ..19 Instrucciones de Montaje (CM-4220 MHD) ..20 Instrucciones de Operaci n ..22 Datos T cnicos ..22 Garant a y P liza Para la Devoluci n del Producto ..23U H F P e r f o r m a n c e antenna series2 METRO tenna- Suburban/Metro Range 2-Bay AntennaAntena de Bah a Doble con Rango Metro/SuburbanoAntenne 2 baies rayon suburbain/urbain Fringe/Deep Fringe 8-Bay AntennaAntena de 8 bah as perif rica/perif rica profundaAntenne 8 baies p riph rique/p riph rique puissanteMETRO tenna- Suburban/Metro Range 2-Bay AntennaAntena de Bah a Doble con RangoMetro/SuburbanoAntenne 2 baies rayon suburbain/urbainULTRA tenna- Suburban/Metro Range 4-Bay AntennaAntena de 4 Bah as de Rango Metro/SuburbanoAntenne 4 baies rayon suburbain/urbainCM-4220
3 MHDCM-4228 HDCM-4220 HDCM-4221HD3 Product OverviewAll Channel Master UHF Performance Series Outdoor Antennas are engineered to be easy to install, and have been optimized for receiving the highest quality UHF HDTV signals available. The modern design makes it easy to simply unfold the antenna, mount it, connect it, and you re ready to go! Attention to detail has been taken into consideration; every piece is smooth and machined to ensure a safe, trouble-free installation. Every antenna is made of the finest components to exceed consumer expectations. That means peace of mind for years to Features Designed and tested for high quality HDTV digital and UHF reception Easy installation - Unfold, mount, and connect Long lasting, durable design: Heavy duty aluminum elements UV stabilized plastics 75 Ohm PC balun built into antenna Easily mounts to a traditional antenna mast CM4220 MHD includes a high quality mount making an installation convenient and effortless Rooftop, eave, or wall mountable Transparent designPackage Contents and AccessoriesCM-4220HD1.
4 Hardware KitCM-4220 MHD1. Hardware Kit2. "J" MountCM-4221HD 1. Hardware KitCM-4228HD1. Hardware KitU H F P e r f o r m a n c e antenna series4 WArnIng AnD SAFeTy InFOrMATIOnPlease read this user's manual before operating this product. The information contained in this document is subject to change without notice. Features or specifications may be different depending on the type of product model FOR WIRES!READ INSTRUCTIONSYou can be KILLED if this antenna comes near electric power lines!5 Follow These Procedures for the Safest Installation1. Perform as much antenna assembly on the ground as Watch out for overhead power lines.
5 Check the distance to the power lines before you start installing. WE RECOMMEND YOU STAY A MINIMUM OF TWICE THE MAXIMUM LENGTH OF THE ANTENNA ASSEMBLY AWAY FROM ALL POWER Do not use a metal Remember, even the slightest touch of an antenna to a power line can cause a fatal Do NOT try to do the job on a windy Have a friend as a spotter when you re on the roof. They can see things you can If you start to drop an antenna, move away from it and let it If any part of the antenna should come into contact with a power line CALL YOUR LOCAL POWER COMPANY! DO NOT TRY TO REMOVE IT YOURSELF!
6 They will remove it Mast, lead-in, and metal guy wires are excellent conductors of electrical current - - keep them away from power lines Be sure your family and friends understand the danger of touching an overhead power line. Tell them never to try to remove any object in contact with a power line (TV antenna, mast or anything else).11. Make sure that the antenna mast assembly is properly grounded. For more information, visit H F P e r f o r m a n c e antenna series6CM-4220HD, CM-4220 MHD, CM4221HD Installation Instructions:1. Identify the direction of the desired TV stations transmitter by using Fold antenna front section out and tighten 4 wing nuts as shown in Fig 1.
7 Make sure the front section is aligned straight with respect to the reflector grid and the 4 wing nuts are securely 173. Attach mounting hardware (Fig 2 and 3) to middle of antenna grid as shown in Fig 4. Make sure the U-bolt is placed between the 2 bracket clamps before attaching using the 2 screws. 4. Mount antenna to mast as shown in Fig 4. 5. Connect coaxial cable to antenna cable connection port shown in Fig 1. Secure cable to the mast with a cable tie to prevent strain on the cable connector. 6. Point the front of the antenna toward the TV transmitter location and adjust for best reception.
8 NOTe: The front of the antenna is the side with the X shaped Tighten all loose HardwareFig 2U-bolt must be thru bracket before assembling to antennaFig 3 Fig 4U H F P e r f o r m a n c e antenna series8CM-4228HD Installation Instructions:1. Identify the direction of the desired TV stations transmitter by using Fold out the 2 front sections of the antenna making sure to fold out the right and left sections simultaneously to ensure that stress is not put onto the phasing harness. Make sure that the front sections are straight and parallel with respect to the reflector grid and securely tighten the 8 wing nuts (See Fig 1).
9 Cable connection portFront sectionsWing nutsWing nutsFig 1 Phasing harness93. Attach the mounting hardware to the antenna as shown in Fig 2. Included HardwareU-bolt must be secured with bolts thru antenna. Fig 2 Fig 34. Mount antenna to mast as shown. 5. Connect coaxial cable to antenna cable connection port. Secure cable to the mast with a cable tie to prevent strain on the cable connector. 6. Point the front of the antenna toward the TV transmitter location and adjust for best reception. nOTe: The front of the antenna is the side with the X shaped Tighten all loose H F P e r f o r m a n c e antenna series10CM-4220 MHD Mounting Instructions:1.
10 Assemble mast bolts with hex flange nut loose enough to allow movement in curved slot without damaging the painted surface (on each side) (see Fig A). Once proper alignment is determined, tighten flange With the provided lag bolts, secure the DBS mount so that the antenna can be pointed towards the TV transmitters with clearance from obstructions to allow for adjusting. Secure at least 2 lag bolts into a Mount the antenna per the 4220HD and 4221HD instructions on page Tighten all loose hardware. nOTe: Use proper hardware for brick or masonry installations. Use sealant for roof mounts to prevent Flange NutHex Flange Nut1/4 x 1/2 Carriage Bolts(2) Nests(4) SplitLock Washers(4) Hex Nuts(2) U-BoltsFig AHex Flange NutHex Flange Nut1/4 x 1/2 carriage bolts11 Operating Instructions:For best reception, please consider the following conditions:1.