Transcription of USER GUIDE Digital Light Meter - Extech Instruments
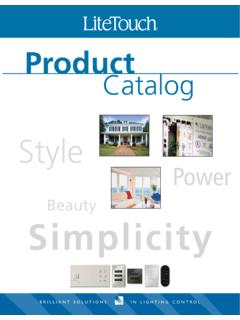
1 user GUIDE Digital Light Meter Model LT300 LT300-EU-EN 2/13 2123456789101112131415 Introduction Congratulations on your purchase of the Extech LT300 Digital Light Meter . The LT300 measures Light level (illuminance) to 400,000 Lux (40,000 Fc). The LT300 offers a backlit display, MAX/MIN, Data Hold, Relative, Peak, and Reset features. This instrument is shipped fully tested and calibrated and, with proper use, will provide years of reliable service. Please visit our website ( ) to check for the latest version of this user GUIDE , Product Updates, and Customer Support. Meter Description 1.
2 Sensor cable 2. Analog bargraph 3. Numerical display 4. RANGE button 5. ON/OFF button 6. MAX/MIN button 7. RESET button 8. LCD Backlight button 9. LUX button 10. Fc foot candle button 11. Protective rubber jacket 12. RELATIVE button 13. Data HOLD button 14. PEAK button 15. Photo sensor dome Notes: Protective sensor cap not shown. Battery compartment, Tilt Stand, and Tripod Mount are located on the rear of the instrument. The protective rubber jacket must be removed from Meter to access battery compartment. LT300-EU-EN 2/13 3 Operation Light sensor 1. The Light sensor is permanently attached to the Meter by the coiled cable.
3 2. Remove the protective cap by unsnapping it to expose the white domed Light sensor. When the sensor s protective cap is removed, the white domed Light sensor lens will begin to capture Light . Replace the cap when the Meter is not in use. Turn Power ON or OFF Press the button to turn power on or off. If the display does not switch on, check that the 9V battery is installed and is fresh. Selecting Lux or Foot candle units of measure Press the LUX button to select lux units or the Fc button to select foot candle units. Measurement Procedure 1. Remove the protective cap from the sensor so that the white domed Light sensor is exposed to the Light .
4 For overhead lighting, the sensor can be placed on a desk or table top. A tripod mount and a tilt stand are located on the rear of the Meter for convenience. 2. The display will indicate the Light level in Fc or Lux. 3. Press the RANGE button to select the range that provides the maximum resolution. If the OL appears the Light measurement is out of range. Select another range using the RANGE button. 4. Press the backlight button to illuminate the LCD display if needed. MAX/MIN The Max/Min function allows for recording and display of the maximum and minimum Light levels over time. 1. Press the MAX/MIN button.
5 The MAX display icon will appear and Meter will now display and hold only the highest reading. The display will update only when a higher reading is measured. 2. Press MAX/MIN button. The MIN display icon will appear and Meter will now display and hold only the lowest reading. The display will update only when a lower reading is measured 3. Press MAX/MIN again. The MAX MIN display icons will appear flashing and Meter will now display the current reading, but will continue to record the highest and lowest values. 4. Press MAX/MIN again to cycle through MAX and MIN displays. 5. To exit the MAX MIN mode, press and hold the MAX/MIN button until the MAX and MIN icons completely disappear.
6 Data Hold Press the HOLD button to freeze the displayed reading. The MANU HOLD hold icon will appear on the display. Press the HOLD button again to return to normal operation. When the Data Hold function is enabled the analog bar graph will continue to display level changes. LT300-EU-EN 2/13 4 Peak Hold The Peak Hold feature allows the Meter to captures Light pulses that rise or fall down to 10 s. 1. Press and hold the PEAK button until CAL appears in the display. 2. Momentarily press the PEAK button. The PMAX icon will appear on the LCD. The Meter will then measure and display any Light pulses.
7 The display will hold the results until a higher pulse appears. 3. Press the PEAK button again to display the PMIN values. 4. To exit the Peak Hold mode, press and hold the PEAK button until the PMAX or PMIN icon disappears. Relative mode Measurements can be displayed as a difference between the measured Light level and a stored reference value. To store a reading as a reference, press the REL button when the desired reference measurement is on the LCD (the REL icon will switch on). All subsequent displayed readings will be relative to the stored reference value. For example, if the reference value is 100 and the actual Light level is 125, the Meter will display 25.
8 To view the reference value, press the REL button again so that the REL icon begins to flash. The displayed value will be the reference value. To exit the Relative mode, press and hold the REL button until the REL icon disappears. RESET Press the RESET button to clear the memory and exit from REL, HOLD, PEAK and MAX/MIN. The RESET will also reset the auto power off timer. Backlight Press the button to turn the backlight on. Press again to turn it off. LT300-EU-EN 2/13 5 Maintenance Cleaning and storage 1. The white plastic sensor dome should be cleaned with a damp cloth when necessary.
9 Use only a mild soap if needed. Do not use solvents, abrasives, or harsh detergents to clean the dome. 2. Store the Meter in an area with moderate temperature and humidity (refer to the operating and storage range in the Specifications section). Battery Replacement When the battery power begins to fail the low battery symbol will appear on the LCD. Replace the 9V battery by first removing protective jacket that encases the Meter . Remove the rear (center) battery compartment screw to access the battery compartment. Ensure that the compartment cover is securely fastened and that the protective jacket is properly installed before using the Meter .
10 Never dispose of used batteries or rechargeable batteries in household waste. As consumers, users are legally required to take used batteries to appropriate collection sites, the retail store where the batteries were purchased, or wherever batteries are sold. Disposal: Do not dispose of this instrument in household waste. The user is obligated to take end of life devices to a designated collection point for the disposal of electrical and electronic equipment. Other Battery Safety Reminders o Never dispose of batteries in a fire. Batteries may explode or leak. o Never mix battery types. Always install new batteries of the same type.