Transcription of User Guide - WRT1900AC Dual Band Gigabit Wi-Fi Filter
1 USER GUIDEWRT 1900AC | Contents PRODUCT OVERVIEW1 WRT1900AC3 Wall-mounting placementSETTING UP: BASICS5 How to create a home network5 What is a network?5 How to set up a home network5 Where to find more help6 How to install your router7 How to configure your router7 How to connect to Linksys Smart Wi-Fi7 How to disable remote access8 How to connect directly to your router8 How to improve your wireless connection speed8 How to change your network s name and password9 How to change your router s local access password9 How to change your router s time zone10 How to test your Internet connection speed10 How to connect devices to your network10 How to connect a computer to your network10 How
2 To connect a USB printer11 How to connect other devices 12 How to view device details13 How to set up parental controls14 How to configure your guest network15 How to back up your router configuration15 How to customize Linksys Smart Wi-Fi15 Using widgets15 Customizing the Network MapUSING AN EXTERNAL DRIVE16 Overview16 How to attach a USB drive16 How to use secured folder access17 How to set up authorized users and shared folders18 How to access shared folders18 How to set up your router as a media server19 How to connect your UPnP device to the media server20 How to remotely access storageSETTING UP.
3 ADVANCED21 How to manually set up your router21 How to manually set up your Internet connection22 How to associate a router with your Linksys Smart Wi-Fi account22 How to get the most out of your dual-band router24 How to control access to your network25 How to improve security using the built-in firewall26 Changing IPV6 firewall settings27 How to set up the DHCP server on your router27 How to set up DHCP reservation28 How to access your network on the Internet29 How to clone a MAC address30 How to connect to your corporate office using a VPN31 How to optimize your router for gaming and voice32 How to enable Voice over IP on your network33 How to configure UPnP34 How to use a router as an access point35 How to put your new router behind an existing router35 How to add your router to an existing router or gateway36 How to share an Internet connection37 How to extend your network37 How to expose a device to the InternetContentsWRT 1900AC | Contents PORT FORWARDING AND PORT TRIGGERING39 How to set up port forwarding39 How to set up port forwarding for a single port39
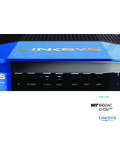
4 How to set up port forwarding for multiple ports40 How to set up port forwarding for a range of ports40 How to set up port range triggering for online gamingMAINTAINING AND MONITORING42 How to back up and restore your router configuration43 How to upgrade the router s firmware43 How to restore factory defaults44 How to check the status of your router44 How to disable the Ethernet port status lights44 How to test your Internet connection45 How to configure and use logsTROUBLESHOOTING46 Your router was not successfully set up46 Windows XP Service Pack update46 Your Internet cable is not plugged in message47 Cannot access your router message48 After setup48 The Internet appears to be unavailable48 Rebooting your router49 Linksys Smart Wi-Fi does not open in your web browser49 You cannot access Linksys Smart Wi-Fi49 All other troubleshooting has been unsuccessfulSPECIFICATIONS50 Linksys WRT1900 ACWRT 1900AC | Product Overview1 FRONT PANEL INDICATORS(White) The icon LED is solid white while the router is powered on.
5 It will blink when the router goes through its self-diagnostic mode during every (White/Amber) The Internet LED is solid white when connected to the Internet. It blinks white while the router works to establish a connection. A solid amber LED indicates the connection is down due to configuration issues. Amber blinking indicates that the connection is down due to hardware GHz(White) The Wireless LED is solid white when one or more clients are connected to the GHz network. If the LED is blinking white, the router is sending or receiving data over the GHz GHz(White) The Wireless LED is solid white when one or more clients are connected to the 5 GHz network.
6 If the LED is blinking white, the router is sending or receiving data over the 5 GHz SATA(White) When off, the USB/eSATA port is off or a USB device is connected. The LED is solid white when an eSATA device is connected. A blinking white LED indicates activity through the eSATA 1(White) When off, the USB /eSATA port is off or an eSATA device is connected. The LED is solid white when a USB device is connected. A blinking white LED indicates activity on the port. USB2 Primary(White) When off, the USB port is off. The LED is solid white when a USB device is connected.
7 A blinking white indicates activity on the portUSB2 Secondary(White) When off, a USB or USB device is connected. A solid white LED indicates a USB device is 1 thru 4 (Primary)(White) These numbered LEDs correspond with the numbered ports on the router s back panel. If the white LED is solid, the router is connected to a device through that port. A flashing white LED indicates network activity over that 1900 ACFront ViewFront PanelETHERNET Secondary IndiatorsUSB 2 Secondary IndiatorUSB 2 Primary IndiatorETHERNET Primary IndiatorsProduct OverviewWRT 1900AC | Product Overview2 ETHERNET 1 thru 4 (Secondary)(White)If the white LED is off, the router is successfully connected to a device through that port at 10/100 Mbps.
8 A solid white LED indicates that the router is successfully connected to a device at 1000 Mbps. (White/Amber) The LED blinks slowly for two minutes during Wi-Fi Protected Setup. It will be solid white for five seconds to indicate a successful connection The LED blinks amber if the he Wi-Fi Protected Setup process fails. Make sure the client device supports Wi-Fi Protected Setup. Wait until the LED is off, and then try again. The router supports one session at a time. Adjustable External Antennas This router ships with four adjustable external antennas that should be connected to the router before powering it on.
9 To connect the antennas, twist the antenna connector clockwise onto the antenna port on the :For best performance, position the side antennas vertically as shown in the ViewCombo USB Port4 x Adjustable External AntennasReset ButtonPower PortInternet PortUSB PortWi-Fi Protected Setup ButtonEthernet PortsWi-Fi Protected Setup button Press to easily configure wireless security on Wi-Fi Protected Setup-enabled network Ports Connect Ethernet cables to these blue Gigabit 10/100/1000) ports, and to wired devices on your :For best performance, use CAT5E or higher rated cables on the Ethernet Port Connect an Ethernet cable to this yellow Gigabit (10/100/1000) port, and to a broadband Internet cable/DSL or fiber :For best performance, use CAT5E or higher rated cables on the Ethernet Port Connect and share a USB or eSATA drive on your network or on the Combo Port Connect and share a USB or eSATA drive on your network or on the Internet.
10 You can also connect a USB printer and share it across your Button Press and hold for 10 seconds (until the power LED starts flashing) to reset the router to factory settings. You can also restore the factory settings using Linksys Smart Wi-Fi on the Internet or mobile Port Connect the included AC power Button Press to turn on the mmWRT 1900AC | Product Overview3 Wall-Mounting PlacementThe router has wall-mount slots on the bottom of each foot for flexibility in mounting the router on the wall. The distance between the slots on the short side is 105 mm.