Transcription of User’s Manual
1 EnUser s ManualDIGITAL CAMERAQ uick Start Guide 6 Point-and-Shoot Modes (i and j) 11 Viewing Photographs 11 Deleting Unwanted Photographs 11 Recording Movies 12 Camera Menus 13 Caring for the Camera 14 Troubleshooting 14 Specifications 15 For Your Safety 27 Notices 29 Bluetooth and Wi-Fi (Wireless LAN) 33 The Camera Body 3 Read this Manual thoroughly before using the camera.
2 To ensure proper use of the camera, be sure to read For Your Safety (0 27). After reading this Manual , keep it in a readily accessible place for future Contents D5600 camera DK-25 rubber eyecup BF-1B body cap EN-EL14a rechargeable Li-ion battery (with terminal cover) AN-DC3 strap user s Manual (this booklet) Warranty MH-24 battery charger (plug adapter supplied in countries or regions where required; shape depends on country of sale)Purchasers of the lens kit option should confi rm that the package also includes a lens. Memory cards are sold separately. Cameras purchased in Japan display menus and messages in English and Japanese only; other languages are not supported.
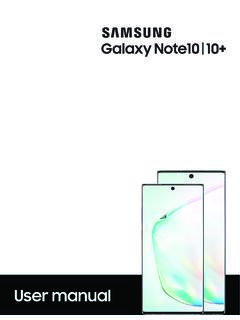
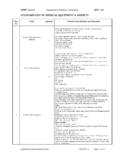
3 We apologize for any inconvenience this may Model Name: N1538 About the Reference ManualFor more information on using your Nikon camera, download a pdf copy of the camera Reference Manual from the website listed user SupportContact a Nikon representative for technical assistance with the operation of your Nikon product or products. For information on the Nikon representatives in your area, visit Manual Viewer 2 Install the Nikon Manual Viewer 2 app on your smartphone or tablet to view Nikon digital camera manuals, anytime, anywhere. Nikon Manual Viewer 2 can be downloaded free of charge from the App Store and Google Camera Body1412131516891110186734521171 AF-assist illuminatorSelf-timer lampRed-eye reduction lamp2 Power switch3 Shutter-release button4 E/N button5 Movie-record button6 Live view switch7 Mode dial8 Built-in fl ash9 M/Y button10 Eyelets for camera strap11 Fn button12 Mounting mark13 Lens release button14 s/E button15 Mirror16 Lens mount17 CPU contacts18 Body cap4293031 28 27 2620 211922 23 242519 Stereo microphone20 Accessory shoe (for optional fl ash units)21 Eye sensor22 R (information)
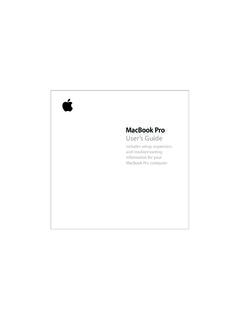
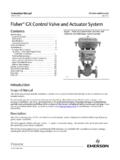
4 Button23 Command dial24 A/L button25 Connector cover26 G button27 Speaker28 Focal plane mark (E)29 USB connector30 Connector for external microphone31 Accessory terminal5324733 34353637394038414244 4351504948464532 Viewfi nder eyepiece33 Diopter adjustment control34 K button35 P button36 Multi selector37 J (OK) button38 N-Mark (NFC antenna)39 O button40 Memory card access lamp41 Battery-chamber cover latch42 Battery-chamber cover43 W/Q button44 X button45 Tripod socket46 Touch-sensitive vari-angle monitor47 Rubber eyecup48 HDMI connector cover49 Memory card slot cover50 Power connector cover for optional power connector51 Battery latch AThe Multi SelectorIn this Manual , operations using the multi selector are represented by 1, 3, 4, and 2 : Press the multi selector up4: Press the multi selector left2: Press the multi selector right3.
5 Press the multi selector downJ button (select)6 Quick Start GuideAttach the Camera StrapCharge the BatteryIf a plug adapter is supplied, raise the wall plug and connect the plug adapter as shown below at left, making sure the plug is fully inserted. Insert the battery and plug the charger chargingCharging completeInsert the Battery and a Memory Card7 Open the MonitorOpen the monitor as shown. Do not use a LensMounting mark (camera)Mounting mark (lens)Rotate the lens as shown until it clicks into ALenses with Retractable Lens Barrel ButtonsBefore using the camera, unlock and extend the lens.
6 Keeping the retractable lens barrel button pressed (q), rotate the zoom ring as shown (w).Retractable lens barrel buttonPictures can not be taken when the lens is retracted; if an error message is displayed as a result of the camera having been turned on with the lens retracted, rotate the zoom ring until the message is no longer displayed. ARemoving LensesTo remove the lens, turn the camera off and press and hold the lens-release button on the front of the camera while rotating the lens in the direction opposite that shown Setup Setup from a Smartphone or Tablet1 Download and install the SnapBridge app is available free from the Nikon website ( ), the Apple App Store , and Google Play.
7 2 Turn the camera language-selection dialog will be displayed; press 1 and 3 to highlight a language and press J to Press J when the dialog at right is Pair the camera and the smart device. Android devices with NFC support: After checking that NFC is enabled on the smart device, touch the camera H (N-Mark) to the NFC antenna on the smart device to launch the SnapBridge app. iOS devices and Android devices without NFC support: Press the camera J button. The camera will wait for a connection; launch the SnapBridge app on the smart device and follow the on-screen instructions to tap the name of the camera you want to pair Check the authentication J on the camera and tap PAIR on the smart device (the button may vary with the smart device).
8 106 Press J when the dialog at right is the camera displays Unable to connect., the display will change after a short pause. Return to Step Follow the on-screen the instructions displayed by the camera and smart device to complete the setup process. Setup from the Camera Menus1 Turn the camera language-selection dialog will be displayed; press 1 and 3 to highlight a language and press J to Press G and set the camera setting time zone, date format, and daylight saving time options, use the multi selector and J button to set the camera the Viewfi nderAfter removing the lens cap, rotate the diopter adjustment control until the AF area brackets are in sharp focus.
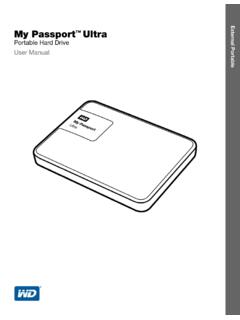
9 When operating the control with your eye to the viewfi nder, be careful not to put your fi ngers or fi ngernails in your nder not in focusViewfi nder in focus11 Point-and-Shoot Modes (i and j)1 Rotate the mode dial to i or Frame the Press the shutter-release button halfway to Smoothly press the shutter-release button the rest of the way down to take the PhotographsPressing K displays a picture in the buttonDeleting Unwanted PhotographsNote that photographs can not be recovered once deleted. Press the O button. A confi rmation dialog will be displayed; press the O button again to delete the image and return to button To exit without deleting the picture, press Movies1 Rotate the live view view through the lens will be displayed in the view switch2 Press the shutter-release button halfway to Press the movie-record button to start buttonA recording indicator and the time available are displayed in the remainingRecording indicator4 Press the movie-record button again to end Rotate the live view switch to exit live MenusMost shooting, playback, and setup options can be accessed from the camera menus.
10 To view the menus, press the G iconIf the help icon is displayed, you can press the W (Q) button to view help for the currently selected from the following menus:DPlaybackCShootingACustom SettingsBSetupNRetouchmRecent Settings / O My MenuTabsOptions in current optionsSlider shows position in current settings are shown by for the Camera StorageWhen the camera will not be used for an extended period, turn the camera off and remove the battery. Do not store in locations that: are poorly ventilated or subject to humidities of over 60% are next to equipment that produces strong electromagnetic fi elds, such as televisions or radios are exposed to temperatures above 50 C (122 F) or below 10 C (14 F) CleaningCamera BodyUse a blower to remove dust and lint, then wipe gently with a soft, dry cloth.