Transcription of USING TABLE SAW METHODS TO MAKE OBJECTS HAVING …
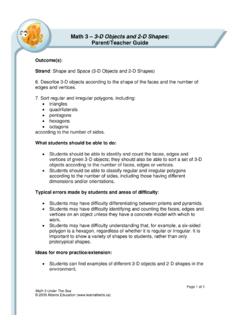
1 USING TABLE SAW METHODS TO MAKE. OBJECTS HAVING POLYGONAL SHAPES. D. SNYDER LAST UPDATE: JUNE 10, 2012. Contents page 1. Introduction .. 1. Polygon Mathematics . 4. Regular Polygons 4. Irregular Polygons .. 5. 2. Miter Terminology 5. 3. TABLE -Saw METHODS for Making Polygonal-Shaped OBJECTS HAVING Sides Without Slope . 6. A Special Method for Cutting Hexagons on a TABLE Saw 6. A Pattern-Following Method for Cutting Regular and Irregular Polygons on a TABLE Saw. 11. 4. Polygonal-Shaped OBJECTS With Sides that Slope .. 13. Example: a small hexagonally shaped bowl 18. Example: a hexagonally shaped lamp .. 20. 5. Polyhedra .. 22. 6. Frink 22. 7. References . 23. 1. Introduction Since we are going to be dealing with OBJECTS that in some way involve polygonal shapes, perhaps it would be best to start by saying what a polygon is because that might be a faded memory from distant grade-school days. A n -sided polygon is a closed object obtained by connecting n straight-line segments, with each line touching the other lines at only two points.
2 In Figure 1: (a) is a five-sided polygon; (b) is a six-sided polygon; (c). Figure 1. Polygon definition 1. is not a polygon because it is not closed; (d) is not a polygon because there are lines touching other lines at more than two points; and, (e) is not a polygon because all its lines are not straight. Here is some terminology used with polygons: edge a line that forms a side of the polygon a point where two edges meet vertex the angle, inside the polygon, between two edges that meet interior angle at a vertex a polygon in which all edges have the same length and all regular polygon interior angles are equal the angle subtended by an edge of a regular polygon at the center central angle of the polygon shorthand for a regular polygon with n edges n -gon Several n -gons and their numbers of edges and names are displayed in Figure 2. Figure 2. Examples of regular polygons Regular polygons have the property that they can be surrounded by a circle that touches all vertices, called the circumscribed circle.
3 It is the smallest circle that lies entirely outside the polygon. The center of a regular pol- ygon is the center of its circumscribed circle. This implies that the central angle of an n -gon is equal to 360 / n ; for example, each edge of a hexagon subtends an angle of 360 / 6 60 degrees at its center. The interior angles of an n -gon are the same and equal 180 n 2 / n degrees; for example, the interior angles of a square are 180 4 2 / 4 90 degrees and of an octagon are 180 8 2 / 8 135 degrees. The inte- rior and central angles are supplementary; they sum to 180 , so one of them easily determines the other. A. second circle can also be drawn for regular polygons, called the inscribed circle. It is the largest circle that lies entirely inside the polygon; it is tangent to all edges and concentric with the circumscribed circle. A regular polygon can have any number of edges greater than three. As the number of edges increase, the shapes of the regular polygons get closer and closer to their circumscribed and inscribed circles, and eventually in the limit they converge to a single circle.
4 2. Some OBJECTS involving polygonal shapes with no sloping sides are displayed in Figure 3. Figure 3. Polygonal shapes HAVING no sloping sides: requires simple miter cuts The top of the lidded box and the bottom of the tray are octagons of solid wood, with the sides of both made from rectangular shapes connected together to form hexagons. The picture/mirror frames are rectangular (not a 4-gon) and hexagonal. The rectangular frame and hexagonal cutting board are not regular polygons but are obtained from regular forms by stretching two parallel sides. Making the OBJECTS in Figure 3 requires a simple bevel cut, as discussed below in Section 2. Some OBJECTS involving polygonal shapes with sloping sides are displayed in Figure 4. Figure 4. Polygonal shapes HAVING sloping sides: requires compound miter cuts The vase has sides that slope outward, from bottom to top, 7 from the vertical and a heptagonal (7-gon).
5 Cross section at each level. The sides of the TABLE lamp slope inward, from bottom to top, 5 from the vertical and a hexagonal (6-gon) cross section at each level. Making these requires a compound bevel cut, as discussed below in Section 2. 3. Polygon Mathematics Here we review some mathematical aspects of polygons that are useful when making polygonal OBJECTS . This might be a major yuk or a ho-hum for some averse to digging up trigonometry memories, but the knowledge is useful if making polygons is a goal. This is a summary to keep the discussion focused on the facts a woodworker HAVING such a goal needs. Regular Polygons The quantities of importance when making an object involving a regular polygonal shape are the in- terior angles, the length of an edge, and the overall size of the object. Displayed in Figure 5 is a segment of an n -gon with its inscribed and circumscribed circles. A highlighted triangle with three sides (with lengths labeled R , r , and l ) and three angles (labeled A1 , A2 and A3 degrees) is shown; its sides are formed by the radii of the circumscribed and inscribed circles and the line be- tween the endpoints of these radii on the circles, one endpoint at the site of tangency with the in- scribed circle and the other endpoint at the vertex for the circumscribed circle.
6 The radius of the circumscribed circle is R , which is a measure of the overall size of the n -gon because it lies within a circle of diameter 2R and, also, within a square HAVING sides of length 2R . The angle A1 is half the central angle and so is equal to 180 / n degrees for an n -gon. Angle A2 is 90 because a ra- dius of a circle meets a tangent to the circle at a right angle. This implies that A3 is the comple- ment of A1 , so A3 90 A1 90 n 2 / n , which is half the interior angle. Two Figure 5. Polygon geometry sides determine the third side of the triangle because R 2 r 2 l 2 . Sides r and l in terms of the angle A1 are given by r R cos A1 and l R sin A1 . The length L of an edge is L 2l 2R sin A1 , which is another measure of the size of the n -gon. Example: Consider a pentagon HAVING edges of length L 1 in. Angle A1 180 / 5 36 degrees, and A2 90 36 54 . The pentagon lies inside a . circle of radius R L / 2sin A1 1/ 2sin 36 in.
7 Example: Consider a hexagon to fit inside a circle HAVING a diameter of in. The radius of the circumscribed circle is R / 2 in. The angles A1 180 / 6 30 and A3 60 . The length of an edge is L 2R sin A1 in. 4. The angles A1 and A3 are important when setting up a TABLE saw to make an object involving the shape of a regular polygon. They are listed in TABLE 1 for some frequently encountered n -gons: the square, pentagon, hexagon, and octagon. TABLE 1. Angles for selected n -gons n central angle internal angle A1 A3. 90 90 45 45. 4. 72 108 36 54. 5. 60 120 30 60. 6. 45 135 8. Irregular Polygons Irregular polygons those HAVING edges of unequal lengths are also of interest. Examples are seen in the cutting board and rectangular picture/mirror frame in Figure 3 and the corner cabinets in Figure 6. Here the angles and edge lengths are less obvious but depend on the particular shape. More can be said for the stretched shape, such as those of the cutting board and picture/mirror frame.
8 Their angles and edge lengths follow in a straightforward way from the underlying regular polygonal shapes from which they are derived. Figure 6. Corner cabinets HAVING irregular polygonal shapes 2. Miter Terminology No miter is cut on a TABLE saw when the plane of the saw blade is perpendicular to both the plane of the saw surface and the plane of the miter gauge surface, as in Figure 7(a). The angle indicator of the miter gauge in this position shows 90 . The angle shown by blade-tilt indicators on TABLE saws is the complement of the an- gle between the plane of the blade and the plane of the surface ( , 90 minus the angle between the blade and surface), so the tilt indicator shows 0 in Figure 7(a). A simple miter results when one or the other, but not both, of the blade or miter gauge is angled away from these perpendicular positions, as shown in Figure 5. 7(b) and (c). A compound miter results when both are angled away from their perpendicular positions, as in Figure 7(d).
9 Figure 7. Miter types 3. TABLE -Saw METHODS for Making Polygonal-Shaped OBJECTS HAVING Sides Without Slope Making polygonal shaped OBJECTS HAVING sides that do not slope, such as those in Figure 3, requires cutting simple miters. For items like the lid of the box and the bottom of the tray in Figure 3, it is natural to position the blank to be cut so it is flat on the surface of the saw. The blade would then be set perpendicular to the saw's surface (tilt indicator at 0 ) and the miter gauge set so that its angle to the saw-kerf is A3 . For the sides of the box and the tray, with the blanks flat on the surface of the saw, the blade would be set at an angle A3. to the surface of the saw (tilt indicator at 90 A3 A1 ) and the miter gauge set at an angle perpendicular ( , 90 ) to the saw kerf. Example: One approach for making the octagonal top of the lidded box of Figure 3 is to draw the octagon on the blank to identify the cut lines for the eight edges and then use the simple miter setup of Figure 7(c) with the blade perpendicular to the saw surface and the miter gauge set to angle A3 90 n 2 / n 90 6 / 8.
10 An alternative method for making the top is described in Section below. A Special Method for Cutting Hexagons on a TABLE Saw The method we describe for cutting hexagons is adapted from Jim Cummins' [ ] method for the band- saw. It is safe, accurate and repeatable, so it is suitable when one or multiple identical hexagons are re- quired. The smallest width W of a hexagon is the perpendicular distance be- tween two of its opposing edges, which is the diameter of its inscribed circle;. from Figure 5, W 2r . The diameter of the circumscribed circle is 2R 2r / cos A1 W / cos30 . Following is a method that requires an accurate cut of stock to width W , a stop block cut to angle A3 60 , and o setting a fence accurately to be at angle A3 60 to the saw kerf. o 6. Step 1. (Preliminaries) Cut a length of stock to the desired width W . The length is not critical but should be at least the diameter of the circumscribed circle, , but does not need to be significantly greater than that.