Transcription of USING THE RAPITEST SOIL TEST KIT TEST CHAMBER Green …
1 USING THE RAPITEST soil TEST KITThis RAPITEST soil Test Kit is designed for simplicity of use and accurate results. At the heart of the system are 4 patented, specially designed testing devices called color comparators - one each for pH, Nitrogen, Phosphorus and Potash. Each comparator has a removable film color chart and color coded top. Capsules for each test are also YOUR soil SAMPLESFor lawns, annuals or house plants, take the soil sample from about 2-3" below the surface. For perennials especially shrubs, vegetables and fruit, the sample should be from 4 deep. Avoid touching the soil with your hands. Test different areas of your soil , as it may differ according to past cultivation, underlying soil differences or a localized condition.
2 It is preferable to make individual tests on several samples from different areas, than to mix the samples together. Place your soil sample into a clean container. Break the sample up with the trowel or spoon and allow it to dry out naturally. This is not essential, however it makes working with the sample easier. Remove any small stones, organic material such as grass, weeds or roots and hard particles of lime. Then crumble the sample finely and mix it thoroughly. pH TEST:1. Remove the cap from the Green comparator and take out the package of capsules. Make sure the color chart (film) is in Fill test CHAMBER to soil fill line with soil Holding the capsule horizontally over the test CHAMBER , carefully separate the two halves of the Green capsule and pour powder into the test USING the dropper provided, add water (preferably distilled) to water fill Fit the cap onto comparator, making sure it is seated properly and caps tightly.
3 Shake Allow soil to settle and color to develop for about a Compare color of solution against pH chart. For best results allow daylight (not direct sunlight) to illuminate the solution. Refer to the information that follows for adjusting soil pH, if required, as well as the pH Preference List , PHOSPHORUS & POTASH tests :1. Fill a clean container with 1 cup of soil and 5 cups of water. (Larger or smaller quantities may be tested as long as the 1 part soil to 5 parts water proportions are maintained.) For best results use bottled or distilled Thoroughly shake or stir the soil and water together for at least one minute; then allow the mixture to stand undisturbed until it settles (30 minutes to 24 hours, dependent on soil ).
4 A fine clay soil will take much longer to settle out than a coarse sandy soil . The clarity of the solution will also vary, the clearer the better, however cloudiness will not affect the accuracy of the Select the appropriate comparator for the test you wish to make. Remove the cap and take out the capsules which should be the same color as the cap. Make sure the color chart (film) is in place. Do not interchange color charts between = pHPurple = NitrogenBlue = PhosphorusOrange = Potash A dropper is providedto facilitate transferringthe test solution into thecolor USING the dropper provided, fill the test and reference chambers to the fill mark on the chart with solution from your soil sample.
5 Solution is added to the reference CHAMBER to compensate for any discoloration in the tested sample caused by the soil . Avoid disturbing the sediment. Transfer only Remove one of the appropriate colored capsules from its poly bag. Holding the capsule horizontally over the test CHAMBER , carefully separate the two halves and pour the powder into the test Fit the cap on the comparator, making sure it is seated properly and caps tightly. Shake thoroughly. 7. Allow color to develop for 10 Compare the color of the solution in the test CHAMBER to the color chart. For best results, allow daylight (not direct sunlight) to illuminate the solution in both the test and reference chambers.
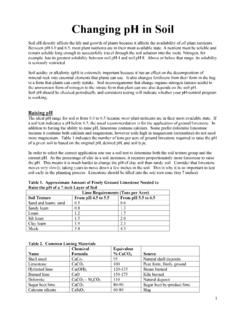
6 Judge colors, if necessary, and note your results for future reference. Follow the same easy steps for each of the N, P & K tests . When you have the test results you need, refer to the information RAISE OR LOWER pH OF YOUR SOILR aising and lowering pH is not an exact science & most plants have a reasonably wide tolerance, certainly to within 1 pH point. Consult the enclosed pH Preference List and you will see that the majority can manage well on a pH around but some need an alkaline soil and some a particularly acid soil . Altering pH takes time so do not expect rapid changes; rather, work steadily towards giving a plant its ideal pHpH can be adjusted to provide more suitable growing conditions for the different plants you wish to grow.
7 Or, you can leave the pH of the soil as it is and select plants that like the level revealed by your test. Once you have your pH reading, check the enclosed pH Preference List for the pH levels of over 450 popular plants, trees, shrubs, vegetables and fruits. If your pH reading differs significantly from the list s recommended levels, follow instructions below for adjusting soil pH. You can correct pH at any time of the year but it is best to start in the Fall and check progress in the Spring. After working to adjust your soil , retest for pH level in 40-60 days. If results are still significantly off, retreat your soil , not exceeding recommended application levels.
8 Allow one month to pass between adding lime and adding TYPES:Sandy Soils: A light, coarse soil comprised of crumbling and alluvial debris. Loam Soils: A medium friable soil , consisting of a blend of coarse (sand) alluvium and fine (clay) particles mixed within fairly broad limits with a little lime and humus. Clay Soils: A heavy, clinging, impermeable soil , comprised of very fine particles with little lime and humus and tending to be waterlogged in winter and very dry in summer. ADJUSTING soil pH - HOW MUCH TO APPLY Material pH Change Sandy Loamy Clay Dolomitic or calcic limestone + unit ( pH) + unit ( pH) Hydrated Lime + unit ( pH) - 3 - 4 - + unit ( pH) - - - Iron Sulfate unit ( pH) unit ( pH) Aluminum Sulfate unit ( pH) - 1 - unit ( pH) 1 - Amounts listed are pounds per 100 square feet.
9 Do not add more than 5lbs. of lime or sulfur in one CHAMBERTEST CHAMBERCOLOR FILMCOLOR COMPARISON BARSFEEDING PRIOR TO PLANTINGA dequate reserves of plant food should be available in the soil before planting vegetables, preparing a seed or flower bed, sodding or seeding a lawn, or planting shrubs and trees. To make up any deficiencies, apply fertilizers from the following chart according to your soil test RECOMMENDATIONSFEEDING ESTABLISHED PLANTS AND BEDSB ased on your test results, apply the appropriate fertilizer(s) in the amounts recommended in the following recommendations are based on the following fertilizers sources: Nitrate of Soda (16% N), Triple Superphosphate (46% P2O5) and Muriate of Potash (60% K20).
10 The amounts listed are in oz. /100 sq. ft. (Ounces referred to are by weight, not volume.) If you wish to use other fertilizer, simply check the package for the percentage of nutrients for N,P,&K and adjust the application level FOR N, P AND K RESULTS Very Low Low Medium High N P K N P K N P K Lawn - - - - - - - 0 0 N/A Fruit - - - - - - - N/A Flower - - - - - - - N/A Shrubs (flowering) - - - - - - - - - N/A Shrubs (foliage) - - - - - - - - N/A Veggies (root)