Transcription of Using The Strip Tube RulerTM - CozyQuilt.com
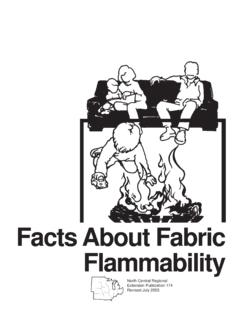
1 Welcome to the wonderful world of Strip Tubing! We've been Using this technique for years, having great fun and making terrific quilts. Now it's your turn. Before we begin, make your life easier by getting The Strip Tube RulerTM from your favorite quilt shop. This brilliantly designed ruler is a great addition to your quilting toolbox. You can use it over and over again. Now that you have let's get to Using it. The most difficult part is not that difficult! It's just a little You have to make a tube. To do this you need two strips (or Strip sets or combination of both). In our example below, we have a solid Strip and a pieced Strip of the same size. For more information on which size to use, see the patterns inside the book, Strip Tubing, or the many patterns by Cozy Quilt Designs. Place them right sides together and sew on the top and bottom of the long sides to make something that looks like a or a tube!
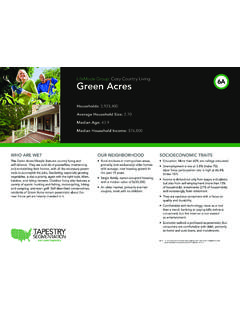
2 Then find the horizontal measurement of your unfinished block size on your ruler. Put that horizontal line on your bottom stitching line and cut up one diagonal side and down the other to get a triangle that opens to a square. Trim off the dog ears, press, and there's your block! For the next triangle turn your ruler so that same horizontal line is on your top stitching line. Continue down the tube to get as many triangles as you can from a Strip set. " seam on top and bottom Strip Tube R uler Using The Strip Tube RulerTM Strip Tube R uler For great ideas Using the tube technique, check out the book Strip Tubing, by Cozy Quilt DesignsTM. Directions and Images Copyright Cozy Quilt DesignsTM 2008-2010. All rights reserved. Making Half Square Triangles with The Strip Tube RulerTM Did you notice that The Strip Tube RulerTM makes pieced Half Square Triangles? That means you can make regular Half Square Triangles too!
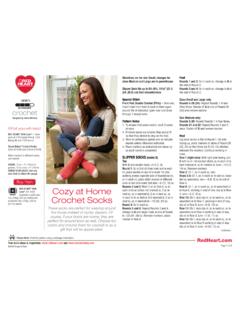
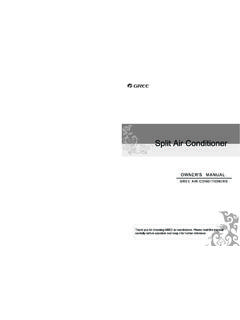
3 For Half Square Triangles, your tube needs to be just two fabrics cut the same width. Here's a great chart to help you cut your strips . It is based on fabric 40" wide with little fabric waste between cuts. Here's an example of how to use the chart: To get a finished Half Square Triangle Block that finishes 4" square, You first sew a dark Strip with a width of 3 " together with a light Strip with a width of 3 " to make a tube. Use the 4 " measurement on The Strip Tube RulerTM to cut out triangles that open to 4 " squares. You will get 10 blocks per Strip set. When sewn together, those blocks will finish at 4" square. Tip: You will have bias edges, so be careful not to stretch the fabric as you sew. Squaring Up Half Square Triangles. You can also square up Half Square Triangles with this ruler! With right sides together, take the triangle to your cutting mat. Place the unfinished block measurement line of The Strip Tube RulerTM on your stitching line and the left edge of the ruler on the left raw edge of the triangle.
4 Then slice off the visible fabric on the right. (Note, if you are left-handed, line the right edge of the ruler on the right raw edge of the triangle. Then slice off the visible fabric on the left.) Tip: To compensate for the fold, you might need to nudge your ruler down so the measurement line is a thread below the stitching line. Finished Block Size Cut Size (and Ruler Measurement) Width of Tube Yield per Strip Set 1 " 2" 1 " wide 23 Blocks 2" 2 " 2" wide 18 Blocks 2 " 3" 2 " wide 16 Blocks 3" 3 " 3" wide 14 Blocks 3 " 4" 3 " wide 12 Blocks 4" 4 " 3 " wide 10 Blocks 4 " 5" 4" wide 9 Blocks 5" 5 " 4 " wide 8 Blocks 5 " 6" 4 " wide 8 Blocks 6" 6 " 5" wide 7 Blocks 6 " 7" 5 " wide 6 Blocks 7" 7 " 5 " wide 6 Blocks 7 " 8" 6 " wide 6 Blocks 8" 8 " 6 " wide 5 Blocks 8 " 9" 6 " wide 5 Blocks 9" 9 " 7 " wide 4 Blocks For great ideas Using the tube technique, check out the book Strip Tubing, by Cozy Quilt DesignsTM.
5 Directions and Images Copyright Cozy Quilt DesignsTM 2008-2010. All rights reserved. Strip Tube R uler