Transcription of VARILUX PROGRESSIVE LENS FITTING AND DISPENSING GUIDE
1 PROGRESSIVE LENS FITTING AND DISPENSING GUIDEVARILUXFITTING GUIDE STEPS FOR FITTING VARILUX LENSES1. FRAME SELECTION2. PRE-ADJUST FRAME3. MARK PUPIL CENTRE AND MEASURE MONOCULAR PUPILLARY DISTANCES (PD) AND FITTING HEIGHT (FH)For best vision select a frame appropriate for the wearer s face: it should be stable on the nose and offer sufficient height between the pupil & the lower rim of the frame. The eyes should also be well adjust the frame on the wearer before taking any measurements!Ensure that: The vertex distance is approximately 12 to 14 mm without touching eyelashes or skin The pantoscopic angle is around 8 to 12 degreesThese 2 parameters are critical for a proper FITTING of PROGRESSIVE lenses.
2 You can measure them manually or automatically, using digital device such as Vscope (recommended for a more accurate DISPENSING ). ManuallyWith the wearer looking straight at far distance, shine a pen torch below the eye and dot each lens at the center of pupil. Draw a line horizontally across the mark and check that the lines are crossing the center of each monocular FH on the di-test card or with a ruler: this is the vertical distance between the deepest point of the frame and the an easy measurement, you can use the HMS (Height measuring system): adjust the white lines to cross the corneal reflect and read the FH at the tangent to the bottom of the the monocular PD on the wearer, using a pupillometer or a PD ruler, to ensure exact centering of the eyes behind the and DISPENSING Guide01 PART IPDFHVARILUX PROGRESSIVE LENS - FITTING and DISPENSING GUIDE DigitallyAdapt the clip on the frame and take the measurements with the Vscope.
3 Ensure the pointer is placed over the corneal reflex and that the markers for the frame size are properly positioned. For patients wishing superior visual performance with personalized parameters, VARILUX comfort f360, VARILUX Physio f360, VARILUX Ipseo and some VARILUX S Series will need these additional measurements. As for PD and FH, you can proceed manually using the 360 ruler or digitally using the Vscope. Always measure on a pre-adjusted frame! ManuallyPantoscopic TiltWith the wearer looking straight ahead, place the vertical edge of the tool against the temporal front surface of the frame. Once the air bubble is stabilized, you can read the pantoscopic tilt of the frame.
4 Check lens cut out To ensure proper lens cut out, place the lens marking in alignment with the layout chart cross, aligning the pupil center dot over the FITTING cross. Frame size is adequate if the full areas of the distance vision and the reading circles fall within the frame. If the lens does not fit consider choosing another Vertex DistanceWith the patient standing up in profile, place the edge of 360 Ruler tool along the frame temple with the 0 at the lens plane, and measure the distance in millimeters from the back of the lens to the front of the AngleUsing the 360 Ruler tool, place the frame top down on the tool aligning bridge center and lens as shown.
5 Measure the frame wrap angle from the base of the tool to the right lens angle. 02+4. PERSONALIZATION PARAMETERS AdameapoinandproVARILUX PROGRESSIVE LENS - FITTING and DISPENSING GuideMeasuring Tools for Personalization Parameters: DISPENSING GUIDE STEPS FOR FOR DISPENSING VARILUX LENSES1. CONFIRM MEASUREMENTS, POWER AND LOCATE ENGRAVINGSUse a good light source and dark background to locate the engravings. Center the frame using the centering chart: Confirm the monocular PD and FH Confirm the powers: note that because modern PROGRESSIVE lenses are optically compensated to optimize wearer perception, measured powers (sphere, cylinder, axis, add, prism) might differ from prescribed powers.
6 Please check on the lens label what should be the measured power and ask your customer service if in doubt. - distance power can be checked through the center of the distance checking circle, 3mm above the FITTING cross - verify that the add power engraving under the temporal micro-circle matches the first two digits of the prescribed add ( 25 signifies addition D) and check the addition at the center of the near vision circle - confirm prism at prism reference point (PRP) Design identification ensures that you are getting a quality branded VARILUX lens. It s shown as an engraving located under the nasal micro-circle that s unique to each VARILUX lens design.
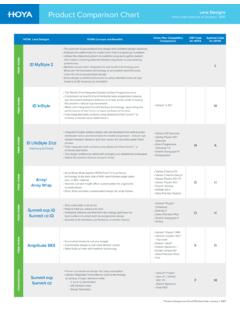
7 Technological devices: To prescribe sophisticated lenses, high technology measurement devices have been developed. The Visioffice allows to measure 15 parameters in a few minutes, including the Eye Rotation Center position and the Head/Eye behavior for totally personalized lenses. 03PD Ruler 360 Ruler Pupillometer Vscope Visioffice PDs FH VD WRAP PANTO DEYE WD H/E PDs FH VD WRAP PDs PANTO DEYE WD PDs FH VD PDs FH VD WRAP Material codes appears to the right of the design identification. EngravingRegularEngravingShortDigitalDig italVarilux LibertyClassicalEngravingRegular360 IndiaEngravingShort360 360360 Azio 360 Azio 360 Indiaf-360 f360360360 Kan Kan VARILUX PhysioEngravingRegularEngravingShortClas sicalDigital360 Azio 360360 Digital360 Azio 360360 India 360 India 360 KanKanVarilux ComfortDesignDesignShortDigital+ SDigitalCustomizedDesign+ FFit3D+4D4 DAzio 360 Azio 360 India360 IndiaKan Kan 360 + 3 DVarilux S series20 Lens EngravingNasalTemporal20 Physio201510 ABCD* RLAdd PowerDesign Identification Distance PowerPrism Reference PointPART IIPD Pupillary Distance; FH FITTING Height; VD Vertex Distance; Wrap Wrap Angle.
8 Panto Pantoscopic Tilt; Deye Dominant Eye; WD Working Distance; H/E Head Eye 3. DEMONSTRATE VIEWING AREAS2. CONFIRM FIT ON PATIENT WITH THE FOLLOWING STEPS: a. Verify lenses: lenses should have their ink markings and frame should be adjusted. If ink markings are missing, retrace them from the micro-circles using the appropriate di-test card. the FITTING cross should be at pupil center when eyeglasses are on the wearer. adjust the frames to raise or lower the fit if necessaryb. Recheck frame adjustments Pantoscopic Tilt, Face Form Angle, Back Vertex Distance c. Educate wearers how to use lenses: explain The extent of the visual fields The transition between distance, intermediate and near zones Side-to-side head movement for peripheral viewingd) PeripheryDemonstrate the decrease in power at the periphery by having the wearer hold his or her head still while moving the reading card from side to ) IntermediateRepeat the demonstration.
9 This time, ask the patient to look at an object at arm s-length ) DistanceDemonstrate the distance prescription by having the patient look at an object at least 6m ) Near Demonstrate the near reading area by having the wearer read the VARILUX Lens Reading Provide Assurance to the wearer Deliver the Certificate of Authenticity Inform patient about adaptation period Provide wearing GUIDE 046m40cm60cmVARILUX PROGRESSIVE LENS - FITTING and DISPENSING Guide1) Understand the precise complaint Type of problem encountered, frequency and symptoms of problem, distances concerned, expedient solutions found, etc. Discuss with the wearer to clarify the ) Remark the lenses Locate the lens engravings and remark the FITTING cross for distance vision and near vision circles.
10 Look also for coating issues (crazing, scratches, resisting ) that can affect vision. 3) Recheck lens prescription Power of distance vision, near addition, pupil distances and FITTING heights. TROUBLESHOOTINGHOW TO SOLVE ADAPTATION PROBLEMSFOLLOW UP CAREIt is important to follow a precise sequence in order to determine the cause of the SOLUTIONW earer has narrow reading areaPeripheral vision blurs and movesWearer lifts head or glassesto readWearer lowers head or glasses to look at a distanceWearer moves reading material off to side for better focusDistance vision is slightly blurryWearer sees light sources doubled Verify FITTING height and PD Measurements Verify ADD Power Add pantoscopic tilt and decrease vertex distance Adjust frame to decrease vertex distance and to increase facial