Transcription of Vintage Installation and Maintenance Information
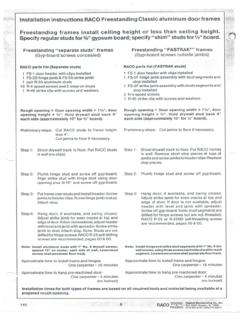
1 Tools & Accessories - For all types of Installations Table saw, miter saw, measuring tape, nail set, hammer, tapping block, nail gun (manual or pneumatic), square, chalk line, putty fill, broom, dustpan and Vintage Cleaning Kits. Always consult the dealer you purchased your flooring from for appropriate Installation tools. Tools & Accessories - Nail Down 15 lb felt or equivalent, nail gun or staple gun (manual or pneumatic), square, chalk line, putty fill, broom, dustpan and Vintage Cleaning Kits. See Chart #4 for nail gun & cleat recommendations. Vintage Installation and Maintenance Information Tools & Accessories - Glue Down This Installation and Warranty Card is for all Vintage Product lines. Trowel, cleaning solvent and moisture cured glue See Chart #5 for recommendations. General Installation instructions for all products NOTE: It is extremely important that you use the proper trowel to ensure maximum coverage and produce a good bond between subfloor and flooring.
2 You may also require a 100-150 pound roller. Ensure the site environmental conditions are suitable for Installation and take record. This includes: Relative Humidity, Subfloor or Concrete Moisture Reading, condition of product to be layed, sources Tool & Accessories - Floating Floors of water or humidity extremes. Do not continue, if any of the conditions in these directions and Vintage T & G glue, Vintage 's Premium Underpad, mineral solvents (for cleaning glue), and shims. warranties are not met and/or according to the NWFA instructions . ** All flooring strips should be installed perpendicular (right angle), to the floor joists. In some applications, installing parallel to floor joist may be required for aesthetic reasons. Consult your dealer, installer, and Ensure all other trade activities are completed they may impact the quality of the installed flooring.
3 Developer for their recommendations and building code requirements. Wood flooring is one of the last products to be installed at a construction site. Window, door, dry walling and painting and HVAC activation (on for >7 days) must be completed and dry before Installation Installation - Expansion Gap allowances begins. This is to avoid humidity extremes and damages that void the warranty. Acclimatize the product according to the product directions (many Vintage products are designed to Pioneered 3/4 Leave 3/4 around entire room install and perform better without acclimatization). See more Information below. Crafted 9/16 For Nail & glue down leave 1/2 . Floating leave 5/8 around entire room Solid Sawn 3/4 Leave 3/4 around entire room Ensure the subfloor is perfectly level (1/8 per 8'). Level high spots and fill low spots as required. Ensure Northern Solid Sawn 3/4 Leave 3/4 around entire room the subfloor is firmly anchored ensuring no movement, flex or squeaking.
4 U-LOC 5/8 For rooms up to 26' x 52' - Leave 1/2 (13 mm). Ensure the subfloor is less than 12% MC and record readings, subfloor must be within 4% of the actual For rooms up to 26' x 52' - Leave 1/2 (13 mm). floor being installed. For rooms up to 26' x 52' - Leave 1/2 (13 mm). Thoroughly sweep and vacuum the area the flooring is to be installed. For floating floors a 3/4 expansion gap must be left up against all vertical obstructions Prepare Installation along longest straightest wall first using long pieces for starting row and across (Chart #1). (perpendicular to) floor joist. Open and select products from multiple boxes to ensure an appropriate mix of lengths, wood Material Acclimatization character and color. Pioneered: Inspect each piece before Installation . Do not install any defective piece or piece that has a color, Open boxes fully (never just the ends) and allow the wood to acclimate to the ambient temperature character or grain etc.
5 That may not suit the look of the floor and may be displeasing to the consumer. of the room. The wood must be given 48-72 hours at approx. 23 C (72 F) and a relative humidity of These pieces can be cut and used for starters, installed in a less conspicuous location ( Closet, 40% before Installation . Special note: In some instances you may not be able to acclimate flooring. under Cabinets etc.) or discarded. If you choose not to install these pieces please note they are not covered by Vintage 's warranty. When the relative humidity is too high or to low (above 50 % and below 40 % RH), acclimating may not be suitable. Always consult your hardwood flooring dealer or installer for their recommendations. Preparation of Plywood & Concrete Subfloor Expansion and contraction caused by acclimating is not covered under this warranty. Vintage Hardwood Flooring recommends that all Vintage Hardwood Flooring be installed with a Crafted, Solid Sawn, Northern Solid Sawn & U-LOC: Do not acclimate.
6 Flooring must be installed minimum of 5/8 ( mm) approved, stamped plywood, or 3/4 Underlay immediately upon opening the boxes. grade PS2-92 rated, or concrete slab. The use of particleboard as a subfloor will automatically void the warranty. Consult your Authorized Vintage Dealer for recommendations on your specific subfloor Hardwood flooring should be one of the last items installed when renovating your home. For application. Any failure of Vintage Hardwood Flooring relating to improper subfloors, or subfloor new construction, the heating system must be operating for at least one week (7 days) at normal preparation is not the responsibility of Vintage Hardwood Flooring, and will not be covered under residential temperatures (approx. 70 F / 22 C ) prior to Installation . warranty. Sweep and vacuum subfloor. Ensure that old carpets, oils, foreign particles, protruding nails, carpet glues, etc.
7 , are removed prior to Installation . For wood subfloors, make sure they are Additional Allowance Recommendations level, clean, dry and securely fastened. Repair and/or replace any section that is rotted or damaged. This will cover waste, defects or personal preference of boards. It is the installer's and owner's Always follow local building codes. responsibility that all pieces be inspected, and graded prior to Installation . If any piece does not meet installer/owner's personal standard, do no install these pieces. If you choose not Do not install Vintage 's Pioneered Solid hardwood flooring over concrete unless an acceptable plywood to install pieces because of appearance, length of piece, or your personal visual standards, subfloor and vapor barrier is firmly anchored over sleepers and a dehumidifier is in place to continuously this will not be considered part of the 5% defect allowance.
8 It is also recommended to have remove excess humidity from the room. additional materials keep in case of future repairs. Moisture Content 2 1/4 - 4 3/8 widths 5% additional Acceptable subfloors & ground levels installations for Vintage Product 5 - 10 widths 8% additional Pioneered Solid Plywood, OSB At or above ground Nail (Chart #2). level only Crafted Engineered Plywood, OSB or At, above or below Nail, glue or float Concrete ground level Important Notes Solid Sawn Plywood, OSB or At, above or below Nail, glue or float Concrete ground level FOR ALL INSTALLATIONS - ALWAYS WORK FROM 5-6 DIFFERENT BOXES AT ONE TIME. The installer is the final grader. Installer/homeowner will take full responsibility for all flooring that Northern Solid Sawn Plywood, OSB or At, above or below Nail, glue or float Concrete ground level is installed, even if the primary owner of the residence is absent at the time of Installation .
9 If you are unsure of any requirements, please consult a Vintage dealer prior to Installation . Although U-LOC Plywood, OSB or At, above or below Float Vintage Hardwood Flooring takes every precaution to ensure that Vintage 's Hardwood Flooring is Concrete ground level graded and shipped to industry standards, we suggest you inspect each piece of Vintage Hardwood Flooring before Installation . Boards that you may not like the look of, or contain a mark that you think Plywood: The maximum moisture content (MC) for plywood should never exceed 12% will affect the look of the floor should be used as cut pieces for your start/end pieces. You may also Concrete: The maximum moisture content for concrete should never exceed 12%. The difference between the flooring and the subfloor should never exceed 4%. use these pieces in less conspicuous areas such as in closets or under couches and sofa's etc.
10 Nailed Down Application Hardwood Floor Tips See Chart #4 for nail gun and cleat recommendations Here are a few tips to make your job easier, should you decide to use a hardwood floor nailer or staple gun. Step #1 Mark your starting line using a chalk line, draw a guide 1. Prevent any scratches and indentations on the surface of the board by keeping the nailer plate line out from the starting wall by measuring out the width of (base) clean, free from nicks and scratches at all times. Also by putting down the nailer/stapler on one board plus (see Chart #1). This line is where your first strip the plywood or on a piece of cardboard, not directly on the prefinished floor. of flooring is going, and also allows for the expansion gap. It is 90. o very important for the starting line to be straight and square 2. Make sure the nailer/stapler base is squared and sits well on the edge of the strip to ensure the (see Fig.)