Transcription of WHILE INSTALLING - Dynojet
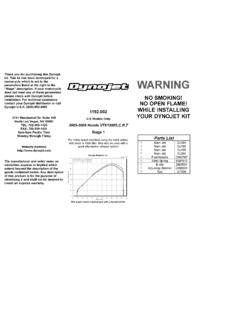
1 Thank you for purchasing this Dynojetkit. This kit has been developed for amotorcycle which is set to the parameters listed at the right in the Stage description. If your motorcycledoes not meet any of these parametersplease check with Dynojet before installation. For technical assistancecontact your Dynojet distributor or callDynojet (800)-992-49932191 Mendenhall Dr. Suite 105 North Las Vegas, NV 89081 TEL: 702-399-1423 FAX: 702-399-14318am-5pm Pacific TimeMonday through FridayWebsite manufacturer and seller make nowarranties express or implied whichextend beyond the description of thegoods contained herein. Any descriptionor this product is for the purpose ofidentifying it and shall not be deemed tocreate an express Models Only2009-2014 Kawasaki KLX250 SStage 1 & 2 STAGE 1 For mildly tuned machines using the stock airbox, with stock or K&N 2 For mildly tuned machines using stock airbox with intakesnorkel removed, with the stock or K&N stages may be used with a good aftermarket exhaustThis graph shows a typical gain with a Dynojet jet kit.
2 WARNINGNO SMOKING!NO OPEN FLAME! WHILE INSTALLINGYOUR Dynojet KITP arts List1 Main JetDJ1121 Main JetDJ1161 Main JetDJ1201 Main JetDJ1241 Main JetDJ1281 Main JetDJ1321 Fuel NeedleDNO2281E-clipDE00012 Adjusting Washers DW00011 Slide SpringDSP0271 Plug DrillDD 5 Remove the vacuum slide from the carb. Remove the stock needleand spacers, noting order of assembly (Fig. A). 2. Install the Dynojet needle on groove #3 from the top. Install the smallDynojet washers above the e-clip. Install the Dynojet slide spring(DSP027) in place of the stock slide spring. After INSTALLING the slide in thecarb be sure to check slide movement Remove the stock main jet and replace with the Dynojet main jetprovided. If you are running the stock exhaust install the DJ116 main you are running an aftermarket exhaust or slip-on with highflowing baffle use the DJ120 main jet. Be sure that the jet you are changing is the main Locate the fuel mixture plug (Fig.)
3 B). If you see a screw head at proceed to the adjusting procedure. With the 5/32 drill bit providedcarefully drill through the :The mixture screw is directlyunderneath this plug, be ready to pull back on the drill the instant youbreak screw provided to secure and remove this turn the mixture screw clockwise until lightly seated, then backout 3 ONE INSTRUCTIONSFig. APlace E-clipin groove #3from the top. Fig. BSTAGE TWO INSTRUCTIONS1. Remove the vacuum slides from the carbs. Remove the stock needleand spacers, noting order of assembly (Fig. A). 2. Install the Dynojet needle on groove #3 from the top. Install the smallDynojet washers above the e-clip. Install the Dynojet slide spring(DSP027) in place of the stock slide spring. After INSTALLING the slide in thecarb be sure to check slide movement Remove the stock main jet and replace with the Dynojet main jetprovided. If you are running the stock exhaust install the DJ124 main you are running an aftermarket exhaust or slip-on with highflowing baffle use the DJ128 main jet.
4 Be sure that the jet you are changing is the main Locate the fuel mixture plug (Fig. B). If you see a screw head at proceed to the adjusting procedure. With the 5/32 drill bit providedcarefully drill through the plug. NOTE:The mixture screw is directlyunderneath this plug, be ready to pull back on the drill the instant youbreak through. Use screw provided to secure and remove this turn the mixture screw clockwise until lightly seated, then backout 3 ScrewPlug LocationMain JetLocationDynojet Parts