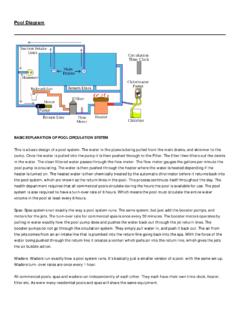
Transcription of WhisperFlo Pump Owner's Manual IMPORTANT …
1 Rev. D 6-5-011P/N 071109 WARNINGRisk of electrical shock or pool pump must be installed by a licensed or certified electrician or a qualified poolserviceman in accordance with the National Electrical Code and all applicable local codes andordinances. Improper installation will create an electrical hazard which could result in death orserious injury to pool users, installers, or others due to electrical shock, and may also causedamage to disconnect power to the pool pump at the circuit breaker before servicing the to do so could result in death or serious injury to serviceman, pool users or others due toelectric Pump Owner's ManualPentair Pool Products1620 Hawkins Ave.
2 , Sanford, NC 27330 (919) 774-415110951 West Los Angeles Ave., Moorpark, CA 93021 (805) 523-2400 IMPORTANT SAFETY INSTRUCTIONSREAD AND FOLLOW ALL INSTRUCTIONSSAVE THESE INSTRUCTIONSB efore installing this product, read and follow all warning notices and instructions accompanying this to follow safety warnings and instructions can result in severe injury, death, or property damage. Call(800) 831-7133 for additional free copies of this Manual contains IMPORTANT information about the installation, operation and safe use of thisproduct. This information should be given to the owner /operator of this of ContentsSECTION INFORMATION .. 2 SECTION 3 SECTION 5 SECTION IV. RESTART 6 SECTION.
3 7 SECTION 8A. REPLACEMENT PARTS .. 8B. PUMP CURVES ..9 Listed227 TListedImportant NoticeP/N 0711092 Rev. D 6-5-01 NoteWhen pump is mounted permanently within 5 ft. of the inside walls of a swimming pool, you must use a No. 8 AWG orlarger conductor to connect to bonding conductor reduce the risk of injury, do not permit children to use this product unless they are closely supervised at all pump is for use with permanently installed pools and may also be used with hot tubs and spas if so marked. Donot use with storable pools. A permanently installed pool is constructed in or on the ground or in a building such that itcannot be readily disassembled for storage.
4 A storable pool is constructed so that it may be readily disassembled forstorage and reassembled to its original integrity and has a maximum dimension of 18 feet ( ) and a maximum wallheight of 42 inches ( ).CAUTIONFor hot tubs and spa pumps , do not install within an outer enclosure or beneath the skirt of a hot tub or spa unless Make sure all electrical breakers and switches are turned off before wiring Make sure that the wiring voltage matches the motorvoltage (230v or 115v). If they do not match themotor will burn Choose a wire size from the Chart 1. When in doubtuse a heavier gauge (larger diameter) wire. Heaviergauge will allow the motor to run cooler and Make sure all electrical connections are clean Cut wires to the appropriate length so they don toverlap or touch when connected to the of electrical shock or pool pump must be installed by a licensed or certified electrician or a qualified pool serviceman inaccordance with the National Electrical Code and all applicable local codes and ordinances.
5 Improperinstallation will create an electrical hazard which could result in death or serious injury to pool users,installers, or others due to electrical shock, and may also cause damage to disconnect power to the pool pump at the circuit breaker before servicing the pump. Failure to doso could result in death or serious injury to serviceman, pool users or others due to electric shock.)GWA(SEZISERIWYLPPUS)rewopesrohybh tgneldnaezis( 101018414121201884121213--- 212101 Chart D 6-5-013P/N 0711096. Permanently ground the motor using the green ground terminallocated on the inside of the motor canopy or access plate, seeFigure 1. Use the correct wire size and type specified byNational Electrical Code. Make sure the ground wire isconnected to an electrical service Bond the motor to the pool structure in accordance with theNational Electrical Code.
6 Use a solid No. 8 AWG or largercopper conductor. Run a wire from the external bonding to thepool bonding structure, see Figure Connect the pump permanently to a circuit. Make sure no otherlights or appliances are on the same is IMPORTANT that the O-ring be kept clean and well lubricated. We recommend a silicone base lubricant for best The Pump Strainer unit, sometimes referred to as the Hair and Lint Pot , is the unit in front of the volute. Inside the chamber is thebasket which must be kept clean of leaves and debris at all times. View basket through the See Through Lid to inspectfor leaves and of the length of time between filter cleaning, it is most IMPORTANT to visually inspect the hair and lint pot basketat least once a week. A dirty basket will reduce the efficiency of the filter and heater and also put an abnormal stress onthe pump motor which would result in a costly repair prevent damage to the pump and filter and for proper operation of the system, clean pump strainer and skimmerbaskets Pump Strainer Basket Cleaning Turn off Relieve pressure in the Turn the clamp and lid in a counter-clockwise direction until it Turn the clamp and lid set to remove the clamp and Put the debris from the basket into the trash and rinse out the basket.
7 Ifthe basket is cracked, it should be Replace the basket and fill the pump pot and volute up to the inlet portwith Clean the cover, cover O-ring, and sealing surface of the pump the O-ring with Teflon or Reinstall the lid by placing the clamp and the lid on the pot;see Figure Make sure the lid O-ring is properly placed. Seat the clamp and lidthen turn clockwise until the handles are horizontal; see Figure Turn the power ON at the house circuit breaker. Reset the pool timeclock to the correct LugGround ScrewClamp, potLidO-ring, lidBasketPotP/N 0711094 Rev. D 6-5-01 WARNINGTHIS FILTER OPERATES UNDER HIGH PRESSURE. WHEN ANY PART OF THE CIRCULATINGSYSTEM ( , LOCK RING, PUMP, FILTER, VALVES, ETC.) IS SERVICED, AIR CAN ENTERTHE SYSTEM AND BECOME PRESSURIZED.
8 PRESSURIZED AIR CAN CAUSE THE LID TOBLOW OFF WHICH CAN RESULT IN SEVERE INJURY, DEATH, OR PROPERTY DAMAGE. TOAVOID THIS POTENTIAL HAZARD, FOLLOW THESE Open the High Flow Manual air relief valve on top of the Stand clear of the filter. Start the Bleed air from the filter until a steady stream of water comes the High Flow Manual air relief If the air temperature drops below 35 F. the water in the pump canfreeze and cause damage. Freeze damage is not To prevent freeze damage follow the procedures listed Shut off electrical power for the pump at the house circuit Drain the water out of the pump case by removing the two thumb-twist drain plugs from the case. Store the plugs in the Cover the motor to protect it from severe rain, snow and Do not wrap the motor in plastic.
9 It will cause condensation and rust on the inside of the Care of Electric Protect from Shade the motor from the Any enclosure must be well ventilated to prevent Provide ample cross Protect against Protect from any foreign matter or splashing Do not store (or spill) pool chemicals near the Avoid sweeping or stirring up dust near the motor while it is If a motor has been damaged by dirt it voids the motor Protect against Protect from splashing pool Protect from the Protect from lawn If a motor has become wet - let it dry before operating. Do not allow the pump to operate if it hasbeen If a motor has been damaged by water it voids the motor NOT wrap motor with plastic or other air tight materials. The motor may be covered during a storm, for winterstorage, etc.
10 , but never when operating, or expecting replacing the motor, be certain that the motor support is correctly positioned to support the size of motor D 6-5-015P/N 071109 SECTION Pump All moving parts are located in the rear sub-assembly of this required:a. 3/32 inch Allen head inch open end 9/16 inch open end Flat blade To remove and repair the motor sub-assembly perform the following Turn off the pump circuit breaker at the main Drain the pump by removing the drain Remove the 6 bolts that hold the main pump body (strainer pot/volute) to the rear GENTLY pull the two pump halves apart, removing the rear Use a 3/32 inch Allen head wrench to loosen the two holding screws located on the sure not to scratch or mar the polished shaft seal faces; seal will leak if faces are Hold the impeller securely in place and remove the impeller lock screw by using a flat bladescrewdriver.