Transcription of Wi-Fi Settings Wi-Fi Connections with the Printer Guide
1 Wi-Fi Connections with the PrinterConnecting with a Computer via a Wi-Fi RouterConnecting with a Computer DirectlyConnecting with a Smart Device via a Wi-Fi RouterConnecting with a Smart Device DirectlyAppendixWi-Fi Settings Guide1 TABLE OF CONTENTS1. Wi-Fi Connections with the Printer ..22. Connecting with a Computer via a Wi-Fi Router ..3 For Windows ..3 Installing the Printer Driver and RICOH Printer Software ..3 Setting an Access Point using RICOH Printer ..4 For Mac OS ..5 Installing the Printer Driver and RICOH Printer software ..5 Setting an Access Point using RICOH Printer ..53. Connecting with a Computer Directly ..6 For Windows ..6 Enabling the Soft AP function using the Power Key on the Printer ..6 Enabling the Soft AP function using RICOH Printer ..74. Connecting with a Smart Device via a Wi-Fi Router ..8 For Android or iOS ..8 Setting an Access Point using RICOH Printer ..85. Connecting with a Smart Device Directly.
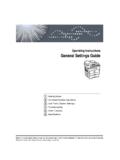
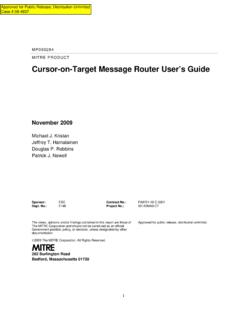
2 9 For Android or iOS ..9 Enabling the Soft AP function using the Power Key on the Printer ..9 Enabling the Soft AP function using RICOH Printer ..106. Appendix ..11 Troubleshooting ..11 Where can I find the instructions for use of RICOH Printer ? ..11 Unable to connect to the Printer via Wi-Fi network..11 System Requirements ..11 Trademarks ..1221. Wi-Fi Connections with the PrinterYou can connect your computer or smart device with the Printer via a Wi-Fi router (access point), or directly connect them using Soft AP with computersYe sNoFor Windows, see page 3 For Windows .For Mac OS, see page 5 For Mac OS .See page 6 For Windows .See page 8 For Android or iOS .See page 9 For Android or iOS . Wi-Fi routerWi-Fi routerComputerComputerSmart deviceSmart devicePrinterPrinterPrinterPrinterConnec tion via a Wi-Fi routerDirect connectionConnection via a Wi-Fi routerDirect connectionA Wi-Fi router available? connection with smart devicesYe sNoA Wi-Fi router available?
3 For details on using RICOH Printer ,see User Guide for RICOH Printer included in the CD-ROM or available on the RICOH official website at: Connecting with a Computer via a Wi-Fi RouterYou can connect your computer with the Printer via a Wi-Fi router (wireless access point).Install the Printer driver and RICOH Printer software on your computer first to use the Printer via wireless WindowsInstalling the Printer Driver and RICOH Printer SoftwarePrepare the following items for the installation. CD-ROM provided with the Printer * USB cable* If your computer is not equipped with a CD-ROM drive, down-load the installer from the RICOH official website at: Press and hold the power key to turn on the Connect the computer to a Wi-Fi Press and hold the power key on the Printer for 1 second or power indicator turns blue and the Wi-Fi function is ena-bled on the Insert the CD-ROM into the CD-ROM drive on the computer or start the downloaded installer from the RICOH official installation menu appears on the Connect the computer with the Printer using a USB Select [ Wi-Fi Configure and Installation] in the installation Click [License Agreement] and read the license Click [Exit] to close the license agreement If you accept the license agreement, select the check box of [I have agreed to use Ricoh Printer Driver], and click [Next].
4 Available access points are searched for, and found access points are displayed in the list. You cannot proceed to the next step without accepting the license Select the access point (the Wi-Fi router connected with the computer in step 2), and click [Next].11. Enter the password to connect with the selected access point, and click [Next]. If the [Key Index] setting is displayed, select the option corresponding to the SSID and entered password from the pull-down Select the Printer from the list, and click [Next].The installation After the completion message appears, click [Fin-ish].The Printer driver and RICOH Printer software are installed on the computer, and RICOH Printer icon is created on the can now print files on the computer from the Printer via the Wi-Fi router by selecting Print from the File menu of applica-tions or use the functions of RICOH Printer . The Wi-Fi router set at the time of the installation can be changed using RICOH Printer .
5 For details, see page 4 Set-ting an Access Point using RICOH Printer .Setting an Access Point using RICOH Printer You can set an access point ( Wi-Fi router) to use for wireless con-nection with the Printer using RICOH Printer on the computer. Install RICOH Printer to your computer first. For details, see page 3 Installing the Printer Driver and RICOH Printer Software .1. Press and hold the power key to turn on the Connect the computer with the Printer using a USB cable, via a Wi-Fi router, or using the Soft AP function. If the Wi-Fi setting has been set up, you can connect the computer with the Printer via a Wi-Fi router. Enable the Wi-Fi connection by pressing and holding the power key on the Printer for 1 second or longer. The power indicator turns blue. For the Soft AP connection , see page 6 Connecting with a Computer Directly .3. Click RICOH Printer icon on the application is Click [ Settings ].5. Click [ Wi-Fi ].
6 6. If the Wi-Fi setting is disabled, toggle the [WLAN] switch to enable the Wi-Fi access points are searched for, and found access points are displayed in the list. Click [Manual Wi-Fi ] to specify an access point by manually specifying SSID, encryption method, and password. After specifying an access point manually, click [Connect] to estab-lish a Click an access point to Enter the password to connect with the selected access point, and click [Connect]. If the [WEP KeyID] options are displayed, select the option corresponding to the SSID and entered password. If the setting is modified, the authentication password entry screen appears after [Connect] is the administrator password (default password is 888888 . The password can be set from [Modify Password] in the [ Settings ] menu.), and click [Login].Restart the Printer to apply the modified setting to the Printer . If the computer is connected with the Printer via a Wi-Fi router, the connection is terminated after the access point change is applied to the Printer .
7 Connect the computer to the same ac-cess point to connect with the Printer via the Wi-Fi can now print files on the computer from the Printer via the Wi-Fi router by selecting Print from the File menu of applications or use the functions of RICOH Printer .For Mac OSInstalling the Printer Driver and RICOH Printer softwarePrepare the following items for the installation. CD-ROM provided with the Printer * USB cable* If your computer is not equipped with CD-ROM drive, down-load the installer from the RICOH official website at: Press and hold the power key to turn on the Connect the computer with the Printer using a USB Insert the CD-ROM into the CD-ROM drive on the computer. If the computer is not equipped with a CD-ROM drive, down-load the installer from the following site and start the Double-click the CD-ROM icon on the Double- click the [Install] installer is Perform the installation by following the instructions on the After the installation is completed, open System Preferences and then Printers & Scanners on the Confirm that the connected Printer is displayed in the list.
8 If the Printer is not displayed in the list, add the Printer as Click + .2. Click Default .3. Select the Printer , and click [Add].Setting an Access Point using RICOH Printer You can set an access point ( Wi-Fi router) to use for wireless con-nection with the Printer using RICOH Printer on the computer. Install RICOH Printer to your computer first. For details, see page 5 Installing the Printer Driver and RICOH Printer software .1. Press and hold the power key to turn on the Connect the computer with the Printer using a USB cable or via a Wi-Fi router. When you set an access point for the Printer for the first time, connect the computer with the Printer using a USB cable. If the Wi-Fi setting has been set up, you can connect the com-puter with the Printer via a Wi-Fi Press and hold the power key on the Printer for 1 second or power indicator turns blue and the Wi-Fi function is ena-bled on the Launch RICOH Printer on the Click [Setting].
9 6. Click [WiFi Setup].7. Select [Search WiFi] in [WiFi Setup]. Select [Manual Setup] to specify an access point by manually specifying SSID, encryption method, and password. After specifying an access point manually, click [Apply] to establish a Select an access point from the pull-down list of [SSID].9. Enter the password to connect with the selected access point, and click [Apply]. If the [Key Index] setting is displayed, select the option corre-sponding to the SSID and entered password from the pull-down list. If the setting is modified, the authentication password entry screen appears after [Apply] is the administrator password (default password is 888888 . The password can be set from [Modify Password] in the [Setting] menu.), and click [Login].Restart the Printer to apply the modified setting to the Printer . If the computer is connected with the Printer via a Wi-Fi router, the connection is terminated after the access point change is applied to the Printer .
10 Connect the computer to the same ac-cess point to connect with the Printer via the Wi-Fi can now print files on the computer from the Printer via the Wi-Fi router by selecting Print from the File menu of applications or use the functions of RICOH Printer .3. Connecting with a Computer DirectlyThe Printer supports the Soft AP function that enables the Printer to act as an access point (virtual router).You can directly connect your computer with the Printer (without using a Wi-Fi router) using the Soft AP function. The Soft AP function is not supported for Mac WindowsEnabling the Soft AP function using the Power Key on the Printer1. Press and hold the power key to turn on the Press and hold the power key for 1 second or power indicator turns blue and the Wi-Fi function is ena-bled on the Press and hold the power key for 1 second or power indicator flashes twice and the Soft AP function is enabled on the Set papers on the Press the power key three times System Settings are printed out from the Confirm that the Soft AP function is enabled on the System Settings sheet.