Transcription of Winning Woodwinds! - Bandworld
1 Winning Woodwinds! Beginning Band Method book Supplement for: FLUTE by Catrina Tangchittsumran-Stumpf Practical Applications III in partial fulfillment of the degree requirements for a Master s of Music in Conducting from the American Band College of Sam Houston State University American Band College Master's Degree Project More info on ABC @ (541) 778-4880 American Band College Master's Degree Project More info on ABC @ (541) 778-4880 Winning WOODWINDS Table of Contents 2 Developing Proper Seated Posture .. 3 Developing Correct Breathing Habits .. 4-5 Parts of the Instrument .. 6 Forming the Embouchure .. 7-9 Weight Training for Your Lips: Chopsticks! .. 10 What if it Doesn t Sound Right? Common Problems & Solutions ..11-12 Parts of the Instrument & Instrument Instrument Care & Hand Position ..17-18 Developing Muscle Memory: Finger 19 Posture while Holding the Flute .. 20 Reading Treble Clef ..21-22 Reading Time Signature.
2 25-26 Putting it All Together (Reading & Playing Music) ..27-31 Flute Fingering Chart ..32-34 Treble Clef Flash Acknowledgements/About the Author .. 44 Works American Band College Master's Degree Project More info on ABC @ (541) 778-4880 American Band College Master's Degree Project More info on ABC @ (541) 778-4880 PAGE 2 Winning WOODWINDS: FLUTE Congratulations, you ve decided to play a woodwind instrument! This book will help guide you through the process of developing correct habits for posture, breathing, tone quality, and hand position. It will also give you information on how to take care of your instrument in order to keep it in good, working condition at all times. This book is designed to be a supplement to whatever method book your school band teacher or your private music instructor already uses. Remember that playing a musical instrument is a physical activity which requires you to use your facial (and other) muscles in a new and different way.
3 When you first start playing, you may only be able to practice for a few minutes at a time before you get tired. That s okay! Practicing on a daily basis will help you build your endurance and allow you to play with a better sound for a longer period of time. So even if you have trouble at the start, don t give up! Regardless of which woodwind instrument you choose to play, here is a list of items you will need in order to develop good playing habits: Your instrument & method book A music stand A small mirror (set on your music stand so you can see yourself in it.) A pencil (to mark down reminders!) A cleaning rod and handkerchief or a swab A polishing cloth for your instrument Appropriate reeds (for clarinet & bassoon) Recommended items: A metronome (a small device that you set to click and/or blink at a regular rate to make sure you don t speed up or slow down when you play. ) If you don't own a metronome, a free one is available online at A chromatic tuner (a small device that will tell you what note you are playing, and if the pitch is accurate.)
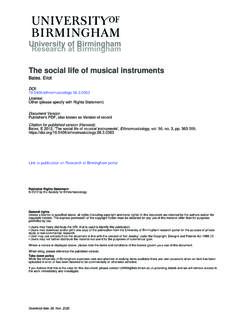
4 If you don t own a metronome but you have a computer with a microphone, a free chromatic tuner is available online at American Band College Master's Degree Project More info on ABC @ (541) 778-4880 PAGE 3 Winning WOODWINDS: FLUTE Developing Proper Seated Posture Before we start learning how to play our instrument, we need to first start to de-velop proper posture. Correct posture isn t just about looking professional while you play it helps you breathe better. This is important, since you have chosen to play a wind instrument! Imagine a garden hose that s turned on full blast. If you bend the hose, the flow of water will slow down or stop altogether. When you hunch over, you are put-ting a kink in your airway, which makes it more difficult to breathe in and out. Seated Posture 1. Sit on the front edge of your chair with your feet flat on the floor and spread shoulder width apart. Your weight should be distributed far enough forward that you can stand straight up without having to shift your weight first.
5 2. Push your spine slightly forward towards your navel until you are sitting up-right and tall. 3. Make sure your shoulders, arms and neck stay relaxed. You should be com-fortable enough to sit in this position for quite a while. Yes! Yes! No! Yes! American Band College Master's Degree Project More info on ABC @ (541) 778-4880 PAGE 4 Winning WOODWINDS: FLUTE Developing Correct Breathing Habits You may look at this section and think, What do I need to learn about breathing? I ve managed to live on this earth for years and have successfully inhaled and exhaled enough to still be here today! Playing a musical instrument requires you to use more air than you would normally use when you re just sitting around having a conversation with friends. It also means that you have to learn how to control the rate and speed of the air that you use. Developing good posture will help allow you to breathe in large amounts of air quickly.
6 Breathing Technique 1. Start by laying on the floor, flat on your back, with one hand on your stomach and the other hand on your upper chest. Relax and breathe naturally for a few minutes. You should notice that, when your body is relaxed, your abdomen expands first, and then your chest does when you inhale. As you exhale, your chest deflates first, then your abdomen. 2. Sit in your chair (while demonstrating proper posture.) Relax your shoulders and try to inhale and exhale in the same way that you did while you were lying on the floor filling your lungs all the way to the bottom first, then up to your chest before exhaling. Try and expand your ribs outwards until you feel like they can t expand any more before exhaling. If you are breathing properly and expanding your lungs, your shoulders should not move very much as you inhale and exhale. American Band College Master's Degree Project More info on ABC @ (541) 778-4880 PAGE 5 Winning WOODWINDS: FLUTE Checkpoint: Think about saying the word OH when you inhale and HO when you exhale.
7 If you are breathing correctly, you should feel cold air in your throat when you inhale and you should be able to blow warm air onto the palm of your hand when you exhale. 3. When you play a musical instrument, you need to be able to inhale so that your lungs are full in a short amount of time. Try the following exercise to help you breathe in more quickly: Turn your metronome on to 60 beats per minute (mm=60) Inhale for 4 beats, then exhale for four beats; make sure that the air is either constantly moving in or out; you should never stop and hold your breath in this exercise. Inhale the same amount of air over the course of 3 beats and exhale over the course of 5 beats. You may need to add pressure from your stomach muscles to keep the air moving as you exhale. (Imagine blowing out a birthday cake with 1,000 candles on it you ll use those same muscles!) Inhale for 2 beats and exhale for 6; then inhale for 1 beat and exhale for 8.
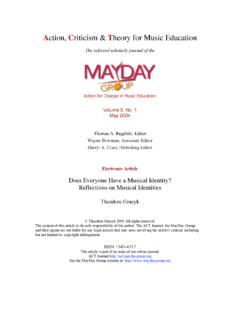
8 Important! If you start feeling light-headed during these exercises, STOP, lean over to rest your head between your knees, and breathe naturally for a few minutes until you feel well again! This is perfectly nor-mal when you start a wind instrument! American Band College Master's Degree Project More info on ABC @ (541) 778-4880 PAGE 6 Winning WOODWINDS: FLUTE Parts of the Instrument Before you get started, ask your music teacher to help you put a mark on your case to help you identify which side is the TOP and which side is the BOTTOM. (As a general rules, the latches flip UP to open on most cases.) Put your instrument case on the floor and open the latches. Always leave your case on the floor if you attempt to assemble your instrument with your case on your lap, you could drop it! When you open your case, this is what you should see: For right now, all you will need to get started is the head joint. Take it out of the case, then close and latch your case and leave it on the floor.
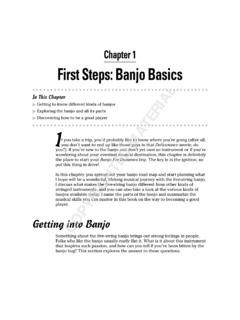
9 A-flat key (points towards the center of the case.) Tenon Keys BODY HEAD JOINT Crown Embouchure Hole FOOT JOINT Tenon Barrel Lip Plate E-flat key Rod Rod American Band College Master's Degree Project More info on ABC @ (541) 778-4880 PAGE 7 Winning WOODWINDS: FLUTE Forming the Embouchure Embouchure (pronounced AHM-buh-shur) is the term for the way you form your lips and facial muscles in order to play a wind instrument. The term comes from the French word bouche (pronounced boosh) which means mouth. Materials you may want to have nearby to help in this section: Your flute head joint A small handful of uncooked rice (20 grains) A mirror Step 1: Spitting Rice (Note: It s probably best to do this activity outside.) Sit or stand up straight. If you are standing, your weight should be distributed evenly over both legs, you should be standing tall (pushing your spine slightly towards your belly button), your shoulders and head should be relaxed and balanced.
10 Put a single grain of rice in between the center of your lips. Look straight ahead and use your tongue to try and launch (spit) the piece of rice off of your top of your lip at a 45 degree angle away from your body. Your tongue should touch the spot where your upper teeth and your upper lip meet. Practice this several times until you can do it consistently. Step 2: See Sue Too Sit or stand with good posture. Look in the mirror and say the word See the corners of your lips should pull back slightly. If you d like, make a V with your index and middle fingers and place them at the corner of your mouth as a reminder to American Band College Master's Degree Project More info on ABC @ (541) 778-4880 PAGE 8 Winning WOODWINDS: FLUTE keep your corners in place. There should still be space between your molars (your back teeth.) While saying see, add the word sue, and then the word too (exhaling at a 45 degree angle, just like you did when you were spitting rice.)