Transcription of Wireless Weather Station Instruction Manual Page
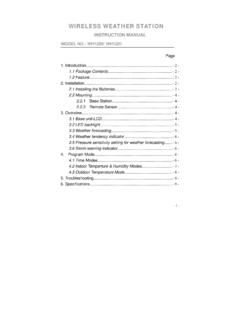
1 - - Wireless Weather StationInstruction Manual Page . Introduction ..22. Inventory of contents ..2 Feature of the base Station ..2 Feature of wind sensor ..2 Feature of rain sensor ..33. Set up guide ..33. Battery install ..3 Mounting ..64. LCD overview ..84. LCD overview .. Weather forecasting .. Weather forecast tendency indicator .. Storm warning indicator .. 05. Program modes .. 5. Quick display mode .. Setting mode .. History mode .. Alarm mode .. Min/Max mode .. 56. Problems and interference with 67. Specification .. 7 This Operation Manual is part of this product and should be kept in a safe place for future reference.
2 It contains important notes on setup and . Introduction Thank you for purchasing this Professional Weather Center Designed for everyday use, the Weather Station will prove to be an asset of great value for your personal use in the home or office. Please read this Instruction Manual thoroughly to fully understand the correct operation of your Weather Station and benefit from its unique Inventory of contents1) Base station2) WH1 sensor including thermo-hygro sensor, rain sensor, wind sensor3) Instruction Manual 4)2 adjustable hoops (to fix the mast to your desired location)The received data is continuously updated to bring you the latest Weather information on the base Station s LCD.
3 The outdoor thermo-hygro sensors is the main data communication unit since both the wind and rain sensors are connected to the thermo-hygro sensor for operating power and rely on it to communicate to the base Station . Weather data sent from the thermo-hygro sensor is transmitted through Wireless equipment (not included)1. 3 Fresh AA LR6 Alkaline 2 Fresh AA LR6 Alkaline of the base Station : Indoor and outdoor temperature display in degrees Fahrenheit or Celsius (user selectable) Indoor and outdoor relative humidity displays Barometric pressure reading in inHg or hPa, absolute or relative (user selectable) Detailed display of rainfall data in 1 hour, 24 hours, one week, one month and total since last reset.
4 (user selectable in mm or inch) Wind speed in mph, km/h, m/s, knots or Beaufort (user selectable) Wind chill temperature display Dew point temperature display-3- Weather forecast display by Weather icons (sunny, cloudy, rainy) Weather forecast tendency arrow Storm warning alarm Display of extensive Weather data, in all cases with programmable alarm functions for certain Weather conditions as well as records of all minimum and maximum values along with time and date of their recordings Supper bright green LED back light DCF Radio controlled time and date with Manual setting option 12 or 24 hour time display Perpetual calendar Time zone setting Automatic daylight saving time function based on Germany DST system ( for those users using the clock outside the time zone of Germany, the DST automatic change time will be delayed or triggered earlier according to the time zone difference accordingly)
5 Wall hanging or free standing Synchronized instant reception for outdoor Weather data as well as radio controlled time signalFeatures of wind sensorThe wind sensor measures wind speed and sends the data to thermo-hygro sensor, which in turn transmits the data to the base of rain sensorThe rain sensor measures the rainfall and sends the data to thermo-hygro sensor, which in turn transmits the data to the base Station . Operating power is taken from the thermo-hygro sensor by a cable connection3. Set up Guide3. Battery install-4- Note: To avoid operating problems, please take note of battery polarity before/when inserting any Alkaline Batteries. Use good quality Alkaline Batteries and avoid rechargeable batteries.
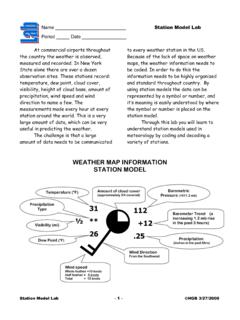
6 Since the radio controlled time receiver is built inside the sensor, please do not put the sensor close to area with mass metal or obvious shielding objects )Pull away the shower proof casing of the thermo-hygro sensor to reveal the two sockets (for the wind sensor and rain sensor)2)Connect the attached cables of wind and rain sensors to the corresponding sockets of the thermo-hygro sensor by clicking them into place. Make sure that rain and wind sockets not swapped when plugging the phone )Open the base Station s battery cover located at the back of the unit and insert 3 x AA, Alkaline batteries into the battery compartment and close the battery cover4)Open the battery cover of the thermo-hygro sensor located below the two sockets and insert 2 x AA, Alkaline batteries and close the coverEvery time the thermo-hygro sensor is powered up (for example after a change of batteries), the LED indicator will light up for 4 seconds (if no LED light up or is lighted permanently, make sure the battery is inserted the correct way or a proper reset is happened).
7 After the thermo-hygro sensor is powered up, the sensor will transmit Weather LED Indicator Sensor Sockets Battery Compartment Battery cover Thermo-hygro Sensor Setting up using batteries-5-data for 24s, and then the sensor will start radio controlled time reception. During the RCC time reception period (maximum 5 minutes), no Weather data will be transmitted. The LED indicator will be blinking 5 times once RCC signal was synchronized and the LED indicator will not light during any future regular RCC reception routines. Regular RF link will be established once RCC reception routine is the base Station is powered up, a short beep will sound and all LCD segments will light up for about 3 seconds before it enters into learning mode to learn the sensors security code.
8 Note: DO NOT PRESS ANY KEY during the first 10 minutes learning period or before radio controlled time is displayed on the receiver. After both outdoor Weather data and radio controlled time are displayed you can place your remote sensor outdoors and set your time (if no RCC reception is possible). If there is no temperature reading in the indoor Station , make sure the units are within range of each other or repeat the battery installation procedure. If a key is pressed before the Weather Station receives the temperature signal, you will need to follow the battery installation procedure again. Please wait minimum 0seconds before re-insert the battery again to make a proper reset for both transmitter and : If a battery change on the transmitter side happened, the base Station will be resynchronized to the transmitter again within the next 3 hours.
9 If you want to shorten the receiving data time, the base Station has to re-install the battery so that it can have the new security code learnt right way, but the previous Weather data and alarm value settings in base Station will be for Radio Controlled Time DCF:The time and date display is based on the signal provided by the highly accurate government operated atomic clock. The outdoor sensor will continue to scan for the radio controlled time signal each day despite it being manually set. If reception has been unsuccessful, then the radio controlled time icon will not appear but reception will still be attempted continually. If reception has been successful, the received time and date will overwrite the manually set time and : When batteries require replacement for the base Station , the low battery indicator will light up on the LCD.
10 Please participate in the preservation of the environment by properly disposing of all used-up batteries and accumulators at designated disposal points. Never dispose of batteries in a fire as this may cause explosion, risk of fire or leakage of dangerous chemicals and fumes Mounting1) Base stationWith one foldable leg at the back of the unit, the base Station can be placed onto any flat surface or wall mounted at the desired location by the hanging holes also at the back of the unit. It is important to check that outdoor sensor data can be received before permanently mounting any of the units2) Remote sensorFor accurate results, the remote sensor mast should be securely mounted onto a horizontal surface and in an open area away from trees or other coverings where rainfall or wind speed may be reduced causing inaccurate readinga).