Transcription of Wiring Harness Installation Instructions - PIAA
1 You very much for purchasing a PIAA read this entire manual before Installation and use of this Harness Installation InstructionsPlease give this Installation Manual to customer after Installers Lighting laws vary state to state, check your local laws before use. Do not splash water directly on the hot lamps, as this may cause cracking of the lens due to dramatic change in temperature. The lamps and relay Harness are to be used only with 12 volt electrical systems. Using this light system while the engine is not running will drain the battery. Do not repeatedly turn the light system on and off as it will shorten the life of the system.
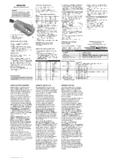
2 Some vehicles generate high voltage at start up and when it is turned off, do not have lights on as you start or turn off your vehicle. Using the wrong bulbs may cause a malfunction, use only specified PIAA bulbs. Leave at least 1/8 clearance between the lamps and any plastic surface as the heat may damage the connecting the wires on the Harness , follow the Wiring diagram and connect them as in the Route wires from lamp(s) to battery or lighting coil under the gas tank or other protected area. Make sure wires are clear of sharp edges, hot surfaces and any moving parts. CAUTION: If lamps are mounted on handlebars, fork legs or other moving surfaces, make sure there is enough wire length for a full range of Connect lamp wire connector(s) to Wiring Harness connector(s).
3 3. Connect black ground Wiring Harness ring terminal to negative (-) battery terminal. If no battery, connect ground to an engine frame Connect white Wiring Harness ring terminal to positive (+) battery terminal. If no battery, connect to positive lighting coil Attach switch so it can be conveniently accessed and secure lead wire with wire ties. If mounted on the handlebars, route wire near the pivot and check full range of The switch power lead controls when both the switch and lights can be operated. Choose the best option to connect the switch power lead from the following: A. Connect to ignition switch positive wire. Lights will operate anytime ignition is Connect to high beam positive wire.
4 Lights will only operate on high beam. Recommended for long range driving lights. Required by some state laws for highway Connect to low beam positive wire. Lights will only operate on low beam. Recommended for all weather and fog lights. Required by some state laws for highway Connect to battery or lighting coil positive. Lights will operate anytime with battery and anytime engine is running with the lighting coil. CAUTION: Direct battery connection has a higher risk of running the battery control positive (+)to lampsto lampswhitefuseblackbatterypositive (+)batterynegative (-) the exception of bulbs, PIAA Corporation, USA ("PIAA") warrants its products to be free from defects in workmanship and materials under normal use for as long as the original purchaser owns Limited Warranty specifically excludes defects resulting from misuse, abuse, neglect, alteration, modification, improper Installation , unauthorized repairs, submersion, theft, vehicle crash, or by any other type of impact.
5 Except for the Limited Warranty stated above, there are no warranties of PIAA products or any part thereof, whether express or implied. Any implied warranty of merchantability or any warranty of fitness for a particular purpose is expressly disclaimed. Some states do not permit the disclaimer of implied CRACKSC rash or impact damage is not covered. This can be determined by a chip or scrape on the lens or the housing. Stress cracks sometimes occur when the lens is subjected to sudden and extreme temperature changes. A stress crack has no chip or other sign of impact. Stress cracks are covered under OF DAMAGESIn no event shall PIAA be liable for any damages whatsoever (including, without limitation, consequential damages, incidental damages, or damages for loss of use, loss of business profits, business interruption, loss of business information, loss of time, inconvenience, or other losses) arising out of the use, misuse, or inability to use a PIAA product.
6 PIAA reserves the right to change the design its products without any obligation to modify any previous product. This warranty gives you specific legal rights. You may also have other rights that vary from state to AND REPLACEMENTIf a PIAA product is suspected of being defective, it must be submitted freight prepaid, to either an authorized dealer or distributor for warranty inspection. The receipt or other proof of purchase and a description of the problem must be included. The returned product will be inspected. If the product is found to be defective and covered by this Limited Warranty, the sole remedy is repair or replacement, at PIAA's option.
7 A repaired or replacement product will be shipped back at no charge, and will be warranted to be free from defects in workmanship and materials under normal use for as long as the original purchaser owns it. Removal, Installation , or reinstallation costs are not covered by this Limited vous remercions d avoir achet un produit lire l int gralit de ce manuel avant d installer et d utiliser ce de Instructions d installationVeuillez donner ce manuel d Installation au client apr s l installateurs Les lois sur l clairage varient d une juridiction l autre; s informer des lois locales en vigueur avant d utiliser.
8 Ne pas verser de l eau directement sur des phares chauds, ce qui occasionnerait un brusque changement de temp rature et pourrait fendre la lentille. Utiliser les phares et faisceaux de relais seulement avec des syst mes lectriques de 12 volts. L utilisation de ce syst me de phares lorsque le moteur est l arr t risque d puiser la batterie. Ne pas activer / d sactiver de fa on r p titive le syst me de phares pour viter de r duire sa dur e de vie utile. Certains v hicules produisent une forte tension au d marrage et l arr t dumoteur; ne pas allumer les phares au d marrage ou l arr t du moteur. L utilisation d ampoules inad quates peut entra ner une d faillance; utiliser seulement les ampoules PIAA.
9 Laisser un d gagement d au moins 3 mm (1/8 po) entre l ampoule et la surface en plastique, car la chaleur pourrait endommager le DU FAISCEAU1. Avant de connecter un fil quelconque, d brancher la borne n gative (-) de la batterie. Lors de la connexion des fils sur le faisceau, suivre le sch ma de c blage pour les pour assurer un fonctionnement correct des phares, il est recommand de connecter les fils d alimentation lectrique positif (+) et n gatif (-) directement aux bornes correspondantes de la pas brancher l alimentation directement sur l Identifier une source d alimentation pour y brancher le fil d alimentation. pour uneutilisation l gale des phares auxiliaires, la source d alimentation doit tre aliment e seulement lorsque les feux de route des phares principaux sont allum s.
10 pour effectuer cette connexion, utiliser le connecteur fourni ou tout connecteur qui convient cette pas connecter les lumi res aux feux clignotants pour le virage ou d autres lumi res Lorsque les fils sont achemin s dans le compartiment moteur, s assurer de les garder bonne distance des pi ces mobiles comme le c ble d acc l ration, et bonne distance des pi ces chaudes comme le collecteur de gaz d Une fois le filage termin , v rifier le fonctionnement du syst me en l activant. Si le syst me fonctionne, fixer solidement les bo tes de relais et les porte-fusibles ou les attacher distance avec des fils. Si le syst me ne s active pas, veuillez contacter votre d taillant PIAA pour obtenir de l MA DE C BLAGEON/OFFcommutateurrelaisbatteriecomm ande de commutateur positif (+)vers les pharesvers les pharesblancfusiblenoirbatteriepositif (+)batterien gatif (-)Hormis les ampoules, PIAA Corporation, USA ("PIAA")