Transcription of Word 2010: Working with Sections and Page Numbering
1 Handout Word 2010: Sections & Page Numbering (Topics came directly from Microsoft Word 2010 Help) ICT Training, Maxwell School of Syracuse University Page 1 Word 2010: Working with Sections and Page Numbering Table of contents SECTION BREAKS .. 2 TYPES OF SECTION BREAKS THAT YOU CAN INSERT .. 2 SECTION BREAK EXAMPLES .. 3 INSERT A SECTION 3 Remove changes of the document layout .. 3 Use portrait and landscape orientation in the same document .. 4 VARYING YOUR HEADERS AND FOOTERS .. 4 HOW Sections ARE SHOWN IN HEADERS AND FOOTERS .. 4 CREATE UNIQUE TEXT IN A HEADER .. 5 Create a different first page .. 6 Different headers and footers for odd and even pages .. 6 ADD A PAGE NUMBER TO AN EXISTING HEADER OR FOOTER .. 6 Add header or footer content to a preformatted page number design .. 7 Place the page number in the side margin of the page .. 7 TIPS FOR Working WITH DIFFERENT HEADERS AND FOOTERS.
2 7 CONTROL WHERE PAGE Numbering STARTS .. 8 INSERT PAGE Numbering .. 8 REMOVE PAGE NUMBERS .. 8 Remove a page number when the page number is the only content in the header or footer .. 9 Remove a page number, but leave the rest of the header or footer in place .. 9 REMOVE THE PAGE NUMBER FROM THE FIRST PAGE .. 9 START Numbering ON THE SECOND PAGE WITH 2 .. 9 Documents that do not yet use page numbers .. 9 Documents that already use page numbers .. 10 START Numbering ON THE SECOND PAGE WITH 1 .. 10 Documents that do not yet use page numbers .. 10 Documents that already use page numbers .. 10 START Numbering AFTER THE SECOND PAGE .. 10 RESTART FOOTNOTE OR ENDNOTE Numbering FROM 1 .. 11 CONTROL THE Numbering FORMAT .. 11 Change the page-number format .. 11 Format page numbers differently in different Sections of a document .. 11 CREATE NEWSLETTER COLUMNS .. 12 FORMAT A DOCUMENT WITH NEWSLETTER COLUMNS.
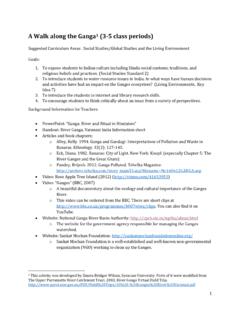
3 12 Add newsletter columns to part of a document .. 12 Handout Word 2010: Sections & Page Numbering (Topics came directly from Microsoft Word 2010 Help) ICT Training, Maxwell School of Syracuse University Page 2 Section breaks You can use section breaks to change the layout or formatting of a page or pages in your document. For example, you can lay out part of a single-column page as two columns. You can separate the chapters in your document so that the page Numbering for each chapter begins at 1. You can also create a different header or footer for a section of your document. Section formatted as a single column Section formatted as two columns If your document has several parts to it, and you want unique headers and footers for each part, the first thing you need to do is to create section breaks between the document's parts. A section break enables you to create a unique page layout for the pages in that section.
4 With the unique layout established, you can set up the headers and footers the way you want them for that section. Types of section breaks that you can insert Section breaks are used to create layout or formatting changes in a portion of a document. You can change the following formats for individual Sections : Margins Paper size or orientation Paper source for a printer Page borders Vertical alignment of text on a page Headers and footers Columns Page Numbering Line Numbering Footnotes and endnotes Notes: A section break controls the section formatting of the text that precedes it. When you delete a section break, you also delete the section formatting for the text before the break. That text becomes part of the following section, and it assumes the formatting of that section. For example, if you separate the chapters of a document by using section breaks and then you delete the section break at the beginning of Chapter 2, Chapter 1 and Chapter 2 are in the same section and assume the formatting that previously was used only by Chapter 2.
5 The section break that controls the formatting of the last part of your document is not shown as part of the document. To change the document formatting, click in the last paragraph of the document. Handout Word 2010: Sections & Page Numbering (Topics came directly from Microsoft Word 2010 Help) ICT Training, Maxwell School of Syracuse University Page 3 Section break examples The following examples show the types of section breaks that you can insert. (In each illustration, the double dotted line represents a section break.) The Next Page command inserts a section break and starts the new section on the next page. This type of section break is especially useful for starting new chapters in a document. The Continuous command inserts a section break and starts the new section on the same page. A continuous section break is useful for creating a formatting change, such as a different number of columns, on a page.
6 The Even Page or Odd Page command inserts a section break and starts the new section on the next even-numbered or odd-numbered page. If you want document chapters always to begin on an odd page or on an even page, use the Odd page or Even page section break option. Insert a section break 1) On the Page Layout tab, in the Page Setup group, click Breaks. 2) Click the type of section break that you want to use. Note: The actual section breaks in the document don't show automatically. You can expose them in Print Layout view, with the header and footer workspace turned off, by clicking the Show/Hide button on the Home tab. You can also see them in Draft view. Remove changes of the document layout A section break defines where a formatting change occurs in the document. When you delete a section break, you also delete the section formatting for the text before the break. That text becomes part of the following section, and it assumes the formatting of that section.
7 Make sure that you're in Draft view so that you can see the double dotted line section break (or, display the Show/Hide button while in Print Layout view). 1) Select the section break that you want to delete. 2) Press DELETE. Handout Word 2010: Sections & Page Numbering (Topics came directly from Microsoft Word 2010 Help) ICT Training, Maxwell School of Syracuse University Page 4 Use portrait and landscape orientation in the same document 1) Select the pages or paragraphs that you want to change to portrait or landscape orientation. Note: If you select some but not all of the text on a page to change to portrait or landscape orientation, Word places the selected text on its own page, and the surrounding text on separate pages. 2) On the Page Layout tab, in the Page Setup group, click Margins. 3) Click Custom Margins. a) On the Margins tab, click Portrait or Landscape.
8 B) In the Apply to list, click Selected text. Note: Microsoft Word automatically inserts section breaks before and after the text that has the new page orientation. If your document is already divided into Sections , you can click in a section (or select multiple Sections ), and then change the orientation for only the Sections that you select. Varying your headers and footers You have a multipart document, and you want to create headers and footers that go with each part. The picture shows examples of how you might want the headers and footers to differ to fit parts of the document. For the cover page, you may want no page numbers at all, or any other header or footer text. For front matter, such as the table of contents, headers and footers should reflect that this part is not yet the body of the document. For chapters, headers can serve effectively as signposts to readers, reminding them of which chapter they're in and who wrote it.
9 You already know that the handy quality of headers and footers is that you can apply one once and have it appear everywhere. But for the multipart document, you need more control. How Sections are shown in headers and footers When you open the header and footer workspace, markers appear there that define the Sections and keep you oriented. As the picture shows, the header and footer areas indicate the Sections and give each a number. This footer is at the end of section 1. The header below is at the start of section 2. And you'll notice another tab: Same as Previous. The section break means that what comes before it is one section, and what's after it is another section. So, with the section break inserted before chapter 1, all the front matter the cover page, table of contents, list of illustrations, and so on becomes section 1, and all the chapters become section 2.
10 (This assumes that all pages and chapters are in one document.) Though you've created distinct Sections in the document, Word still gives you the option of having header and footer content carry over between Sections . In the illustration, the Same as Previous tab on the header's dotted Handout Word 2010: Sections & Page Numbering (Topics came directly from Microsoft Word 2010 Help) ICT Training, Maxwell School of Syracuse University Page 5 line means that header content for the new section is linked to header content in the preceding section. If you want the headers in the new section to be unique, you have to break the link to the earlier section. The same will be true for all the footers in the new section. They'll carry over footer content from the previous section unless you break the link in the footer. Create unique text in a header 1) Place the insertion point in the header you want to break the link for.