Transcription of WS-300M WS-310M WS-320M Instructions EN - Olympus Corporation
1 DIGITAL VOICERECORDERWS-320 MWS-310 MWS-300 MThank you for purchasing an OlympusDigital Voice read these Instructions for informationabout using the product correctly and the Instructions handy for future ensure successful recordings, we recommend thatyou test the record function and volume before Instructions EN2 Table of ContentsTable of Contents .. 2 Safe and Proper Usage .. 4 General Precautions .. 41 Getting StartedMain Features .. 6 Identification of Parts .. 8 Inserting Battery .. 10 Power Supply .. 11 Setting Time/Date (Time&Date) .. 12 Switching Between the Voice Recorder andMusic Player .. 142 When Using the Recorder as aVoice 15 Using the Variable ControlVoice Actuator (VCVA) .. 18 Recording Modes (Rec Mode) .. 20 Microphone Sensitivity (Mic Sense) .. 21 Recording from External Microphoneor Other Devices .. 22 Playing .. 24 Continuous Playback (All Play) .. 28 Repeat Playback.
2 29 Auto Backspace Review (Back Space) .. 31 Index Marks .. 32 Locking Files (Lock) .. 34 LCD Display Information .. 36 Menu List (VOICE mode) .. 383 Using the Recorder on Your PCSaving Files in Your PC .. 40 Operating Environment .. 41 Connecting to Your PC .. 424 Using the Recorder as aMusic PlayerUsing the Recorder as a Music Player .. 44 Using Windows Media Player .. 44 Window Names .. 45 Copying Music from CD .. 47 Transferring Music File to the Recorder .. 48 About the Music Folders .. 513 Music Playback .. 53 Selecting Play Mode (Play Mode) .. 58 Repeat Playback (Repeat) .. 59 Random Playback (Random) .. 60 Increasing the WOW Effect (WOW) .. 61 Selecting Equalizer (EQ) .. 63 Moving the Tracks (Move) .. 66 Menu List (MUSIC mode) .. 685 Feature Common to the VoiceRecorder and Music 73 Menu Setting Method .. 74 System Sounds (Beep) .. 76 Backlight (Backlight) .. 77 LCD Contrast Adjustment (Contrast).
3 78 Formatting the Recorder (Format) .. 7912345676 Other Practical Use MethodsUsing as External Memory of the Computer .. 817 Other InformationAlarm Message List .. 82 Troubleshooting .. 83 Accessories (optional) .. 85 Technical Assistance and Support .. 874 Safe and ProperUsageBefore using your new recorder, read thismanual carefully to ensure that you knowhow to operate it safely and correctly. Keepthis manual in an easily accessiblelocation for future reference. The warning symbols indicate important safetyrelated information. To protect yourself and othersfrom personal injury or damage to property, it isessential that you always read the warnings andinformation Precautions Do not leave the recorder in hot,humid locations such as inside aclosed automobile under directsunlight or on the beach in thesummer. Do not store the recorder in placesexposed to excessive moisture ordust.
4 Do not use organic solvents such asalcohol and lacquer thinner to cleanthe unit. Do not place the recorder on top ofor near electric appliances such asTVs or refrigerators. Avoid recording or playing back nearcellular phones or other wirelessequipment, as they may causeinterference and noise. If youexperience noise, move to anotherplace, or move the recorder furtheraway from such equipment. Avoid sand or dirt. These can causeirreparable damage. Avoid strong vibrations or shocks. Do not disassemble, repair or modifythe unit Warning Battery should never be exposed toflame, heated, short-circuited ordisassembled. Do not attempt to recharge alkaline,lithium or any other non-rechargeablebattery. Never use any battery with a torn orcracked outer cover. Keep battery out of the reach ofchildren. If you notice anything unusual whenusing this product such as abnormalnoise, heat, smoke, or a burning the battery immediately whilebeing careful not to be your dealer or local Olympusrepresentative for service.
5 Do not operate the unit whileoperating a vehicle (such as a bicycle,motorcycle, or car). Keep the unit out of the reach ofchildren.<Warning regarding data loss>Recorded content in memory may bedestroyed or erased by operatingmistakes, unit malfunction, or duringrepair is recommended to back up and saveimportant content to other media such asa computer hard Features of the DigitalVoice Recorder The recorder stores highly compressedWMA format voice messages in integratedflash memory. ( ) By using the built-in stereo microphone, a stereorecording mode, which is ST HQ (Stereo HighQuality), and 3 types of monaural recordingmodes, which are HQ (High Quality), SP(Standard Playback), and LP (Long Playback)can be selected. ( )Recording time WS-320M (1 GB)*1ST HQ mode:35 hours 25 minutesHQ mode:70 hours 50 minutesSP mode:139 hours 30 minutesLP mode:277 hours 20 minutes WS-310M (512 MB)*1ST HQ mode:17 hours 40 minutesHQ mode:35 hours 20 minutesSP mode:69 hours 30 minutesLP mode:138 hours 15 minutes WS-300M (256 MB)*1ST HQ mode:8 hours 45 minutesHQ mode:17 hours 30 minutesSP mode:34 hours 35 minutesLP mode:68 hours 45 minutesThis product is equipped with the followingfeatures.
6 Dual function recorder as a Digital VoiceRecorder and a Digital Music Player.( ,44) Connecting this recorder directly to theUSB port links up with your PC. The datacan be transferred or saved without USBcable or driver software. ( ) This USB storage class support recordercan be utilized as external memory to readand save the data. ( ) By connecting the computer with the USB,pictures, text data, etc. can be saved, andutilized to carry data. It has a backlight full-dot display (LCDdisplay screen). ( )1 Getting StartedMain FeaturesMain Features71 Main Features The five folders can hold 199 files each,for the maximum of 995 recordings.( ) It has a built-in Variable Control VoiceActuator (VCVA) function. ( ) You can insert or delete index marks.*2( ) The playback speed can be controlled aspreferred. ( )Main Features of the DigitalMusic Player You can play back music files in WMA andMP3 format.
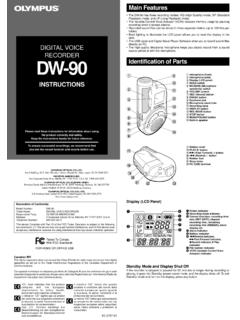
7 ( )Playback timeWS-320M (1 GB):13 hours 20minutes to45hours 20 minutesWS-310M (512 MB): 6 hours 40minutes to22hours 40 minutesWS-300M (256 MB): 3 hours 20minutes to11hours 20 minutes Has built-in WOW. ( ) You can change the playback equalizersettings. ( )*1 Available recording time may be shorter if manyshort recordings are made. (The displayedavailable recording time and recorded time areapproximate indications.)*2 For WMA files, these functions are onlyavailable for files recorded with this recorderor the IC recorders from and PC/AT are the trademarks or registeredtrademarks of International Business , Windows and Windows Media areregistered trademarks of Microsoft , SRS and symbol are trademarks of SRSLabs, technology is incorporated under license fromSRS Labs, Layer-3 audio coding technology licensedfrom Fraunhofer IIS and product and brand names mentioned hereinmay be the trademarks or registered trademarks oftheir respective (Earphone) jack2 MIC (Microphone) jack3 Built-in stereo microphone (R)4 REC (Record) button5 STOP button6 PLAY button7 Built-in speaker8 USB terminal9 VOL (+) button09 button!
8 VOL ( ) button@ FOLDER/INDEX button#ERASE button$OK button%0 button^Display (LCD panel)&Built-in stereo microphone (L)*Record/Play indicator light(Strap hole)USB access indicator light-HOLD switch=Mode (VOICE/MUSIC) switchqBattery coverwRELEASE (Release) buttonIdentification of PartsIdentification of Parts456783^&*12)(-=wq%$#0!@9 Main unitBattery compartment911 Folder indicator2 Battery indicator3 Microphone sensitivity indicator4 VCVA (Variable Control VoiceActuator) indicator5 Stereo indicator6 Memory remaining indicator (E/F bar)7 Record mode indicator8 Erase lock indicator9 Total number of recorded files inthe folderIdentification of PartsDisplay (LCD Panel)VOICE mode displayMUSIC mode displayThe display appears when display appears when indicating a file number!Character information display@Folder name indicator#Title and artist name indicator$Play position bar indicator%Current music file number^Total number of recorded musicfiles in the folder&Character information display10132 Inserting Battery1 Lightly press down on the arrow and slide the batterycover size-AAA alkaline battery, observing the the battery cover the BatteryThe battery indicator on the display changes as the battery losespower.
9 When appears on the display, replace the battery as soon the battery is too weak, the recorder shuts down and BatteryLow appears on the display. AAA alkaline battery is Be sure to stop the recorder before replacing the battery. Unloading the battery while the recorder is in usemay corrupt the file. If you are recording into a file and the battery runs out, you will lose your currentlyrecorded file because the file header will not be able to close. It is crucial to change the battery once yousee only one hash mark in the battery indicator. If it takes longer than 1 hour to replace the dead battery, you may have to reset the time when you load afresh battery ( ). Remove the battery if you are not going to use the recorder for an extended period of BatteryAn optional Ni-MH rechargeable battery from Olympus can beused for the recorder ( ).Ni-MH Rechargeable Battery111 Power SupplyWhen the recorder is not used, setting it to HOLD turns off the recorder, suppressing theconsumption of the battery to a if the power is turned off, the existing data, settings of each mode, and clock setting will bemaintained.
10 To turn the power on, cancel the HOLD Off the PowerMove the HOLD switch to theHOLD position while the recorderis not in Hold is displayed, flashing for2 seconds, the display will turn On the PowerRelease the HOLD switch of SupplyIf the recorder is stopped/not used for over 5 minutes after it is turned on, it goes into standby(power-save) mode, and the display shuts off. To exit standby mode and turn on the display,press any Mode and Display Shut Off121If you set the date and time beforehand, the information when the file is recorded is automaticallystored for each file. Setting the date and time beforehand enables easier file Time/Date (Time&Date)Setting Time/Date (Time&Date)1 Press the 9 or 0 button toselect the item to the item from hour , minute , year month and day with a flashing the + or button to the same steps by pressing the 9or 0 button to select the next item, andpress the + or button to the OK button to completethe setup clock will start from the set date andtime.