Transcription of Yakima Roof Racks Installation Instructions
1 RailGrab Tower (4x). SMALL CLAW. (PRE-INSTALLED) (4x). LARGE CLAW (4x). END CAP (4x). Medium CLAW (4x). Note: Railgrab is sold in 2 packs and 4 packs. If you have purchased a 2 pack RailGrab the quantities listed above will be two of each component rather than four of each component. IMPORTANT WARNING. IT IS CRITICAL THAT ALL Yakima Racks AND ACCESSORIES BE PROPERLY AND SECURELY ATTACHED TO YOUR VEHICLE. IMPROPER. ATTACHMENT COULD RESULT IN AN AUTOMOBILE ACCIDENT, AND COULD CAUSE SERIOUS BODILY INJURY OR DEATH TO YOU OR. TO OTHERS. YOU ARE RESPONSIBLE FOR securing THE Racks AND ACCESSORIES TO YOUR CAR, CHECKING THE ATTACHMENTS. PRIOR TO USE, AND PERIODICALLY INSPECTING THE PRODUCTS FOR ADJUSTMENT, WEAR, AND DAMAGE. THEREFORE, YOU MUST READ AND. UNDERSTAND ALL OF THE Instructions AND CAUTIONS SUPPLIED WITH YOUR Yakima PRODUCT PRIOR TO Installation OR USE.
2 IF YOU. DO NOT UNDERSTAND ALL OF THE Instructions AND CAUTIONS, OR IF YOU HAVE NO MECHANICAL EXPERIENCE AND ARE NOT THOROUGHLY. FAMILIAR WITH THE Installation PROCEDURES, YOU SHOULD HAVE THE PRODUCT INSTALLED BY A PROFESSIONAL INSTALLER. Install first Determine Install second set Overview Claw Set Up set of towers crossbar spread of towers YOU. ARE. HERE. READ THROUGH THIS ENTIRE INSTRUCTION Familiarize yourself with these concepts and terms, BEFORE BEGINNING Installation ! and Installation will be a snap. Throughout this This product is the base for everything you'll do document a time line will show you where you're at with your rack, we want to help you get this right. in the process. Notice the time line at the top of the next page and throughout these Instructions . There are two basic types of factory rails, Raised Rails, and Flush Rails.
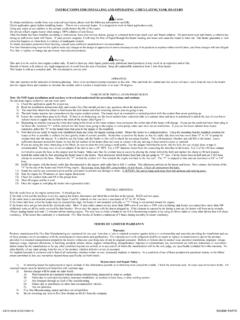
3 Raised rails flush rails FACTORY RAILS. Raised rails are raised up off of the vehicle's roof. Flush rails are flush with the vehicle's roof. = cross-section view Factory rails come in many different shapes. Some rails have a notch in them. Other rails have a slot in them. cross-section cross-section cross-section cross-section cross-section with a notch with a notch with a slot Install first Determine Install second set Overview Claw Set Up set of towers crossbar spread of towers YOU. ARE. HERE. ANATOMY OF THE RAILGRAB. CLAW BASE. INTEGRATED ASSEMBLY DEVICE. CLAW. ADJUSTER. BAR TIGHTENER. CLAW (SMALL) TOWER (SILVER). CLAW (MEDIUM). CLAW TIGHTENER. (BLACK). CLAW (LARGE) PAD. RAILGRAB CLAWS. For most vehicles the pre-installed small claw will be the correct choice. However some vehicles will require the medium claw and for oversized factory rails the large claw must be used.
4 SMALL CLAW Small claw installed. For factory rail heights less than 1-1/16" (27 mm)*. MEDIUM CLAW Medium claw installed. For factory rail heights between 1 -1/16" (27 mm) to 1 3/4" ( mm)*. LARGE CLAW Large claw installed. For larger or odd shaped rails*. * Some rail shapes may require a different claw size than what is noted here. SPECIALTY CLAWS. Some vehicles require specialty claws designed specifically to fit them. Install first Determine Install second set Overview Claw Set Up set of towers crossbar spread of towers YOU. ARE. HERE. Choose your claw based on your rail type. A LOOK AT RAIL B CHOOSE CLAW TOWER FIT EXAMPLE. Switching claws. A B C D. 1033604D-4/27. Install first Determine Install second set Overview Claw Set Up set of towers crossbar spread of towers YOU. ARE. HERE. Put two towers onto a crossbar, and install end caps.
5 2x NOTE: If necessary, loosen the silver bar tightener a couple turns using the integrated assembly device. Put towers and bar onto factory rail. 1033604D-5/27. Install first Determine Install second set Overview Claw Set Up set of towers crossbar spread of towers YOU. ARE. HERE. The goal is to move the claw vertically and horizontally to fit with your factory rail. These adjustments must be made in tandem. You must establish three solid points of contact. Adjust the claw vertically. Adjust the claw horizontally. With the RailGrab covers Locate the black claw tightener. Loosen knob. NOTE: It may be necessary to alternate between step 3 and step 4 until a solid connection is achieved. Complete claw adjustment by securing the black claw tightener with the integrated assembly device. Horizontal Adjust claw vertically.
6 Tighten knob. Check your work. CONTACT POINT 1. Did you establish three solid contact points? Note: rounded factory Racks may only require two points of contact. CONTACT POINT 2 CONTACT POINT 3. Install first Determine Install second set Overview Claw Set Up set of towers crossbar spread of towers YOU. ARE. HERE. Note the vertical position TIP: Look at the markings of the claw, and repeat the on the claw base relative process for the other tower. to the markings on the claw, and use this Check both towers and measurement to help in readjust as necessary. adjusting the other tower. Center round bar. Center the bar so that the ends of the crossbar protruding from the towers are set to an equal distance. Complete assembly of tower/bar system. Assemble bar to tower by tightening silver bar screw using integrated assembly device.
7 Locate the silver bar tightener. Be sure to tighten both towers! Check your work. CHECK THE Installation ! Grip the crossbar inboard to towers;. push and pull using only arm strength. The vehicle should rock back and forth, but the RailGrabs should not budge. Install first Determine Install second set Overview Claw Set Up set of towers crossbar spread of towers YOU. ARE. HERE. Determine your crossbar spread. Install second set of RailGrab towers and crossbar. CROS. SBAR. The accessories you will carry with your RailGrab SPRE. AD. CROS. SBAR. SPRE. will determine your minimum crossbar spread (the AD. distance between the crossbars). Refer to the table below to find the correct minimum crossbar spread. QUICK REFERENCE: MaximumCROSSBAR. and Minimum Crossbar SPREAD TABLES preads crossbar spread range can carry on these accessories.
8 12" (30cm)-24" (61cm) Skis (under 170 cm) Any Ski Mount 12" (30cm)-36" (91cm) Skis (over 170 cm) Any Ski Mount 24 (61cm) Spread 12" (30cm)-36" (91cm) Snow boards Any Ski Mount (minimum) 16"* (41cm)-38" (97cm) Bicycles 1-2 Raptor / Raptor Aero 16"* (41cm)-42" (107cm) Bicycles 1-2 ForkLift / SteelHead / CopperHead / Viper Skis, snow boards, bikes 16"* (41cm)-46" (117cm) Bicycles 1-2 SprocketRocket / HighRoller (including tandems), sail 16"* (41cm)-48" (122cm) Bicycles 1-2 King Cobra / FrontLoader boards, and kayaks 18" (46cm)-38" (97cm) Bicycles, more than 2 Raptor / Raptor Aero 18" (46cm)-42" (107cm) Bicycles, more than 2 ForkLift / SteelHead / CopperHead / Viper 18" (46cm)-46" (117cm) Bicycles, more than 2 SprocketRocket / HighRoller 18" (46cm)-48" (122cm) Bicycles, more than 2 King Cobra / FrontLoader 32" (81 cm)-50" (127cm) Bicycles Boa 24" (61cm)-36" (91cm) Tandem Bicycles SideWinder 18" (46cm) or more Surf/Sail boards (6-8') Crossbar Pads / StrapThang 24 (61cm)or more Surf/Sail boards (9-10') Crossbar Pads / StrapThang 30" (76cm) or more Surf/Sail boards (over 10') Crossbar Pads / StrapThang 24" (61cm) or more Kayaks Mako Saddles / HullyRollers / LandShark / HullRaiser 16 (41cm) Spread 24" (61cm) or more Kayaks HullRaiser Aero / BigStack/BowDown / MakoAero 30" (76cm) or more Kayaks Kayak Stacker / Crossbar Pads (minimum) 24" (61cm) or more Kayaks/Canoes ShowBoat Load Assist Skis, snow boards 24" (61cm) or more Canoes (under 14') Gunwale Brackets and 2 bikes 30" (76cm) or more Canoes (over 14') Gunwale Brackets (excluding tandems) 12" (30cm)-41" (104cm)
9 Cargo, Gear BasketCase 24" (61cm)-36" (91cm) Cargo, Gear RocketBox 15s / PlatinumPro 16s / BlackTop Pro 16s (Round Bars). 24" (61cm)-36" (91cm) Cargo, Gear SkyBox 16s / SkyBox Pro 16s (Round Bars). 24" (61cm)-42" (107cm) Cargo, Gear SkyBox 12, 18, 21 / SkyBox Pro 12, 18, 21 (Round Bars). 30" (76cm)-36" (91cm) Cargo, Gear RocketBox 16 / RocketBox 11 (Round Bars). 30" (76cm)-42" (107cm) Cargo, Gear Platinum Pro 12, 18, 21 / BlackTop Pro 12, 18, 21 (Round Bars). 24" (61cm)-32" (81cm) Bikes, Skis, Boats, Cargo, Gear LoadWarrior 30" (76cm)-50" (127cm) Bikes, Skis, Boats, Cargo, Gear LoadWarrior with Extension 12 (30cm) Spread 30" (76cm)-38" (97cm) Bikes, Skis, Boats, Cargo, Gear MegaWarrior (minimum) 36" (91cm)-60" (152cm) Bikes, Skis, Boats, Cargo, Gear MegaWarrior with Extension Skis, snow boards and basketcase *More than 2 bicycles create enough leverage on the Wheel Tray to make the longer crossbar spread necessary.
10 For 16 (41cm) spreads, limit bikes to 30 lbs (14kg). Install first Determine Install second set Overview Claw Set Up set of towers crossbar spread of towers YOU. ARE. HERE. Install second set of RailGrab towers and crossbar. Lock the towers. Now simply follow the Instructions from the beginning to install If you have purchased lock your second set of towers. Be sure to read all cautions and cores (recommended), warning on the next page. Return integrated assembly device to install them according to storage location. Close the covers. your lock core Instructions . Removing the Racks 1. Mark tower location with marker or tape. installing Racks again 2. Unlock towers and open RailGrab covers. 1. Open covers. 3. Loosen claws (claw tightener). 2. Clean rails and place towers at marked positions. 4. Lift rack up and off (do not disassemble).