
ICE MAKER INSTALLATION INSTRUCTIONS INSTRUCTIONS D ...
2 INSTALLATION INSTRUCTIONS Unpack the Ice Maker Removing Packaging Materials Remove tape and glue from your ice maker before using. of 1/4" (6.35 mm) OD soft copper tubing with a shutoff valve To remove any remaining tape or glue from the exterior of the ice maker, rub the area briskly with your thumb.
Download ICE MAKER INSTALLATION INSTRUCTIONS INSTRUCTIONS D ...

Information
Domain:
Source:
Link to this page:
Documents from same domain
Use & Care Guide - kitchenaid.com
www.kitchenaid.com3 INSTALLATION INSTRUCTIONS Installer: Leave Use and Care Guide with the homeowner. Homeowner: Keep Use and Care Guide for future reference and for local electrical inspector’s use, if required. Unpacking IMPORTANT: Do not grasp console to move compactor. Begin in the room where the compactor will be located. 1. Remove compactor from shipping carton.

KSMSFTA - kitchenaid.com
www.kitchenaid.comPrecise Heat Mixing Bowl, Ice Cream Maker, or the Pouring Shield. The Sifter+Scale attachment can be used in multiple ways: to weigh and sift ingredients while ... WARRANTY AND SERVICE KITCHENAID SIFTER+SCALE ATTACHMENT WARRANTY FOR THE 50 UNITED STATES, THE DISTRICT OF COLUMBIA, PUERTO RICO, AND CANADA

KITCHENAID ICE MAKER WARRANTY
www.kitchenaid.com19 KITCHENAID® ICE MAKER WARRANTY THREE YEAR LIMITED WARRANTY (PARTS AND LABOR) For three years from the date of purchase, when this major applia nce is installed, operated and maintained according to instructions

KITCHENAID DISHWASHER WARRANTY
www.kitchenaid.com21 KITCHENAID® DISHWASHER WARRANTY TWO YEAR LIMITED WARRANTY For two years from the date of purchase, when this major appliance is operated and maintained according to instructions attache d to or

BOWL LIFT STAND MIXER
www.kitchenaid.comreplacement stand mixer, use the carton and packing materials to pack up your “failed” stand mixer. In the carton, include your name and address on a sheet of paper along with a copy of the proof of purchase (register receipt, credit card charge slip, etc.). For a detailed explanation of warranty terms and conditions, including how to ...

STAND MIXER - KitchenAid
www.kitchenaid.comreplacement stand mixer, use the carton and packing materials to pack-up your “failed” stand mixer. In the carton, include your name and address on a sheet of paper along with a copy of the proof of purchase (register receipt, credit card charge slip, etc.). For a detailed explanation of warranty terms and conditions, including how to ...

Use & Care Guide
www.kitchenaid.comWhen using electrical appliances, basic safety precautions should always be followed, including the following: 1. Read all instructions. Misuse of appliance may result in personal injury. 2. To protect against risk of electrical shock, do not put Stand Mixer in water or other liquid. 3. This appliance can be used by children aged from 8 years

Owners Manual - KitchenAid
www.kitchenaid.comDrying - Rinse aid is essential. You must use a drying agent such as a rinse aid for good drying performance (sample included). Rinse aid along with the Heat Dry or ProDry™ option will provide best drying and avoid excessive moisture in the dishwasher interior. For best drying, use the Heat Dry or ProDry™ option. Dispensers vary by model

INSTALLATION INSTRUCTIONS 27 (68.6 CM) AND 30 (76.2 CM ...
www.kitchenaid.com4 Cabinet Dimensions - Double Ovens, Flush Installations A 253/ 8" (64.4 cm) minimum cutout depth is required. These dimensions will result in a 1/4" (6 mm) reveal on the top, a 1/4" (6 mm) reveal on the sides, and a 1/8" (3 mm) reveal on
TOUCH-ACTIVATED ELECTRONIC INDUCTION COOKTOP
www.kitchenaid.comThe touch-activated electronic controls offer a variety of heat settings for optimal cooking results. When melting foods such as chocolate or butter, the surface cooking area can be set to the Melt function for minimal cooking power. For maximum surface cooking power, all cooktop touch-activated electronic controls can be set to Performance Boost
Related documents

Series 1156F, T156B and N256 - Watts | Plumbing, Heating ...
media.wattswater.comInstallation Diagram To Expansion Tank To Radiation Hot Water Boiler *Pressure Relief Backflow Valve *Feed Water Pressure Regulator No. 9D Preventer Shut off Valve Drain Return Cold Water! WARNING. Series 1156F-N256 Repair Kits ORDERING CODE KIt NO. SIzES in. mm

INSTALLATION MANUAL FOR BOILER SYSTEM EXPANSION …
pdf.lowes.comPre-Installation 1. Visually inspect expansion tank for any damage. 2. Adjust pre-charge to equal system fill pressure. 3. Replace and tighten plastic cap on air fitting. Installation 1. Drain the boiler system or isolate the area where the expansion tank will be installed. 2. Install the expansion tank on the supply side of the boiler, on

IS 2470-2 (1985): Code of practice for installation of ...
law.resource.orgINSTALLATION OF SEPTICTANKS ( SecondRevisionJ & FOREWORD 6A This bdian kmderd ~Part 2) (Second Revision) was dopted b the hdian Staidar& titutiom on 28 Febru*ry 1985, efler the dr J t ik&ad by the W- SUPPIY ~d ~t8&~8ti&.iom&Coutmittee had h *ggmuve&&y the CM Ib@newq . &2xn& z “c tank, eyen if of 4hqtu@ ~ and iqmcity, ~y a

HIGH-EFFICIENCY FURNACE INSTALLATION GUIDE FOR …
www.cdn.fortisbc.comA recent study on furnace installation quality completed for FortisBC indicated that on average only . 46% of important installation criteria were in compliance with best practices.3 This represents a large gap between expected and actual furnace performance. This Guide will attempt to address this gap
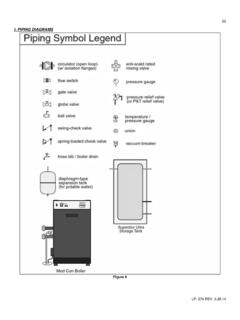
Installation Drawings - HTP - Water and Space Heating
www.htproducts.com12. Use either indirect/tank sensor or system/pipe sensor mounted on common return to the boiler. 13. Wire the tank or system/pipe sensor connected to the DHW sensor terminals on the follower boiler addressed as #1. 14. The system/pipe sensor must be placed on common piping to the tank, as close to the tank as possible. 15.

TANK BUILDING METHODOLOGY
www.iqpc.com•EPC / Site Construction Projects – Tank Farm, Plant Piping, Storage Tanks for Crude Oil & Finished Products etc. •Pressure Vessels & Tanks Manufacturing – Knock out Drums, Filters, Vent Drums, Separators etc. •Gas Projects – Storage Tanks & System Installation for LP, Propane – Aerosol/Odorless & Synthetic Natural Gases – Piping Networks Industrial, Building …