
INSTALLATION INSTRUCTIONS - Armstrong Ceiling S
Ceiling Plank Installation Instructions. We are constantly working to improve our instructions with . learnings from customers like you. If you need additional . guidance, call our Techline at 1-877-ARMSTRONG (276-7876). We recommend installing WoodHaven ™ planks using the Easy Up ® track . and clip system.
Download INSTALLATION INSTRUCTIONS - Armstrong Ceiling S

Information
Domain:
Source:
Link to this page:
Documents from same domain

ENVIRONMENTAL PRODUCT DECLARATION - …
www.armstrongceilings.comENVIRONMENTAL PRODUCT DECLARATION ... European Waste Catalogue (EWC), the waste key for steel as a component of metal ceiling systems made of steel is:

Installation and Maintenance Guide - Ceilings from …
www.armstrongceilings.com2 water is present, or where moisture will come in direct contact with the ceiling. 1.4. Plenum Installation of Optima® and Lyra® Concealed panels requires a minimum of 3" of space in the plenum to install the hanger

AXIOM Knife Edge Perimeter Trim - Ceilings from Armstrong
www.armstrongceilings.comAxiom Knife Edge is a perimeter trim system designed for use with any of the Armstrong suspension systems. Field fabrication is limited to component assembly, straight cuts, and minor adjustments to accommodate differences between design dimensions and actual field conditions.

50% U I ALU armstrongceilings.com/greengenie rECLEDyC ...
www.armstrongceilings.comaxiom Knife Edge alignment Clip (aXKEaLiGn) ViSuAl Selection DetAilS For more information, see submittal BPCs-3080. 5-9/16" 2-5/16" axiom Knife Edge for Vector profile Item (AXKE or AXKEV) Corner
KEY SELECTION ATTRIBUTES TYPICAL APPLICATIONS COLOR …
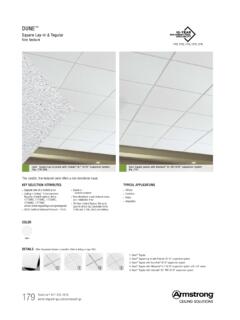
www.armstrongceilings.comDUNE ™ Square Lay-in & Tegular fine texture 179 Dune™ Square Lay-in panels with Prelude ® XL 15/16" suspension system (Pgs. 279-280) Dune Tegular panels with Interlude XL HRC 9/16" suspension system (Pg. 274) TYPICAL APPLICATIONS

KEY SELECTION ATTRIBUTES TYPICAL APPLICATIONS COLOR …
www.armstrongceilings.comDune™ Square Lay-in panels with Prelude® XL® 15/16" suspension system (Pgs. 391-392) Dune Tegular panels with Interlude ® XL HRC 9/16" suspension system

EXPOSED STRUCTURE - Ceilings from Armstrong
www.armstrongceilings.comWhether making a design statement that puts acoustical materials front and center, or opting for a more open, exposed structure look with a direct-attach solution, we've got hundreds

PART 1 - GENERAL - Ceilings from Armstrong
www.armstrongceilings.com09120-1 SECTION 09 51 13 AXIOM® INDIRECT LIGHT COVE PERIMETER SYSTEM PART 1 - GENERAL 1.1 RELATED DOCUMENTS Drawings and general conditions of Contract, including General and Supplementary Conditions and

Section 1 - IDENTIFICATION* * * - Ceilings from Armstrong
www.armstrongceilings.comPage 1 of 7 Issue Date: 06/1/15 Revision 1.0000 Print Date: 5/29/2015 * * *Section 1 - IDENTIFICATION* * * Material Name: Armstrong Wood Ceilings and Walls (WoodWorks) Chemical Family. Wood particle board ceilings and walls . Recommended Use. ceilings and wall coverings .

Solid Wood Backer, Dowel, and Backer & Dowel Combination
www.armstrongceilings.com242 WOODWORKS ® TechLine 877 276 7876 armstrongceilings.com/woodworks WOODWORKS ® Grille Solid Wood Backer, Dowel, and Backer & Dowel Combination STANDARD SIZES
Related documents
Floating Installation Instructions - COREtec Flooring
coretecfloors.comInstallation Instructions PRE-INSTALLATION GUIDELINES These installation guidelines apply to the COREtec Angle Tap product. All instructions and recommendations should be followed for a successful installation. Required Tools: Tape Measure, Utility Knife, Jigsaw, Tapping Block or Rubber Mallet, Pull Bar, ¼” Spacers,

INSTALLATION INSTRUCTIONS - smartcorefloors.com
smartcorefloors.comINSTALLATION INSTRUCTIONS Simple, easy-to-follow instructions for the handy DIYer. Start to fininsh, everything you need to know to install your SMARTCORE floor like a professional. 872019 MORE SMARTCORE ® UESTIOS Cal 1-800-355-742 n elec ptio 2 wic S abl spañol) EXCLUSIVEL AT LOWE’S ...

Installation instructions - Miele USA
us.mieleusa.cominstallation contact the Technical Service Department. USA 1-800-999-1360 techserv@mieleusa.com CDN 1-800-565-6435 service@miele.ca,During the installation process, please be careful of sharp edges that can cause harm. IMPORTANT SAFETY INSTRUCTIONS 3

Installation Instructions - KitchenAid
www.kitchenaid.comUse and Care Guide. Keep Installation Instructions and Guide close to oven for easy reference. This oven is manufactured with white (neutral) power supply wire and a cabinet-connected bare grounding wire twisted together. 4. Feed oven cable through opening in the cabinet. Make electrical connection following the steps needed for your ...

ICE MAKER INSTALLATION INSTRUCTIONS INSTRUCTIONS …
www.kitchenaid.com2 INSTALLATION INSTRUCTIONS Unpack the Ice Maker Removing Packaging Materials Remove tape and glue from your ice maker before using. of 1/4" (6.35 mm) OD soft copper tubing with a shutoff valve To remove any remaining tape or glue from the exterior of the ice maker, rub the area briskly with your thumb.

Installation Instructions MUSTANG II IFS COMPLETE PARTS ...
www.southernrods.comseparate instructions which are packaged in their boxes. Follow those instructions for those parts. Begin the suspension component installation with the upper and lower control arms using their instruction sheets. Place the springs up into the spring pockets and bring the …

INSTALLATION INSTRUCTIONS 30 (76.2 CM) AND 36 (91.4 …
www.whirlpool.comINSTALLATION INSTRUCTIONS 30" (76.2 CM) AND 36" (91.4 CM) GAS BUILT-IN COOKTOP INSTRUCTIONS D’INSTALLATION DE LA TABLE DE CUISSON À GAZ ENCASTRÉE DE 30" (76,2 CM) ET 36" (91,4 CM) Table of Contents/Table des matières W11116971C IMPORTANT: Installer: Leav e installation instructions with the homeo wner.