Search results with tag "Installation instructions"

92-104611-01 Rev. 00 EZ-Installation Guide for Tankless ...
pts.myrheem.comEZ-INSTALLATION GUIDE This guide is designed to provide a high-level installation overview and address key installation questions. It does not supplement the installation instructions in the Use and Care Manual provided with the water heater. All instructions and installation requirements, as well as any local or national codes, must be followed.
REPLACEMENT WINDOWS FOR DETAILED INSTALLATION …
www.simonton.cominstallation instructions important! read all instructions before beginning installation inspect unit for damages, correct size, type, and correct installation information for your application before removing the existing window. if there is a problem with any of these areas, contact your simonton distributor before installing.

MICROWAVE OVEN BUILT-IN TRIM KIT INSTALLATION …
www.whirlpool.comINSTALLATION INSTRUCTIONS Built-In Trim Kit Models MK2227 MK2220 UL listed for use over any electric or gas built-in oven, up to 30" (76.2 cm) wide INSTRUCTIONS D’INSTALLATION ... A 120 volt, 60 Hz, AC only, 15- or 20-amp …

WAS / WYS Series
images.thdstatic.com2. Installation must be performed according to the installation instructions. Improper installation can cause water leakage, undesired performance, electrical shock, or fire. (In North America, installation must be performed in accordance with the requirements of NEC and CEC, by authorized personnel only.) 3.

(S) LPRFM-5R J30-05377C INSTALLATION INSTRUCTIONS …
www.igcusa.comInstallation must be made in accordance with local codes, or in absence of local codes, with ANSI Standard Z223.1-2002. (N.F.P.A. No. 54) National Fuel Gas Code, or the latest edition of. All of the ANSI and NFPA Standards referred to in these installation instructions are those that were applicable at the time the design of this appliance was ...

VON DUPRIN Installation Instructions 98/9975 Series ...
www.thebuilderssupply.comInstallation Instructions ® 98/9975 Series Mortise Exit Device This product is covered by the following patent numbers: 3,767,238 4,427,223 3,854,763 4,466,643 4,167,280 4,741,563 Devices covered by these instructions: 98/9975 Mortise Exit Device 98/9975-F (Fire) Mortise Exit Device CD98/9975 (Cylinder Dogging) Mortise Exit Device

0137973 Logic 5.0 Commerciual Door Operator Installation ...
www.rsoperators.comIMPORTANT INSTALLATION INSTRUCTIONS 1. READ AND FOLLOW ALL INSTALLATION WARNINGS AND INSTRUCTIONS. 2. Install door operator ONLY on a properly balanced and lubricated door. An improperly balanced door may NOT reverse when required and could result in SEVERE INJURY or DEATH. 3. ALL repairs to cables, spring assemblies and other hardware

Wire Harness Installation Instructions - Painless Performance
www.painlessperformance.comWire Harness Installation Instructions For Installing Harness Numbers: 60221: 03 – 06 GM Gen III 4.8/5.3/6.0L EFI Harness - Throttle by Wire Manual P/N 90570 Painless Performance Products recommends you, the installer, read this installation manual from front to …

PARTS & INSTALLATION INSTRUCTIONS E-47 & E-47H …
ww2.meyerproducts.comINSTALLATION INSTRUCTIONS A. Install E-47 Lift Assembly (1) to Lift Frame (using bolts supplied in the mounting carton), with the Electric Motor toward the right hand side (Passenger side); attach the lift ram in the inner hole of the Lift Arm (unless otherwise instructed in vehicle mounting instructions) as per illustration. On HM-9 and HM-

Temperature Sensor Install Guide - IntelliCenter EasyTouch ...
www.pentair.comTemperature Sensor Installation Instructions Temperature Sensor Installation Instructions 82 1620 HAWKINS AVE., SANFORD, NC 27330 • (919) 566-8000 10951 WEST LOS ANGELES AVE., MOORPARK, CA 93021 • (805) 553-5000 WWW.PENTAIR.COM All Pentair trademarks and logos are owned by Pentair. Intellicenter™, EasyTouch ®, IntelliTouch , SunTouch ,

VENTILATION FAN Page 1 WITH HEATER & LIGHT READ AND …
www.broan-nutone.comparts which have been subject to misuse, negligence, accident, improper maintenance or repair (other than by Broan-NuTone), faulty installation or installation contrary to recommended installation instructions. The duration of an implied warranty is limited to the one-year period as specified for the express warranty.

OPERATION, MAINTENANCE AND INSTALLATION MANUAL …
www.atsource.caMANUAL UP BUTTON MANUAL DOWN BUTTON FEED GATE TURNBUCKLE TO BALE CHAMBER DOOR LATCH BALE CHAMBER DOOR CONTROL PANEL PANEL BOX NOTE: A fused disconnect is not provid-ed on these models. The disconnect must be provided, by the installer, per the installation instructions in the Installation section of this manual. FRONT …

ATLAS (AERO TAPER LOCK ATTACHMENT SYSTEM) …
www.aeroprecisionusa.comATLAS (AERO TAPER LOCK ATTACHMENT SYSTEM) INSTALLATION INSTRUCTIONS . INSTALLATION VIDEO DEMONSTRATION AVAILABLE AT . WWW.AEROPRECISIONUSA.COM/ATLAS. Figure 1: Included P arts . Installation Steps . 1. Properly coat the upper receiver threads with anti -seize or grease. If not available, CLP or oil …

6-71 Through 14-71 Supercharger Installation Instructions
theblowershop.comAug 06, 2016 · 2) Bolt the accessory pulley to the balancer with the supplied (3) 3/8” bolts. Torque bolts to 35 ft. lbs. *Note: The kit includes both coarse and fine thread bolts, be sure to check your balancer for the correct thread pitch before installation. 3) Install supplied crank bolt and washer, then torque to 65 ft. lbs.

1 POWER UP/CONNECT 1 DOWNLOAD - LeapFrog
t7.leapfrog.comBattery removal and installation instructions: 1. Open the battery door with a screwdriver, coin or other household tool. 2. If used or spent batteries are present, remove these batteries from the unit by pulling up on one end of each battery. 3. Install new batteries as shown in the polarity diagram (+/-) inside the battery compartment. 4.
Fatigue of Threaded Fasteners - ASM International
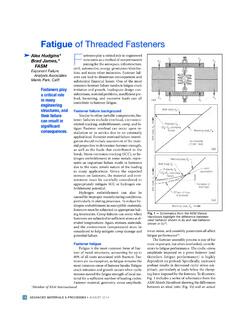
www.asminternational.orgThese screws had been part of equipment used in a silicon wafer fabrication system. The screw service environment was in a cleanroom, with exposure to no known corrosive media. In addition to the failed screws, material specifica-tions, drawings, and installation instructions and specifica-tions were provided. Representative images from some of

Lifeproof Vinyl Warranty
images.thdstatic.com• The flooring must be installed properly in accordance with the manufacturer’s installation instructions and for its ... If we repair or replace a plank or more as a result of a warranty claim, you will be required to clear, at your expense, any items placed over the affected area ... Lifeproof Vinyl Warranty ...
H dIshwa s hEr
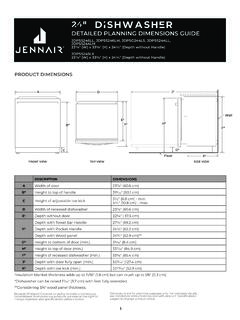
www.jennair.comA Width of door 23⅞" (60.6 cm) B* Height to top of handle 319/16" ... F† Depth with Towel Bar Handle 271/4" (69.2 cm) Depth with Pocket Handle 241/2" (62.2 cm) Depth with Wood panel 243/4" (62.9 cm)** G* Height to bottom of door (min.) 35/16" ... see Installation Instructions packed with product. Specifications subject to change without ...

DVL® - DuraVent
duravent.comMOBILE HOMES: Solid fuel appliances installed in mobile homes must be listed and bear the label of a testing agency approved by the Department of Housing and Urban Development (HUD), and must be installed exactly in accordance with the manufacturer’s installation instructions. DuraVent’s DVL stovepipe complies with the requirements

Axial Piston Fixed Motor A2FM - Hydraulic Pump
www.heavyparts.co.ukInstallation instructions 44 ... RE 91001/06.2012 A2FM Series 6 Bosch Rexroth AG 5/46 Technical data Filtration of the hydraulic fluid ... 0 1000 2000 3000 4000 5000 6000 7000 8000 2 1 0 3 4 5 Differential pressure D p [bar] Speed n [rpm] NG10, 12, 16 …

24 Flush Mount DeFlector Vent: sKMD24F0As
files.sharpusa.comE 1 C N H E F D A B L J I M K G Note: the face of the shelf must sit 1 3/4" (44.45 mm) back from ... INSTALLATION INSTRUCTIONS 1. Prepare cabinet opening as shown in Figures 1, 2A, 2B, 2C. CL Top view A Anti-Tip block Mounting cleat Drawer face B C Cabinet face Note: the mounting surface of the finished cleat must sit 1 1/16" (26.97 mm) back

RAV4 (PHEV, RHD&LHD) - toyota-tech.eu
www.toyota-tech.euInstallation Instructions Model year: As from 2020/06 Vehicle code: AXAP54*-ANX*BW; AXAP54*-ZNXGBW Part number: PW5D0-42560 13 Pin Towbar wiring kit PW5D0-42561 7 Pin Towbar wiring kit 3: ' 3LQHOHFWULFVªWWLQJSDUW Manual reference number: AIM 006 009-0

P TTS/T M/T T
images.thdstatic.comINSTALLATION INSTRUCTIONS Note: This product is intended for either single mount or continuous row applications. 1. Turn off the power at the main fuse/breaker box. Carefully open carton and remove fixture from carton. 2. To remove the channel cover with LED’s from main channel body squeeze beneath the embossed

MG SnowEx RD, HD & LT Straight Blade Snowplows
library.snowexproducts.comAdapted from Chain Kit Installation Instructions (Lit. No. 84788, Rev. 01). The Chain Kit (PN 84787) is used to temporarily hold the blade and A-frame in a raised position during transport to a service location. 1. Raise the A-frame against the stacking stop by driving into a snow pile. The blade will naturally

INSTALLATION INSTRUCTIONS 27 (68.6 CM) AND 30 (76.2 …
www.whirlpool.cominstallation instructions 27" (68.6 cm) and 30" (76.2 cm) electric single and double built-in oven flush installation kit instructions d’installation ensemble d’installation en affleurement pour four Électrique encastrÉ simple et ... around the recessed portion of the oven.

INSTALLATION INSTRUCTIONS - FREESTANDING GAS …
pdf.lowes.comthe gas supplier's instructions. • If you cannot reach your gas supplier, call the fire department. — Installation and service must be performed by a qualified installer, service agency or the gas supplier. Important notes to the installer • Read all instructions contained in these installation instructions before installing range.

Installation Dryers Instructions 05
images.thdstatic.comInstallation Instructions REQUIREMENTS FOR ALCOVE OR CLOSET INSTALLATION MOBILE OR MANUFACTURED HOME INSTALLATION 3 WARNING - Explosion Hazard Keep flammable materials and vapors, such as gasoline, away from dryer. Place dryer at least 18” (46 cm) above the floor for a garage installation. Failure to do so can result in death, explosion, or …

Installation Instructions - Carrier
www.shareddocs.comDealer Logo Application - Instructions. 4. Installation 4.1. Overview This instruction covers installation of the Infinity System Control and the Infinity Wireless Access Point only. Physical installation instructions for the indoor and outdoor equipment, and …

INSTALLATION INSTRUCTIONS E-Z-GO Installation Notes
www.hpevs.comDec 21, 2010 · INSTALLATION INSTRUCTIONS . E-Z-GO Installation Notes. CURTIS 1234, 1236 OR 1238. ... Forward/Reverse switch and press the accelerator pedal. The drive wheels could be in either direction when first turned on. ... Select Forward Direction, Release Parking Brake, Press and hold the ...

Installation Instructions Notice
dl.mitsubishielectric.comFor a USB driver installation procedure, refer to GX Works2 Version 1 Operating Manual (Common). Uninstallation Delete GX Works2 from the personal computer. Model name Product name Quantity SW1DNC-GXW2-E (English version package) (Standard license product) GX Works2 CD-ROM 3*1 Installation Instructions (This document) 1 End-user software ...

Installation Over the Range Instructions Microwave Oven
pdf.lowes.comRemove the installation instructions, filters, glass Fold back all 4 carton flaps fully against carton sides. Then carefully roll the oven and carton over ... Plate position—beneath framed recessed cabinet bottom Installation Instructions 1 2 3 30w(76.2 cm) to Cooktop Touching the Back Frame Mounting Plate with Tabs Below Cabinet

INSTALLATION INSTRUCTIONS - Armstrong Ceiling S
www.armstrongceilings.comCeiling Plank Installation Instructions. We are constantly working to improve our instructions with . learnings from customers like you. If you need additional . guidance, call our Techline at 1-877-ARMSTRONG (276-7876). We recommend installing WoodHaven ™ planks using the Easy Up ® track . and clip system.

INSTALLATION INSTrucTIONS EMPIRE AND OwNer'S …
www.whitemountainhearth.comneighbor’s phone. Follow the gas supplier’s instructions. • If you cannot reach your gas supplier, call the fire department. — Installation and service must be performed by a qualified installer, service agency or the gas sup-plier. WARNING: If the information in these instructions are not followed exactly, a fire or explosion may

Installation Instructions - Whirlpool
www.whirlpool.cominstallation instructions This product is suitable for use above electric or gas cooking products up to and including 36" (91.4 cm) wide. See the “Installation

INSTALLATION MANUAL
dc2kentprodcontent.blob.core.windows.netinstallation, or when moving the unit. • Ensure the unit is properly installed and located in accordance with the Installation Instructions before use. • This appliance is not to be used, cleaned or maintained by persons (including children) with reduced physical, sensory or mental capabilities or lack of experience and knowledge, unless

INSTALLATION INSTRUCTIONS - White Mountain Hearth
whitemountainhearth.comINSTALLATION INSTRUCTIONS CONTEMPORARY LINEAR VENT-FREE GAS FIREPLACE MOdEL VFLB(36,48)FP(3,9)0(N,P)-1 This appliance may be installed in an aftermarket, permanently located, manufactured (mobile) home, where not prohibited by local codes. This appliance is only for use with the type of gas indicated on the rating plate. This appliance is not

INSTALLATION MANUAL - GARAGA
cmsgaraga.garaga.compurchased an Acadia 138 or a Regal N24 doors, you can still use this guide, only the installation instructions will appear as follows. 1 3⁄ 8” doors Installation of a cable-lock or an end stile lock is recommended on these doors. In this manual, the right and the left are as seen by looking at the opening of the door from the inside.

INSTALLATION INSTRUCTIONS FOR INTERIOR PREHUNG …
images.thdstatic.comINSTALLATION INSTRUCTIONS FOR INTERIOR PREHUNG DOORS Make sure: 1. The threshold is level 2. The hinge side of the rough opening is plumb 3. The head is square to the hinge side of the rough opening Center the prehung unit into the rough opening, bottom first. When the door opens to you, and the knob is on the left, it is a left hand door. When ...

INSTALLATION INSTRUCTIONS EL296UHV
tech.lennoxintl.comEL296UHV Gas Furnace The EL296UHV Category IV gas furnace is shipped ready for installation in the upflow or horizontal position. The fur-nace is shipped with the bottom panel in place. The bot-tom panel must be removed if the unit is to be installed in horizontal or upflow applications with bottom return air.

Installation Instructions - Maytag
www.maytag.comAvailable through an authorized Maytag Parts Retailer Remove access and toe panels before beginning installation. Remove bolts from the crate base brackets, using 5/16" socket with ratchet. Remove crate base and discard base and packaging. Until dishwasher is permanently installed, beware of opening the door as the unit may tip forward.
INSTALLATION INSTRUCTIONS RINGS - Ross Racing Pistons
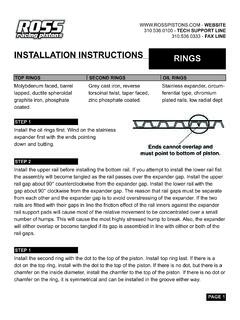
www.rosspistons.comper cylinder add .004 total to the end gaps shown above. EXAMPLE: 3.625 x .004 = .015 plus .004 for turbocharger - .019 total end gap. END GAP When boring the block allow a minimum of .003 for fi nish hone. If fi nish bore size is to be 3.500, bore to dia. of 3.497, any less than this will leave boring marks remaining after honing

Installation Instructions Electric Cooktop - Induction
images.thdstatic.comElectric Cooktop - Induction CUTTING THE COUNTERTOP If you are installing the cooktop in a solid surface material such as granite, quartz or any other natural or synthetic solid surface, we recommend that the cutout be prepared by a professional cabinet or countertop installer. Cooktop cutouts in wood or wood-laminate

Installation Instruction - Tarkett
media.tarkett.comInstallation Instruction Collection iD Inspiration 55-70 Soft Walnut Dark Brown / Rock Grege Wimereux / 2015. 1. TRANSPORT & STORAGE 2. HANDLING In general the rolls and boxes must be stored in a sheltered clean and dry indoor place and free from any pollution. Before installation, the
Similar queries
Installation, Installation Instructions, Instructions, IN TRIM KIT INSTALLATION, Design, Installation Instructions 98/9975 Series, Installation Instructions ® 98/9975 Series Mortise, Device, Door, Throttle, Temperature, Installation Instructions Temperature, Pentair, Parts, INSTALLATION MANUAL, Manual, TAPER LOCK ATTACHMENT SYSTEM), TAPER LOCK ATTACHMENT SYSTEM) INSTALLATION INSTRUCTIONS, Bolt, Part, Lifeproof Vinyl, Plank, Pocket, Wood, Fuel, Series, 4000 5000, Toyota, P TTS/T M/T T, Recessed, Range, Forward, Reverse, Brake, Instructions Microwave, You need, Supplier, Sup-plier, Whirlpool, Gas furnace, Fur-nace, Maytag, Maytag Parts, Cylinder, Honing, Induction, Installation Instruction