Example: bankruptcy
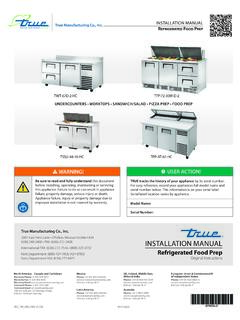
INSTALLATION MANUAL
installation, or when moving the unit. • Ensure the unit is properly installed and located in accordance with the Installation Instructions before use. • This appliance is not to be used, cleaned or maintained by persons (including children) with reduced physical, sensory or mental capabilities or lack of experience and knowledge, unless
Tags:
Information
Domain:
Source:
Link to this page:
Documents from same domain

TRADITIONAL REACH-INS Congratulations!
dc2kentprodcontent.blob.core.windows.netinstallation, or when moving the unit. • Ensure the unit is properly installed and located in accordance with the Installation Instructions before use. • This appliance is not to be used, cleaned or maintained by persons (including children) with reduced physical, sensory or mental capabilities or lack of experience and knowledge, unless

TECHNICAL SERVICE MANUAL - .NET Framework
dc2kentprodcontent.blob.core.windows.netTAC Installation Tips_____ 186 TAC Recommended Cooler Placement_____ 187 Component Location with Mechanical Temperature Control _____188 TAC-48 Sequence of Operation with a Mechanical Temperature Control_____ 189
INSTALLATION MANUAL
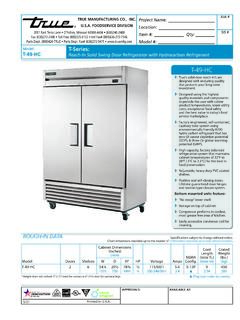
dc2kentprodcontent.blob.core.windows.netNOTE: All servicing must be performed by a qualified technician. See the serial label inside the cabinet for the units refrigeration type. For Hydrocarbon Refrigeration (R290 only), see below: DANGER – Risk of fire or explosion. Flammable refrigerant used. DO NOT use mechanical devices to defrost refrigerator.

GENERIC FAST FACTS - Microsoft
dc2kentprodcontent.blob.core.windows.netGeneric FASTTop Reasons to Buy FACTS Warranty True’s exclusive 5-year compressor/condensing unit warranty is the envy of the industry. At no additional cost, our customers enjoy the option of having the entire condensing unit replaced.

TEMPERATURE CONTROLS/ THERMOMETER/TIMERS
dc2kentprodcontent.blob.core.windows.netTEMPERATURE CONTROL STEP 1 - Disconnect the power to the cabinet. STEP 2 - Locate the temperature control and note its setting. The temperature control should be set at mid-range, about 5. NOTE: If the control was set to high (colder) this could be why the product is freezing. Reset the control and check the cabinet operation in 24-48 hours. You
&BTU5FSSB-BOFt0'BMMPO .JTTPVSJ t 'BY t5PMM'SFF …
dc2kentprodcontent.blob.core.windows.nethydro carbon refrigerant that has zero (0) ozone depletion potential (ODP), & three (3) global warming potential (GWP). High capacity, factory balanced refrigeration system that maintains cabinet temperatures of 33°F to 38°F (.5°C to 3.3°C) for the best in food preservation. Adjustable, heavy duty PVC coated shelves.
Related documents

Sage Peachtree Installation Instructions - EMC P
support.emcp.com11. When the installation is complete, the Installation Completed window appears. Check or uncheck the checkbox options as desired; then select the Finish button to complete the installation. II. Installing Sage Peachtree on a Network Use these instructions if more than one computer will be networked so that multiple users may

AND INSTALLATION INSTRUCTIONS - West Coast …
www.differentials.comInstallation Instructions Please read completely before beginning! You can expect many years and many miles of dependable use from your differential if it is set up properly and if you use only top quality parts. You already have quality parts if you bought a Sierra kit. By following these instructions carefully, you will achieve proper set up.

Installation Instructions - .NET Framework
mohawk.blob.core.windows.net*This product must be installed in accordance with installation instructions illustrated in pages 3-4. Site and Material Preparation A. Remove carpet and padding. Also remove any wood flooring installed on concrete. ... 12. For the last row, align the plank to be used on top of the second to last row. Using a full width plank as a spacer, trace ...

INSTALLATION INSTRUCTIONS - smartcorefloors.com
smartcorefloors.comInstallation Methods: Floating (on, above or below grade) / Glue Down (on or above grade only) For installation in areas larger than 50’x50’, 2500 sq. ft. provide a minimum expansion space of 1/2” (12.7 mm) around the

INSTALLATION INSTRUCTIONS - Doors On-Line
www.doorson-line.comINSTALLATION INSTRUCTIONS Amarr Residential Steel Garage Doors Entrematic manufactures & distributes garage doors under several brand names and trademarks, such as: Amarr®, Heritage™, Classica®, Stratford®, Oak Summit® ... 12 2 2 2 4 8 10 6 2 2 12 2 2 2 4 8 10 6 2 2 12 2 2 2 5 Sec on Garage Door

Installation Instructions - Painless Performance
www.painlessperformance.comIf you have any questions concerning the installation of this harness, feel free to call Painless Performance Products' Tech Line at 1-800-423-9696. The Tech Line can be reached from 8 A.M. to 5 P.M. central time, Monday through Thursday, and 8 A.M. to 4:30 P.M. on Fridays. We have attempted to provide you with as accurate of instructions as