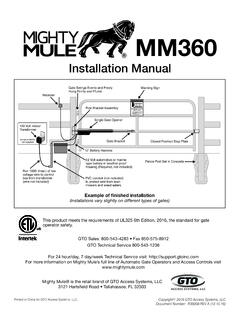
Installation Manual - Mighty Mule
ii Mighty Mule MM360 Installation Instructions Product Usage The Mighty Mule Gate Operator meets all of the safety requirements of a Class I Residential Vehicular Gate Operator and is intended for use solely with vehicular swing gates in single-family residential applications that meet the Class I category listed
Download Installation Manual - Mighty Mule

Information
Domain:
Source:
Link to this page:
Documents from same domain

Installation Manual - Mighty Mule
www.mightymule.comfull responsibility for following and noting the installation and safety instructions. Failure to follow ... You must read the installation manual for detailed

Installation Manual
www.mightymule.comThis equipment meets Underwriters Laboratory Standard 325 (UL 325). However, gate equipment has hazards associated with its use and therefore by installing this product the installer and user accept full responsibility for following and noting the installation and safety instructions. Failure to follow

MM571W MM572W
www.mightymule.comThis equipment meets Underwriters Laboratory Standard 325 (UL 325). However, gate equipment has hazards associated with its use and therefore by installing this product the installer and user accept full responsibility for following and noting the installation and safety instructions. Failure to follow

Wir - Mighty Mule
www.mightymule.comPrior to any assembly of the MMS100, ensure that the Mighty Mule gate operator is turned OFF and disconnected from its power source. If required, punch out the access hole for the Auxiliary Antenna. Align the connectors, then plug in the small …

25 Code GTO Digital Keypad - Mighty Mule
www.mightymule.comStep 7: Slide the keypad into the cover and secure with the small screws provided. (FIG. 8) OUT COM Hard-wire from Gate Opener #1 #2 1 2 ABC 3 DEF 4 GHI 5 JKL 6 MNO 7 PRS 8 TUV 9 WXY 0 Connect #1 wire from the OUT terminal on the keypad to the CYCLE terminal on the opener control board. Connect #2 wire from the COM terminal on the keypad to COM ...

FM500 Installation Manual - Mighty Mule
www.mightymule.commanual cannot be completely exhaustive in nature. They do, however, provide an overview of the safe design, installation, and use of this product. CAREFULLY READ AND FOLLOW ALL SAFETY PRECAUTIONS, ARNINGS, W AND INSTALLATION INSTRUCTIONS TO ENSURE THE SAFE SYSTEM DESIGN, INSTALLATION, AND USE OF THIS PRODUCT.

Vehicle Detection Alarm - Mighty Mule
www.mightymule.comTurn dial counter-clockwise to INCREASE audio volume. RECEIVER TOP VIEW. 4 Installing Transmitter Batteries ... This equipment has been tested and found to comply with the limits for a Class B digital device, pursuant to Part 15 of the ... generates, uses and can radiate radio frequency energy and, if not installed and used in accordance with ...

Instructions for Gate Opener Single Button Entry Transmitter
www.mightymule.comInstructions for Gate Opener Single Button Entry Transmitter FCC Regulation: This device complies with Part 15 of the FCC Rules. Operation is subject to the following two conditions: (1) This device may not cause harmful interference, and (2) This device must accept any interference received, including interference that may cause undesired ...

MM371W MM372W
www.mightymule.com12 Volt automotive or marine type battery in weather proof housing (not included). Example of Dual Gate finished installation (Installations vary slightly on different types of gates) MM371W MM372W Single gate installation [MM371W] Dual gate installation [MM372W] This product meets the requirements of UL325, the standard for gate operator safety.

AUTOMATIC GATE LOCK - Mighty Mule
www.mightymule.comRemember to check the alignment and mark positions before drilling holes in fence post . Illustration F Clevis Pin Receiver Locking Cap GTO Automatic Gate Lock Carriage bolts, washers, and nuts (not provided; size of fasteners depends on the gate) Remember to check the alignment and mark positions before drilling holes in fence post and gate ...
Related documents

INSTALLATION INSTRUCTION AND OWNER’S MANUAL
www.123filter.comwww.123filter.com | (678) 261-7611 sales@ispringfilter.com Page 6 Sample Installation Figure 5 A. Source water from Feed Water Adapter Æ B. Source water to water inlet next to 1st stage C. Waste water from Flow Restrictor Æ D. Waste water to Drain Saddle E. RO water from Automatic Shut-off Valve Æ F. RO water to Storage Tank

MICROWAVE HOOD COMBINATION INSTALLATION …
www.whirlpool.comThese installation instructions cover different models. The appearance of your particular model may differ slightly from the illustration in these installation instructions.
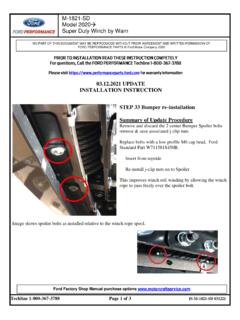
03.12.2021 UPDATE INSTALLATION INSTRUCTION STEP 33 …
performanceparts.ford.comINSTALLATION INSTRUCTION STEP 33 Bumper re-installation Summary of Update Procedure Remove and discard the 2 center Bumper Spoiler bolts remove & save associated j-clip nuts Replace bolts with a low profile M6 cap head, Ford Standard Part W711581S450B. Insert from topside Re-install j-clip nuts on to Spoiler

Installation Instructions - Painless Wiring
www.painlessperformance.comStep-By-Step Instruction Vehicle Harness 11-13 Step-By-Step Instruction EFI Connections 14-15 Step-By-Step Instruction/Diagram 3 Carb or Diesel Connections 16-17 Step-By-Step Instruction/Diagram 4 Identify & Setup of Universal TPS 17-18 Identify, Test & Install Universal TPS Optional Accessories 19-21 Speedo Output, Table Select & Push Button
Installation Instructions
assets.moen.com2. Installation Schematics – Measuring for Ideal Tub/Shower Performance Installation of this product at non-recommended measurements may lead to issues such as water discharge from the showerhead during tub fill mode. 2-1/4" min. (57mm) 3-1/2" max. (89mm) less than 1/4" (6mm) 3/4" (19mm) E Thin Wall Installation For Walls Thinner Than 1/4 inch

Installation Instruction - Tarkett
media.tarkett.comInstallation Instruction Collection iD Inspiration 55-70 Soft Walnut Dark Brown / Rock Grege Wimereux / 2015. 1. TRANSPORT & STORAGE 2. HANDLING In general the rolls and boxes must be stored in a sheltered clean and dry indoor place and free from any pollution. Before installation, the

INSTALLATION & OPERATING INSTRUCTION MANUAL
www.sweetmfg.comBUCKET ELEVATORS I 451337 06/2013 ® INSTALLATION & OPERATING INSTRUCTION MANUAL Manufactured in the U.S.A. by P.O. Box 1086, 2000 E. Leffel Lane • …

Installation Instructions - Whirlpool
www.whirlpool.cominstallation instructions This product is suitable for use above electric or gas cooking products up to and including 36" (91.4 cm) wide. See the “Installation