Transcription of IV Essentials course online version - RN.com
1 Presented by: 12400 High Bluff Drive San Diego, CA 92130 This course has been approved for two ( ) contact hours. This course expires on March 1, 2008. Copyright 2005 by All Rights Reserved. Reproduction and distribution of these materials are prohibited without the express written authorization of First Published: March 1, 2005 IV Essentials 1 Acknowledgements_____ 2 Purpose & Objectives _____ 3 Introduction _____ 4 Anatomy of a Vein _____ 5 Insertion of a Peripheral IV Line or Saline or Heparin Lock _____ 6 documentation of Venipuncture_____ 11 Maintenance of Peripheral IV Sites and Saline or Heparin Locks _____ 12 Site Changes _____ 12 Removal of Peripheral IV Line or Saline or Heparin Lock _____ 13 documentation of Removal _____ 13 Peripheral IV Dressing Change _____ 14 Fluid and Fluid Administration Set Changes _____ 15 Change by Infusate: _____ 15 Change by Infusion Set:_____ 15 Homecare _____ 15 Key Points to Remember _____ 16 Common Complications of Peripheral Therapy _____ 17 Conclusion_____ 19 References _____ 20 Post Test Viewing Instructions _____ 22 2 ACKNOWLEDGEMENTS acknowledges the valuable contributions.
2 Lori Constantine MSN, RN, C-FNP, author of IV Essentials . Lori is a nurse of nine years with a broad range of clinical experience. She has worked as a staff nurse, charge nurse and nurse preceptor on many different medical surgical units including vascular, neurology, neurosurgery, urology, gynecology, ENT, general medicine, geriatrics, oncology and blood and marrow transplantation. She received her Bachelors in Nursing in 1994 and a Masters in Nursing in 1998, both from West Virginia University. Additionally, in 1998, she was certified as a Family Nurse Practitioner. She has worked in staff development as a Nurse Clinician and Education Specialist since 1999 at West Virginia University Hospitals, Morgantown, WV. 3 PURPOSE & OBJECTIVES The purpose of this article is to review the fundamental concepts of intravenous (IV) therapy needed to provide basic IV care for the adult, hospitalized patient.
3 After successful completion of this course , the participant will be able to: 1. Describe the proper technique and documentation criteria for inserting and removing a peripheral IV line or saline (or heparin) lock. 2. Discuss when to change various types of IV tubing, rotate IV site, and change peripheral dressings to decrease the risk of infection 3. Discuss common complications of peripheral IV therapy, their associated signs and symptoms and basic treatment of these complications. You may find that both generic and trade names are used in coursesproduced by The use of trade names does not indicate anypreference of one trade named agent or company over another. Trade namesare provided to enhance recognition of agents described in the course . 4 INTRODUCTION IV therapy is a complex nursing treatment that most patients in an acute care setting have at one time or another during their hospital stay.
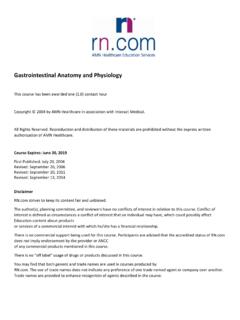
4 Although the technique of actually placing an IV is one that needs practice, the theory behind IV placement and management is didactic in nature and can be covered in a module such as this. The importance of correctly identifying veins, catheter selection, dressings, and potential complications are all issue that nurses face on a daily basis. 5 ANATOMY OF A VEIN Blood leaving the capillaries returns to the heart through the venous system, beginning with venules and progressing to larger and larger veins which lead to the superior and inferior vena cavae which enter the right atrium. Veins are highly distensible, thin walled vessels. They act as a volume reservoir for circulatory systems. At any given time, the veins carry about fifty percent of the body s blood volume. The veins transport blood back to the lungs and heart. Veins have valves that keep blood moving back to the heart.
5 The vein valves also provide footholds for the blood as it travels against gravity towards the heart. For example, blood returning to the heart from the foot has to travel against gravity. The venous valves and muscle contracts of the leg prevents backflow of blood, in this scenario. The vein is composed of three layers, the tunica intima (internal layer), tunica media (middle layer), and the tunica externa or tunica adventia (outer layer) (American Association of Critical Care Nurses, 1998). The names and anatomical location of the most the commonly accessed veins of the upper extremity are listed below. Name of Vein Anatomical Description Basilic Vein The largest arm vein of the upper extremity. It courses along is along the medial (ulnar) aspect of the arm from wrist to shoulder. It begins at the dorsum of the hand, crosses the elbow and drains into the brachial vein. Cephalic Vein This vein runs along the lateral (radial) aspect of the arm also from the wrist to shoulder and empties into the axillary vein.
6 Although the basilic vein is larger, the cephalic vein is more superficial and easier to access. Median Vein Forms a Y just below the elbow and drains into both the basilic and cephalic veins. Median Antecubital Vein Oblique coursing vein at the elbow that joins the basilic and cephalic veins. Deep Forearm Veins These are 2 or 3 veins each that course with and are named like the corresponding arteries of the forearm (radial & ulna). Brachial These veins are the deep veins of the upper arm, usually paired and smaller than the superficial veins. They travel in the upper arm parallel to (on either side) the brachial artery and join with the basilic vein to form the axillary vein. You usually perform venipuncture for the purpose of IV access, continuous or intermittent IV infusion of fluid, or infusion of medications. Generally, supervised instruction and competency evaluation in venipuncture for peripheral IV therapy will be documented.
7 Facility and state regulations may further limit who may perform this task. Please check with your facility and state policies and/or laws regarding this task before performing. Anatomy of a vein Courtesy of the National Cancer Institute, 2005. mmeeddiiaa 6 INSERTION OF A PERIPHERAL IV LINE OR SALINE OR HEPARIN LOCK The first step in the insertion of a peripheral IV line or saline or heparin lock is to obtain a physician s order. IV therapy should only be initiated after this order is obtained, or as necessitated in an emergency situation. After the order is obtained, you must verify the patient s identity by at least two methods. The Joint Commission on Accreditation of Healthcare Organizations (JCAHO) National Patient Safety Goals (NPSG) include using 2 patient identifiers for all patient identification issues. Your facility will have specific standards about the identifiers they use. Next, you will want to provide patient and/or family education regarding the procedure and obtain consent as appropriate.
8 You may then gather your materials and prepare for IV insertion. STEP 1: Gather your Equipment! You Absolutely Need: Antiseptic solution Gloves Tourniquet Peripheral short catheter Sterile 2x2 gauze pads or a sterile, transparent, semi-permeable dressing 1" non-allergenic tape (if applying a gauze dressing) Sterile tape or sterile surgical strips or a manufactured securing device Flush solution (.9% sodium chloride, 20 milliliter vial, preservative-free Flush syringes (3-5 milliliter size ) Sharps container IV solution with attached, primed tubing (if ordered) or an already primed saline or heparin lock IV pole (for administration of fluids or IV medications if needed) These Items are Optional: Arm Board Warm packs Local anesthetic (usually a topical anesthetic like Elma* cream) Scissors 7 STEP 2: Select Your Device! Consider This: Your choice of cannula should be of the smallest gauge that will accommodate the prescribed therapy.)
9 This will allow for sufficient blood flow around the cannula. Only one device should be utilized for each attempt. Stylets shall never be reinserted into the cannula when attempting IV access. Facilities may have different guidelines regarding which type of access device they prefer. You usually have three choices: Winged infusion set Over-the-needle catheter Through-the-needle catheter Winged Infusion Set: Purpose: Short term therapy for any cooperative adult, therapy of any duration for an infant, child, or elderly patient with fragile veins. Advantages: Some claim it is the easiest IV device to insert and ideal for IV push drugs Disadvantages: Can easily infiltrate due to rigidity of catheter Over-the-Needle Catheter: Purpose: Longer-term therapy for the agitated or active patient Advantages: Accidental puncture of the vein is less likely than with a needle, contains radiopaque thread for easy location, more comfortable for the patient Disadvantages: More difficult to insert (Courtesy of Washington State University, College of Veterinary Medicine, 2005) Over-the-needle catheter insertion.
10 Used with permission from Withdrawing the needle in an over-the-needle catheter insertion. Used with permission from 8 Through-the-Needle Catheter: Purpose: Long term therapy for the agitated or active patient Advantages: Accidental puncture of a vein is less likely than with a needle, more comfortable, contain radiopaque thread for easy location, available in many lengths; one variant, the peripherally inserted central catheter must be inserted by a specially prepared nurse Disadvantages: Leaking at the site may occur, especially in the elderly patient. If a needle guard is not used, the catheter may be severed. (Krozek, C.; Milliam, D., & Pelikan, R., 1996) STEP 3: Position the Patient's Arm! Consider this: Dependent positions increase capillary refill and may increase the likelihood you will be successful in inserting the IV. For cold skin, warm it by rubbing or stroking the skin or applying warm packs for 5-10 minutes as needed.