Transcription of SURE SHOT ATOMIZER SPRAYERS - Sure Shot ® …
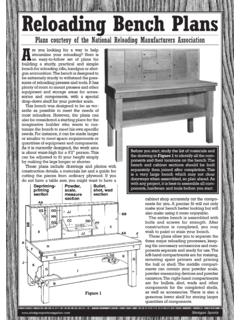
1 sure shot ATOMIZER SPRAYERSINSTRUCTIONSR efillable, Reusable. Extra by Free FOR OPERATING MODEL B SPRAYERS1) ALWAYS DEPRESSURIZE SPRAYER BEFOREREMOVING ANY pressure may be letout of the sprayer one of the two following ways:a) Tip the sprayer upside down and depress nozzleuntil no pressure is some liquid is left inthe sprayer when attempting this proceduremake sure you aim the nozzle at a place wherea little bit of liquid can be )Remove B13 black cap from filler assembly anduse small probe to depress the valve core untilall the pressure escapes. NOTE: Make sure thesprayer is upright and the filler assembly ispointed away from you when depressing thevalve )Remove the complete top assembly from thecanister once all the air has been let out of thesprayer. Do this by grasping the body in one handand the canister in the other and unscrewingcounterclockwise )Fill canister 2/3 full ( 7,8 or 16 ounce maximumcapacity) with light, clean liquid.
2 Make sure the liquidyou are putting into the sprayer is CLEAN and FREEOF FOREIGN PARTICLES. See ACCESSORIES onpage 3 for the liquid filling/measuring )Place complete top assembly on the canister andfirmly hand )Choose the nozzle you wish to use from the polybag in the you have chosen the nozzle,assemble it to the stem of the B15/B16 valve on topof your sprayer. NOTE: Nozzle must be firmlypushed into )Pressurize sprayer with compressed air by holding astandard air chuck onto the filler assembly stem anddepress the valve the air chuck in placeuntil you hear the line pressure equalize with thepressure in the the sprayer uprightwhile pressure is 80 - 145 least 80 psi is necessary to spray the full 7, 8 or16 ounces without MAXIMUMPRESSURE SHOULD NOT EXCEED 200 )The Model B sprayer is now ready to )For best results, the liquid to be sprayed should belighter then a No.
3 10 motor oil.(If liquid is tooheavy a pin stream will result).Dilute with asuitable diluent until desired spray is :Never point the nozzle of sprayer towardsyourself or any other person. Always point the nozzle ofthe sprayer away from yourself and toward the intendedtarget before depressing the : ALWAYS CHECK WITH THE CHEMICALSUPPLIER FOR CHEMICAL COMPATIBILITY WITHO RINGS, VALVES AND NOT RECOMMENDED FOR USE WITH PAINTSDO NOT PRESSURIZE SPRAYER WITHOUT B25 VALVE HEAD IN PLACE AND FIRMLY HAND TIGHTENEDMODEL B16 DESIGNATES PLASTIC BODYCB DESIGNATES CHROME BRASS BODYB8000PL / B8000 CBALUMINUMB8300PL / B8300 CBALUMINUMB8100PL / B8100 CBPLATED ALUMINUMB8400PL/B8400 CBPLATED,BRUSHEDALUMINUMB8700PL / B8700 CBPLATED,BRUSHEDALUMINUMB8200 PLALUMINUM- B45B11W- B46- B47- B48- B43- B44B11WB11WB11WB11WB11 WPART#DESCRIPTIONB05 BUNABuna O Ring B05 NNeoprene O Ring B05 EPEthylene Propylene O Ring B05 VViton O Ring B08 PLPlastic Body (8200 only)B10 CBChrome Brass Body B10 PLPlastic BodyB11 Air Filler Assembly (includes B11W, B12 & B13)
4 B11 WTeflon WasherB12 Valve Core - Viton B13 Black CapB14 BUNABuna O RingB14 NNeoprene O RingB14 EPEthylene Propylene O RingB14 VViton O RingB15 Viton ValveB15 NNeoprene ValveB16 Buna ValveB17 Butyl Rubber ValveB25 Aluminum Valve HeadB30-001 Pin Stream NozzleB30-035 Medium Spray NozzleB30-040 Fine Spray NozzlePART#DESCRIPTIONB30-043 Regular Spray NozzleB30-080 Coarse Spray NozzleB32 Plastic Adjustable Nozzle for all Model B sB437 ounce Aluminum Canister (8200)B448 ounce Aluminum Canister (8300)B4516 ounce Aluminum Canister (8000)B4616 ounce Plated Aluminum Canister (8100)B4716 ounce Plated, BrushedAluminum Canister (8400)B488 ounce Plated, BrushedAluminum Canister (8700)REPAIR KITSB516 Complete Valve Assemblies - contains6 each - B14V & B15 and 3 each - B30-001 w/6 tube & B30-043BK50 Complete Repair Kit contains B05V, B11, B12, B13, B25, 6 each - B14V & B15 and 3 each - B30-001 w/6 tube & B30-043 ACCESSORIESP07362 Filling/Measuring Device 32ounce capacity - Heavy DutyPolyethylene container withbrass mesh screen and easy PROCEDURESThe following is the correct order and way toremove and reassemble all the parts on the Model B ) ALWAYS DEPRESSURIZE SPRAYERBEFORE REMOVING ANY page1.
5 # )Remove the complete top assembly from thecanister once all the air has been let out of thesprayer. Do this by grasping the body in onehand and the canister in the other and unscrew-ing counterclockwise )Unscrew the valve head from the )Remove the valve and B14 o ring from the )Remove the 7/16 hex air filler (B11) assemblyfrom the side of the :The B11W teflon washer will be left in therecessed threaded area on the body where the airfiller assembly was just removed. The B11W mustbe removed and )Remove the o ring from the )The Model B sprayer is completely )To reassemble, start by reassembling the o ringto the )Take a new B11W Teflon washer and insertinto the recessed threaded area on the side ofthe )Take the 7/16 hex air filler (B11) assembly andscrew on by hand.
6 Tighten with : Be careful to only tighten until snug. DONOT )Assemble B14 o ring to valve and reposition ontop of ) Take B25 valve head and secure valve ando ring in place. Firmly hand tighten )Take the completed top assembly and screw itclockwise into top of the canister. Firmly handtighten )Pressurize and check for leaks. If leaks arefound retighten the loose part or parts untilleaks stop. Depressurize and follow steps#1 - #7 on page NOT PRESSURIZE SPRAYER WITHOUT B25 VALVE HEAD IN PLACE AND TIGHTENEDMAXIMUM PRESSURE 200 PSITROUBLE SHOOTINGN ormal maintenance includes replacing theB15/B16 valveTHE B15/B16 VALVE WILL NEED TO BEPERIODICALLY REPLACED. THE LONGEVITY OFEACH VALVE DEPENDS ON THE PRODUCTBEING SPRAYED AND THE AMOUNT OFSEDIMENT OR DIRT THAT GETS INSIDE THESPRAYER WHILE fillings is the average before the valve needsto be replaced.
7 But it is not uncommon to get morethan four filings out of each STANDARD MODEL B UNITS COME WITHVITON O RINGS, A B15 VITON VALVE,AND B12 VITON VALVE CORE. NOT ALLPRODUCTS ARE COMPATIBLE WITH VITON .There are a variety of o rings available (Viton ,Neoprene, Buna & Ethylene Propylene). There arethree different valves (B15 Viton , B15N Neoprene& B16-Buna). There are two different valve cores(B12 - Viton & B12N - nitrile).If the standard Viton o rings and seals are notcompatible with the product being sprayed pleasecheck with the chemical supplier for compatibilitywith the other o rings and seals that are o rings and seals are standard on Model B SPRAYERS because they are compatible with thewidest range of sprayable : Leaks from around B25 valve ) B25 valve to loose. Firmly tighten by hand ) B14 o ring is crimped or has some looseparticles on it.
8 Depressurize sprayer andremove B25 valve head. Remove valve andcheck o ring. Clean away any loose particlesand wet o ring. Reassemble and SHOOTINGP roblem: Pin Stream ) Liquid is too thick. Thin with proper diluent untilsprayable. Consult your chemical supplier forcorrect thinning ) Too little air pressure. You must have at least 80psi to spray full contents of ) Pin Stream nozzle in operating Replace with a spray nozzle. (regular,fine, medium & coarse)Problem: Air filler assembly won t accept air orleaksReason/Solution1) Air filler assembly has been damaged. ) Valve core is swollen. ) Chemical is attacking valve core. Replace B11with an alternative valve : Will not spray at ) Nozzle is completely clogged. Replace2) Valve is completely clogged. ) No Air with at least 80 psi4)Sprayer is full to top with liquid not allowingroom for compressed : Leaks from valve ) Valve worn or swollen.
9 Replace. Standardvalve has a Viton seal. Valves also availablein neoprene and buna for chemicals notcompatible with Viton .Problem: Leaks from between body and ) O ring is dirty. Clean and ) O ring is swollen. Replace. Standard o ring isViton . Neoprene, ethylene propylene, andbuna, are available for chemicals that are notcompatible with Viton .WARNING * WARNING * WARNING Sprayer Units returned to the factory containing ANY LIQUIDS will be returned to sender at their SHOT SPRAYERS , Parts and Accessories are guaranteed against defective materials and workmanshipunder normal conditions of use and service for a period of ninety days from date of sale to the consumer or ninemonths from date of shipment from the factory, whichever transpires first. The obligation of the Company (MilwaukeeSprayer Mfg.
10 Co., Inc.) shall be limited to repairing or replacing any sprayer, part or accessory which is found by the Company to be defective, provided that a written claim covering such defect is submitted within thewarranty period. The Company shall in no event be liable for consequential damages arising out of a defect or failure in any sprayer, part or accessory, or for any loss arising from the use or resale of any such materials, theCompany s liability being limited to repair or replacement of defective components as aforesaid. This warranty shallnot apply to defects resulting from accident, alterations, abuse or misuse, including solutions not recommended foruse with the materials used in the manufacturing of this it shall be the policy of the Company to beliberal in making adjustments, the settlement of claims regarding product defects will be governed by the provisionsof this warranty.