Transcription of 851 Series Frameless Swing Door with Inline Panel
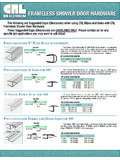
1 Frameless Swing Door with Inline Panel11244111221612611 Euro Header (S123)Sill w/ weep holes (S120)U-wall jamb (S116) Panel Glazing Vinyl - thick (SDTBV) Panel Glazing Vinyl - thin (SDSV)Assembled Door (800 Series )Strike Jamb (S119) w/ magnet(SD-MAGNET,SD-PLATE)and vinyl (CO-EXT BULB SEAL CLR) Drip Rail (SX109-7 CIR)Curb Fill (SDFILLER)Black PVC Setting Blocks (SD-SBV)H-bar (S118)8 x 1" PPH Screws (2-236)#6-20 x 1/2" PPH Tek Screws (2-323)Plastic Wall Anchors (2-477)C-handleMagnet Strike Plate w/ Gasket (SF205, SD-MAGNET,SD-PLATE)851 SeriesInsideOutsideNote: 800 Series units have pre-drilled holes in glass for Chaparral A Division of John Sterling Corporation 2006. All rights reservedShower Door Continuous Hinge w/ Inline 1 Sill (2) can be distinguished from header (1) by the weep holes. Measure from wall to wall for sill (2) and 2 Apply a generous bead of silicone based caulk to the underside, at each end of the sill (2) and place on curb making sure weep holes are on inside of shower.
2 Using a level, position the wall jambs (3) into the sill (2) and against the wall, with the longer legs facing the opening. Mark through the holes provided for anchoring. Drill 3/16 holes and insert plastic anchors (14) for masonry applications or drill 1/8 tap holes for fiberglass and acrylic units. Secure jambs to the walls with #8 x 1 screws (12).STEP 3 Place glass setting blocks (10) with legs facing down in sill (2) about 2 from the wall and approximate 1" to 2" to the inside of the glass edge. Set glass Panel inside wall jamb (3).STEP 4 Position the H-bar (11) over the glass Panel . Standard glass penetration into the wall jamb (3) and H-bar (11) is 3/8 .STEP 5 Measure from wall to wall for header (1) and cut. Place header (1) on top of unit. Making sure header (1) sets down all the way resting on wall jambs (3).STEP 6 Position the door assembly (6) into the opening. Plumb the door assembly (6) leaving an even reveal between door (6) and header (1) not extending more than 1/2" from wall, and secure it to the wall jamb (3) using #6-20 x 1/2 Tek screws (13).
3 STEP 7 Position the strike jamb (7) into the opening over the H-bar (11).Do not secure at this 8 Position the header/sill curb fills (9) against the hinge jamb of door assembly (6) and snap into place. Make certain upright leg is toward outside of 9 Pull the strike jamb (7) flush against the header/sill curb fills (9). Secure the H-bar (11) to the sill (2) and header (1) with #6-20 1/2" Tek screws (13). Secure the strike jamb (7) to the H-bar (11) using #6-20 x 1/2 Tek screws (13).STEP 10 Use #6-20 x 1/2 Tek screws (13) to fasten header (1) to both wall jambs (3).STEP 1 1 There are two different types of vinyl for glazing the panels ; vertical vinyl (5) and horizontal vinyl (4). The vertical vinyl (5) is thinner and should be installed first. Cut the vinyl the length of the opening between header (1) and sill (2) and add 1" so vinyl penetrates the header (1) and sill (2) 1/2" on each side.
4 See diagram 1. Repeat for the inside and outside of shower. Then install the horizontal vinyl (4). The horizontal vinyl (4) should be flush with the vertical vinyls (5) at the header (1) and sill (2). See diagram 2. Repeat for the inside and outside of : If vinyl is difficult to press in, lubricate with soap & 12 with door assembly (6) closed, locate magnet on strike jamb (7) and mark location outside of glass with pencil. Open door assembly (6) and center gasket (16), then magnet strike plate (16) over marked location and tap on with a mallet. Adjust to close 13 Install C-handle (15) using diagram on front side as a guide. C-handle package comes with 2 allen wrenches for 14 Notch drip rail (8) so that flange and drip rail cover the full width of door including hinge. Run a small bead of silicone inside of U-shaped drip rail (8), then press upwards onto bottom of door by hand. Adjust so that drip rail vinyl (8) drags along top of curb fill (9).
5 STEP 15 Caulk all edges and joints exposed to water using a silicone based caulk or other suitable sealant that will prevent water (4)This sideagainst glassinto header (1) & sill (2)Diagram 2:Diagram 1:(5)This sideagainst glassinto wall jamb (3),Pencil or glass markingpencil