Transcription of ATTACHED 8 X 10 DECK - California Redwood …
1 RedwoodFor beauty and performance, Redwood is naturally superior toother woods. That s why it s the first choice for decks, fences andmost outdoor projects. Redwood retains its beauty outdoors, shrinksand swells less than other woods and is less likely to warp, split,check or cup. With relatively little or no pitch, Redwood is easy todrill, saw and shape. Redwood heartwood has natural durability andresistance to insects and will last longer outdoors than most knotty garden grades of Redwood are ideal for outdoor grades are beautiful, durable and economical. Construction Heart/ deck Heartis all heartwood and con-tains knots; used for load-bearing applications near the ground.
2 deck Heart is graded for strength and is available in 2x4 and Common/ deck Commoncontains sapwoodand knots; used for decking and above-ground uses. deck Commonis graded for strength and is available in 2x4 and 2x6. Merchantable Heart is all heartwood and contains larger knotsthan Construction grades; used near the soil. Merchantablecontains sapwood and larger knots; used for fence boards, rails and above-ground accepts finishes better than most woods. Some heightenredwood s natural beauty, bringing out the color and the help the wood harmonize or contrast with surroundingstructures. Read the labels on all finish products before option Redwood performs better than most woods ifleft unfinished.
3 This no-maintenance option will result in redwoodweather-bleaching to a soft driftwood water repellent finishwith mildewcide is recommendedto stabilize the color at tan. Bleaching and weathering stainsproduce a permanent drift-wood gray effect, a good, low-maintenance stainsin Redwood shades tint the wood without hiding the grain. Solid-color stains or paintsshould be applied over compatibleoil-based primers. FastenersUse only non-corrosive hardware such as aluminum, stainless steel or top quality hot-dipped galvanized screws or nails. Ordinary nails and screws will cause Enfrente Drive, Suite 200 Novato, CA 94949-7206 Telephone 415 382-0662 Toll Free 888 Cal- Redwood Fax 415 382-8531 8 X 10 DECKA deck that is ATTACHED to a house is supported at the house wall bya board called a ledger.
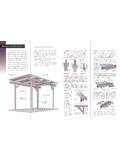
4 Building with a ledger eliminates threeposts and footings, and one skirtboard from the deck design. Theledger must be securely anchored into the house framing (bandjoist) in order to support the deck s weight. Ledger attachmentsmust also be moisture proofed. Install the 2x8 ledger so that thedecking will be at least 1 inch below the indoor floor level. Theillustrations show the most typical ledger attachment and detail an alternate technique for using washers as spacers. Both willallow water to drain away from the house and deck , preventingwater damage. Aportion of the siding must be removed where theledger attaches to the house wall.
5 Allow room for the skirtboardsthat attach to the ends of the ledgerTrim the galvanized metal flashing to thelength of the cutout. Insert the flashing under the siding and foldit up and out of the way until the ledger is ATTACHED . Brace the 2x8 ledger into position and drill pairs of 1 4-inch pilotholes spaced no more than 24 inches apart through the ledger,sheathing and into the house framing. Secure the ledger to the housewith 3 8-inch by 5-inch lag screws and washers, penetrating the houseframing by at least 11 2inches. Where you have through access, use3 8-inch by 6-inch carriage bolts, washers and siliconized acrylic caulking in the bolt holes and around the boltheads after securing them in the ledger.
6 Also seal the ends and bot-tom ofthe ledger where it meets the house. Fold the flashing overthe top of the 2x8 ledger and bend it to direct water away from thehouse and ledger as shown. Other Construction TipsheetsAlso AvailableDeck Over ConcreteDeck ConstructionCalistoga Spa SurroundDeck Grades, Nails and FinishesWindsor Shade ShelterFences for All ReasonsMonterey Potting CenterLandscape Architecture Mendocino BenchLake Tahoe GazeboPetaluma PlantersSonoma Picnic TableContact the California Redwood Association for more great publica-tions containing Redwood technical and building information. Callus toll free at 1-888-Cal- Redwood for a complete literature list or toask for any of the titles listed here:Washers as spacersUse stainless steel or top quality galvanizedwashers and installenough to allow at least a 1 2-inch spacebetween the house walland the ledger.
7 REDWOODN aturally beautiful Easy to usePractical and economicalDurable and stable Resistant to decay and insectsQuantitySizeLengthLedger12x810 feetPosts34x4variedSkirtboard12x1010 feetConcrete footings3 Carriage bolts,washers and nuts10 sets3 8inch6 inchesor Lag screwsand washers10 sets3 8inch5 inchesGalvanized metal flashingas needed10 feetAdditional Materials For ATTACHED 8x10 DeckFlashing3 4" clean-out gap2x8 Ledger 2x8 Redwood deck joistSidingSheathingFlooringBand joist3 8" x 6" lag screwMetal joist hangerUse throughboltwhere possibleFlashing drip-edge2x4 Redwood deck boardsAdditional tools neededMetal snips, siliconized acrylic caulkingand caulking gun.
8 The materials listed below include only those whichare different or in addition to those listed for the Freestanding 8x10 or stainless steel washers for 1 2" spacing2x8 Ledgerskirtboard with 11 4-inch joist hanger nails before installing the a scrap piece of 2x8 lumber as a spacer in the joist hangers whilenailing them to the skirtboard. This will assure a proper final fit. 5. DeckingLay the 25 2x4 deck boards on the joists. Do not fastenthe boards in place until you are satisfied with their arrangement andspacing. Install deck boards bark side up. Predrill nail holes near theends of boards to prevent splitting.
9 Attach decking with 16d nails or 3-inch deck screws. Allow 1 8-inch space between all deck boardsincluding those next to the 2x6 deckingIf you choose 2x6 Redwood decking tocover your deck , you will need 16 pieces and the short-side skirtboardsand ledgers will now trim to 931 8and 831 8inches long, to lay out the deck boards before securing them and to allow 1 8-inch spaces between all you will needTape measure, carpenter s or framingsquare, hammer, ratchet wrench, power radial saw, plumb, linelevel and level, power drill and regular bits and rubber mallet. It is always a good idea to measure and cut as you build for themost accurate results.
10 Use non-corrosive, hot-dipped galvanized,stainless steel or aluminum fasteners and hardware. To minimizesplitting, predrill nail holes at board LayoutMark the deck corners with stakes and string. Use a carpen-ter s square to help lay out 90 corners. Double check for squareness bymeasuring diagonally between the corners. If the two diagonal mea-surements are equal, the layout is a true rectangle. 2. Footings and postsSimple precast concrete footings withwood nailing blocks are used in this design. For this freestanding deck ,you will need six. Check local building codes to be sure these footingsare appropriate for your climate.