Transcription of Remote Power Modules, 4 Circuits HW ... - Lutron …
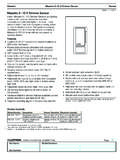
1 EnglishEspa olFran aisPortugu sPlease Read Before InstallingFigure 1 - Remote Power module Mounting and WiringInstallationHWI-PNL-5 Panel ShownModule Interface4 Zone Diagnostic LEDs(if present)Unit Diagnostic LEDA ddress Switch4-Pin ConnectorLabel* Power Feed may be from external breaker panel or from breaker within panel enclosure (if so equipped).Five Position Bypass JumperLoad 2 Power Feed*Load 1 Red 1 Red 2 Red 3 Red 46 Wires: Circuit 1 Circuit 2 Circuit 3 Circuit 4 Hot/Live NeutralRemote Power Modules, 4 Cir cuits HW-RPM-4A-120, HW-RPM-4A-230, HW-RPM-4E-230-CE, HW-RPM-4U-120, HW-RPM-4U-230-CE, HW-RPM-4U-240, HW-RPM-4 FSQ-120 Note: This instruction sheet covers multiple Remote Power module model numbers, each with different voltages, load types, and ratings. Please refer to Table 1 for more InstructionsTable 1 - Models and Ratings1. For higher wattages or for load types other than those listed, a Power Booster or Interface is required. See the HomeWorks Technical Reference Guide (P/N 366-963 for 120 V, 367-1029 for 220-240 V) for This load type is not UL Listed or CSA Certified for use with this control.
2 NOTICE: To avoid the risk of equipment damage, make sure that the LED lighting system used conforms to the Compatibility Guidelines for Lutron Controls and LED Lighting Systems found at The HW-RPM-4E module is only to be used with electronic low-voltage type transformers. Use with magnetic low-voltage transformers will damage the module and void the The HW-RPM-4 FSQ-120 provides quiet fan speed control for up to four ceiling fans (one fan per circuit). This module cannot control fans that have integrated fan speed controls ( , any fan that has a Remote control). It is normal for the HW-RPM-4 FSQ-120 module to hum or buzz when at the medium-high fan speed setting. Do not connect this module to lighting loads. Damage to the module could Turn Power off to all feeds to the panel. WARNING: The panel may be fed by multiple cir-cuits. To avoid the risk of electric shock, locate and lock each supply circuit breaker in the off position before proceeding. Wiring with the Power on could result in death or serious Mount the module into the rough-in panel.
3 Start with position 1, then 2, then 3, etc. Do not overtighten screws, torque to 20 in-lbs ( N m) maximum (see Figure 1). Note - Install modules only in a HomeWorks Panel. To deter-mine which panels will accept modules, see the HomeWorks software or the HomeWorks Technical Reference Guide (P/N 366-963 for 120 V, 367-1029 for 220-240 V).3. Install the module s wires into the appropriate terminal blocks and secure using 5 in-lbs ( N m) of torque. DO NOT overtighten (see Figure 1).Hot/LiveNeutralINC: IncandescentMLV: Magnetic Low VoltageELV: Electronic Low VoltageLED: LED Driver/LuminaireNCC: Neon / Cold-CathodeF2W: Lutron Fluorescent Tu-Wire and Advance Mark 10 SFL: Switched (non-dim) FluorescentModel #Load Types1 Voltage / LoadMax. Load1 Per:OutputModuleHW-RPM-4A-120 INC, MLV, ELV, NCC, F2W120 V 50 / 60 Hz10 W10 A16 ALED2400 W21600 W2HW-RPM-4A-2302 INC, MLV, ELV, NCC220-240 V 50 / 60 Hz10 W8 A13 ALED2300 W21200 W2HW-RPM-4E-230-CE3 ELV, INC220-240 V 50 / 60 Hz10 W10 A (incl.)
4 Up to A INC)16 AHW-RPM-4 FSQ-1204 FAN MOTOR120 V 50 / 60 A2 A8 AHW-RPM-4U-120 INC, MLV, NCC, F2W, SFL120 V 50 / 60 Hz25 W16 A16 ALED2400 W21600 W2HW-RPM-4U-230-CEINC, MLV, NCC, SFL220-240 V 50 / 60 Hz40 W10 A13 ALED2300 W21200 W2HW-RPM-4U-240 INC, MLV, NCC,SFL220-240 V 50 / 60 Hz40 W16 A16 ALED2300 W21200 W2 Brown or BlackBlue or WhiteEnglishEspa olFran aisPortugu sLutron Elec tron ics Co., Inc. 7200 Suter RoadCoopersburg, PA 18036-1299 Made and print ed in the 8/09 P/N 043-271 Rev. A4. Connect the control harness (provided with the HomeWorks processor or module Interface) to the module at the four-pin Check that all bypass jumpers are installed. They will dis-tribute Power to each load and should not be removed until after all modules and loads are fully installed and WARNING: To avoid the risk of electric shock, only turn on input feed circuit breakers when load wiring is complete and it is safe to have Power applied. Failure to verify wiring could result in death or seri-ous injury.
5 Turn on input feed circuit breakers and check that they do not trip. Please refer to Table 1 for load type and capac-ity for each model number. Note (4 FSQ only) - Verify that all connected fan loads are functional. Use the fan s pull chain to set the fan to its high-est For any feed circuit breaker that trips, locate the shorted load and resolve the wiring problem before Turn Power OFF to all feeds to the panel. 9. Remove and store the bypass jumper for possible later use. NOTICE - Install bypass jumpers whenever a circuit breaker is turned OFF to work on a load. Damage caused by short Circuits and miswiring IS NOT COVERED by the product Turn ON input feed circuit breakers and check that they do not For any feed circuit breaker that trips, locate the shorted load and resolve the wiring problem before Use the Address Switch to check the operation of the module . See Table 2. Zone diagnostic LED (light emitting diode) status (if present) Note: When testing each circuit, allow the Circuits to remain on for at least 20 seconds.
6 Verify that the Zone Diagnostic LEDs are not blinking error codes (see Table 4).13. Set each address switch to match the module s position (set module 1 s address switch to 1, etc.).14. After the HomeWorks Processor is programmed, check each module s diagnostic LEDs. See Tables 3 and 2 - Address Switch OperationTable 3 - Unit Diagnostic LED StatusTable 4 - Zone Diagnostic LED Status (if present)1. Locate and repair fault. Cycle Power to Check software configuration. MLV load detected with ELV software Replace RPM. Internal device (FET) Possible faulty MLV Multiple errors exist on this output. The relay has opened to protect the module and all 4 outputs will be : For Warranty information, please see the Warranty enclosed with the product, or visit product may be covered under one or more of the following patents: 5,038,081; 5,510,679; 6,046,550; 6,091,205; 6,347,028; 6,380,692; 7,259,524 and corresponding for-eign patents. and foreign patents pending. Mark 10 is a registered trademark of Advance Transformer, Rosemont, Illinois.
7 Lutron , HomeWorks, and the sunburst logo are registered trademarks of Lutron Electronics Co., Inc. 2009 Lutron Electronics Co., LED Status Possible CauseOffNo Power or Defective Module1 blink per Operation heartbeat 1 blink per 7 secondsNot communicating with processor: open control harness; module set on invalid or diagnostic address; system not properly configured or addressed in HomeWorks Software4 blinks; pause; repeatModule in Manual Override10 blinks per secondZone error on one or more outputsPositionProper module Output / Purpose0 Internal relay ON, no output to load1-8 Address for normal operation9, ANot Used All outputs OFF (internal relay open)BRed 1 output ON Full / Use to check wiringCRed 2 output ON Full / Use to check wiringDRed 3 output ON Full / Use to check wiringERed 4 output ON Full / Use to check wiringFAll outputs ON FullZone LED Status Load StatusDescriptionOffOFFN ormal; Load OffContinuously OnONIncand. / Electronic Dimming1 blink per secondONMagnetic DimmingError Codes1 blink; pause; repeatOFFLoad Short Circuit / Overload12 blinks; pause; repeatOFFI nductive Load23 blinks; pause; repeatON FullShorted Component34 blinks; pause; repeatOFFDC Detection410 blinks per secondAll outputs OFFM ultiple errors5 EnglishEspa olFran aisPortugu sPor favor, lea antes de instalarFigura 1 Cableado y montaje del m dulo de aliment-aci n remotoInstalaci nImagen del panel HWI-PNL-5 Interfaz del M dulo4 LEDs de Zonas de Diagn stico (si existen)LED de Diagn stico de la UnidadInterruptor de direcci nConector de 4 contactosEtiqueta* La Alimentaci n de Potencia puede ser desde el panel del interruptor externo o desde el interruptor dentro del gabinete del panel (si est equi-pado de esta manera).
8 Puente de Derivaci n de Cinco PosicionesCarga 2 Alimentaci n de Potencia*Carga 1M dulos Remote de Potencia, 4 circuitosHW-RPM-4A-120, HW-RPM-4A-230,HW-RPM-4E-230-CE, HW-RPM-4U-120,HW-RPM-4U-230-CE, HW-RPM-4U-240,HW-RPM-4 FSQ-120 Nota: Esta hoja de instrucciones cubre los n meros de modelo de los M dulos Remotos de Potencia, cada uno con diferente voltaje, tipo de carga, y valores nominales. Por favor consulte la Tabla 1 para m s informaci de instalaci nTabla 1 - Modelos y Valores Nominales1. Para potencias m s altas o para otros tipos de carga que los listados, se requiere un Interfaz de Potencia. Consulta la Gu a de Referencia T cnica de HomeWorks (P/N 366-963 para 120 V, 367-1029 para 220-240 V) por m s Este tipo de carga no est listado en UL ni certificado CSA para el uso con este control. AVISO: Para evitar el riesgo de da os en el equipo, asegure que el sistema de iluminaci n de LED cumple con las Gu as de Compatibilidad para los Controles y Sistemas de Iluminaci n de LED de Lutron que se encuentran en El m dulo HW-RPM-4E solamente se usa con transformadores de tipo electr nico de bajo voltaje.
9 El uso con transformadores magn ticos de bajo voltaje da ar el m dulo y se anular la garant a. 4. El HW-RPM-4 FSQ-120 provee control silencioso de velocidad de ventilador para hasta cuatro ventiladores de techo (uno por circuito). Este m dulo no puede controlar ventiladores que tengan controles de velocidad integrados (por ejemplo un ventilador con control remoto). Es normal que el m dulo HW-RPM-4 FSQ-120 zumbe cuando est en velocidad media a alta del ventila-dor. No conecte este m dulo a cargas de iluminaci n. Podr a da Apague la potencia de todos los alimentadores del panel. ADVERTENCIA: Es posible que este panel se alimente de varios circuitos. Para evitar el riesgo de choque el ctrico, localice y coloque cada cortacircuito de alimentaci n en la posici n de apagado antes de continuar. El cableado con la alimentaci n conectada podr a resultar en la muerte o heridas graves. 2. Monte el modulo en el panel de preparaci n. Comience con la posici n 1, luego la 2, luego la 3, etc.
10 No sobreajuste los tornillos m ximo torque 2,25 N m (20 pulg-lbs) (vea la Figura 1). Nota - Instale los m dulos solamente en un Panel HomeWorks. Para determinar qu paneles aceptar n los m dulos, consulte el software HomeWorks o la Gu a de Referencia T cnica de HomeWorks (P/N 366-963 para 120 V, 367-1029 para 220-240 V).3. Coloque los cables del m dulo en los bloques de bornes correspondientes y aseg relos utilizando 0,56 N m (5 pulg-lbs) de torque. NO ajuste de m s los tornillos (vea la Figura 1).VivoNeutroINC: IncandescenteMLV: Bajo Voltaje Magn ticoELV: Electr nico de Bajo VoltajeLED: Conductor/Luminaria del LEDNCC: Ne n/C todo Fr oF2W: Lutron Fluorescente Tu-Wire y Advance Mark 10 SFL: Fluorescentes con-mutadas (sin atenu-aci n) Modelo #Tipos de carga1 Voltaje / M M Por:SalidaM duloHW-RPM-4A-120 INC, MLV, ELV, NCC, F2W120 V50 / 60 Hz10 W10 A16 ALED2400 W21 600 W2HW-RPM-4A-2302 INC, MLV, ELV, NCC220-240 V 50 / 60 Hz10 W8 A13 ALED2300 W21 200 W2HW-RPM-4E-230-CE3 ELV, INC220-240 V50 / 60 Hz10 W10 A(incl.)