Transcription of 1 A primer on planking - admiraltymodels.com
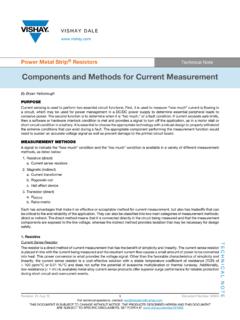
1 1A primer on plankingHere is a short photo-essay on planking a ship s hull. The photographs in this article are of a model of Resolution of 1772: one of Captain Cook s ships for his second and third voyages. The scale of the model is 1:48. You will notice that this is not a fully framed model, as it is to be fully planked except for one small window on the port side (see page 6). The principles of planking a hull are the same, regardless of the framing scheme. It is, however, much easier to plank a fully framed first stage in planking is the process of lining out. In full size practice this consists of dividing the hull into bands of roughly equal widths using wooden battens. In model work the use of battens is often recommended. However, I find that I can visualise a smooth run much more easilyby using black thread held in place by dabs of dilute white glue. In the photograph (below left) the main wale was planked first, defining the upper limit of the lower hull planking .
2 Here the lower hull has been divided off into four bands. Each band will consist (in this case) of five strakes of planking . I divide the girth off into four equal bands by means of paper tick strips. This gives me an approximate run of the planking . The next step is to adjust the threads until the curves of the run look right when viewed from a number of different angles. In the case of this particular hull, which is very bluff-bowed, I will work two drop strakes far forward, just under the main wale. Aft, if properly arranged, there will be no need for any steelers. Most hulls require perhaps one drop strake forward and one aft. A drop strake is where two strakes of planking reduce to one, or three to two. by David AntscherlAll material 2006, 2008 David Antscherl12A steeler (also spelled stealer) is the oppo-site principle: here one strake is worked to become two, or two strakes widen to three. The use of steelers aft can often be avoided by careful the uppermost strake under the aft end of the main wale (previous page).
3 You will need to add a small piece of plank or two to fill the trangular gap under the outer corner of the wing transom. These pieces will run parallel to the lower hull is another view of the hull during lin-ing out. Some minor adjustments still need to be carried out to the threads at the bow. No strake should narrow to more than half its maximum width at the bow rabbet. The uppermost band is where the drop strakes will be worked. This avoids the problem of over-narrow hooding photo above shows the first two bands of planking in place. There are ten strakes in total, completed and treenailed. The point of this photo is to show the forward end of the first strake, the garboard strake. It should not be carried high up the bow rab-bet: a common beginners the garboard is carried up too high, the remainder of the hooding ends of the planks (the ends that fit into the rabbet) will be crowded together and be too narrow, or too many drop strakes will be required forward to now you will realise that virtually all the planking will need to be cut to shape, as you cannot edge set a plank.
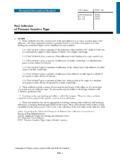
4 Edge setting means bending the plank sideways across its width. If you try to do this, one edge of the plank will lift off the frame and be im-possible to attach. To avoid this happening each plank needs its own pattern. The fol-lowing sequence shows the steps in spiling off : the process of finding its tape a strip of stiff card along the pre-vious strake. I use a lockable compass (at left) with the point reversed in one leg and a carefully sharpened hard lead in the other. Set the compass to a suitable opening and run the reversed point along the edge of the strake. Don t twist the compass as you run it resulting line along the card will give the mating edge of the new the card strip flat on a cutting surface and cut along the pencil line with a very sharp blade. You can do this free-hand, or - very carefully! - use an appropriate ships curve as a guide. You can now use the card pattern to trans-fer the shape of the edge of the new plank to a thicknessed piece of wood stock (lower part of photo above).
5 This accurately defines one edge of the new plank. The next step is to find the width of this plank at different points along its a new tick strip and place it as shown above. Mark the distance from the previ-ous strake to the thread of the planking band that you are working on. Now place this strip on a piece of paper with equally spaced radiating lines (below). In the exam-ple pictured here the first strake of five in that band is complete, therefore the re-maining space will be occupied by four more strakes. Slide the tick strip until its end and your mark align with four spaces, then mark them off as shown the strip on the frame, and you can see how the four strakes yet to be hung will fill the planking band (top of next column).Using the marked strip, you can transfer the width of the new plank at that point to the blank that you are marking out, as pictured below. Repeat for as many points along the plank as you points may now be joined up using a flexible or ships curve to complete the shape of the plank ready to cut out (below).
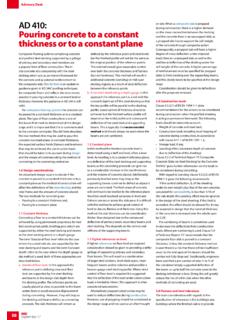
6 5 Here are two identical planks. The lower one has been carefully steamed to shape. One can bend a plank in two planes, but not three. Note that the fitted edge is cut out close to the marked line, but the far side has been cut 1/32 full (actual, not scale measurement) to allow for this photograph the plank has had its fit-ted edge refined with a sandpaper stick, and the hooding end trimmed. It has been glued in place. Properly carried out, there is no stress on the plank and no clamping should be necessary. Note a small piece of offcut plank that has been glued under the aft end to support the joint with the next plank in this strake, as the butt falls between frames. In a fully framed model this is the strake has been completed. Once all planks in a strake are attached, their widths are re-marked at intervals and a sanding stick used to reduce the strake to its final width. Sighting along the plank-ing from bow and stern will show up any waviness which can be eliminated before proceeding with the next view aft shows the strakes as they widen.
7 With careful planning, no steelers will be required. The widest point of the garboard strake is a scale 17 . The lowest five strakes have been treenailed in all the positions that framing would have run in the actual ship. 36An early stage in planking . The garboard and four strakes making up the first band of plank-ing have been view at a later stage of planking . The holes in the keel are for the pedestal bolts. Forward part of a planking expansion. This is a 38-gun frigate of 1808, after David White from an Admiralty draught. No scale specified. Note that there are no drop strakes, and that six strakes under the main wale are top and material David Antscherl, 2004, 20087A planking glossaryBBand, of planking : an arbitrary division of the surface to be planked into sectionsBattens: see planking battensBearding line: the line along which the thinning of a piece of wood beginsBearding: a gradual diminishing of a piece of wood in thickness Bevel: to angle the edge of a plank to closely fit its neighborBilge: the part of the ship s floor that the ship would rest on if beachedBoard: wood of less than 1 in thickness (also see plank and thickstuff )Butt: the end joint between any two planks in a strakeButtock: the aft part of the ship s body, aft of the cant framesCCaulking hammer: specialized tool for forcing oakum into seams, 1:1 scaleCaulking: material forced into plank seams to make the joints watertight, 1: 1 scaleCopenhagen curves.
8 See ships curvesDDoubling: a second layer of planking , usually used to give extra stability to a ship Drop strake: the reduction of three strakes to two, or two to one, where the hull narrowsEEdge setting: attempting to bend a plank edgewise. Not recommended!FFlexible curve: an economic alternative to ships curvesFrench curves: similar to ships curves, but smaller and of limited use in plankingGGarboard strake: the strake lying adjacent to the keel in the keel rabbetHHighway drafting curves: drafting curves of regular radii. Only useful for deck beamsHooding end: the end of a plank that fits into the stem or stern rabbetHoods: the foremost and aftermost planks in a strake ( )LLining out: the process of marking out the run of the plankingOOakum: old rope that has been broken down for use as caulking material, 1:1 scale8 PPlank stock: wood cut to planking thickness, but much wider than an individual plankPlank: wood sawed to between 1 and 4 in thickness (also see board and thickstuff ) planking battens: used to mark the hull into planking bands.
9 Easier to use at 1:1 scalePlanking expansion: a projection drawing of the hull flattened out planking threads: a suitable substitute for planking battens on modelsProportional dividers: a device for dividing a given space into equal partsRRabbet: a rebate or groove, generally triangular, in the keel and stemRadiating line diagram: an inexpensive alternative to proportional dividersSSeam: the joint between two adjacent strakes of plankingShips curves: a set of drafting curves with varying shapesSny: sideways curve, convex uppermost, of planks in order for them to fit properlySpiling (spiling off): the process of finding the shape of a plank edgeStealer (steeler): a partial strake added where the hull form expands, reducing sny ( )Strake: a row of planksTThickstuff: planking from 4 to 12 in thickness (see plank and board)Tic strip: involuntary twitching while undressing. Nothing to do with plankingTick strip: a narrow strip of paper used for marking outWWinding: twisted or curved, term applied to a timber.
10 Out of winding means square or straight