Transcription of Windows 7 Quick Reference Guide - Hobbs Municipal Schools
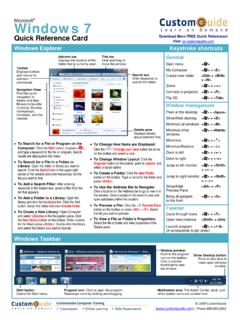
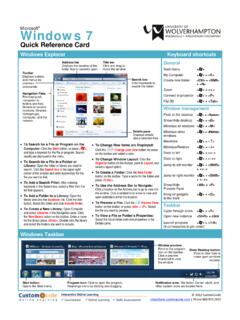
1 Windows 7 Quick Reference GuideUpdated: April 2010 Windows ExplorerKeyboard Shortcuts To Search for a File or Program: Click the Start button and type a keyword for the file or program. Results are displayed immediately in the menu. To Search for a File in a Folder: Open the folder you want to search. Click the Search box in the upper right corner of the window and enter keyword(s) for the file you want to find. To Add a Search Filter: After entering keywords in the Search box, select a filter from the list that appears. Examples include Type, Date Modified, Size, To Change Window Layout: Click the Organize button on the toolbar, point to Layout, and select a layout option.
2 To Create a Folder: Click the New Folder button on the toolbar. Type a name for the folder and prett <Enter>. To Use the Address Bar to Navigate: Click a location on the Address Bar to go to it in the window. Click a location s list arrow to view and open subfolders within the location. To Preview a File: Click the Preview Pane button on the toolbar or press <Alt> + <P>. Select the file you want to Bar Displays the location of the folder that is currently openTitle Bar Click and drag to move the windowSearch Box Enter keywords to search the buttons and menus for common commandsNavigation PaneProvides Quick nagivation to folders and files.
3 Browse to favorite locations, libraries, Computer, and the Pane Displays details about selected Menu My Computer + <E>Create New Folder <Ctrl> + <Shift> + <N>Zoom + <-> or + <+>Connect to Projector + <P>Flip 3D + <Tab> Windows ManagementPeek at the Desktop + <Space>Show/Hide the DesktopMinimize all WindowsMaximize + < >Minimize/Restore + < >Show/Hide Preview PaneTaskbarCycle through Icons + <T>Open New Instance+ <D>+ <M> <Alt> + <P> <Shift> + clickStart ButtonOpens the Start IconClick to open the program.
4 Rearrange icons by clicking and PreviewPoint to the program icon on the taskbar. Click a preview thumbnail to view the Desktop ButtonPoint or click here to make open Windows AreaThe Action Center and other system icons are located To see Through Windows with Aero Peek: Point to Show Desktop button on the bottom right edge of the taskbar or press + <Space>. To View Open Windows with Aero Peek: Point to the program icon on the taskbar that contains the file or window you want to view. Click the thumbnail preview to view it. To Minimize Other Windows with Aero Shake: Click and drag a window s title bar quickly from side to side or press + <Home> To Compare Windows Side by Side with Aero Snap: Click and drag a window s title bar to the right side of the screen, and drag the other window to the left side of the screen.
5 Or press + < > and + < >. To Maximize an Open Windows with Aero Snap: Click and drag the window s title bar to the top of the screen or drag the bottom border of the window down to the taskbar. Or press + < >. To Flip Through Windows with Flip 3D: Press + <Tab>; continue to hold down the key while pressing <Tab> to scroll through the open 7 Quick Reference GuideUpdated: April 2010 Aero Peak makes open Windows invisible so you can view the gadgets and icons on the Personalize Windows 7 Appearance and Sounds Right-click the desktop and select Personalize.
6 The Personalization window appears. Click the appropriate links to personalize these things: Themes - Change menus, icons, backgrounds and sounds all at once. Desktop Background - Choose Built-in colors and pictures, or use your own. Select more than one picture to start a slide show. Window Color - Change window color and transparency. Sounds - Change which sounds play when you perform different tasks. Screen Savers - Adjust what it displays and when it appears. Desktop Icons - Add icons to the desktop, such as Computer and Network. Mouse Pointers - Change how the pointer looks and acts, reverse can use Snipping Tool to capture a screen shot (or snip) of any object on your screen, and then annotate, save,or share the image.
7 Simply use a mouse or tablet pen to capture any of the following types of snips: Free-form Snip: Draw an irregular line, such as a circle or a triangle, around an object. Rectangular Snip: Draw a precise line by dragging the cursor around an object to form a rectangle. Window Snip: Select a window, such as a browser window or dialog box, that you want to capture. Full-screen Snip: Capture the entire screen when you select this type of Capture a Snip: 1. Open Snipping Tool by clicking the Start button , clicking All Programs, clicking Accessories, and then clicking Snipping Tool.
8 2. Click the arrow next to the New button, select a snip type from the menu, and then use your mouse or tablet pen to capture a ToolPersonalizationProblem Steps RecorderYou can use Problem Steps Recorder to automatically capture the steps you take on a computer, including a text description of where you clicked and a picture of the screen during each click (called a screen shot). Once you capture these steps, you can save them to a file that can be used by a support professional or someone helping you with a computer Record and Save to your Computer 1. Open Problem Steps Recorder by clicking the Start button , and then typing psr.
9 In the list of results, click psr. 2. Click Start Record. On your computer, go through the steps on your computer to reproduce the problem. You can pause the recording at any time, and then resume it later. 3. Click Stop In the Save As dialog box, type a name for the file, and then click Save (the file is saved with the .zip file name extension).