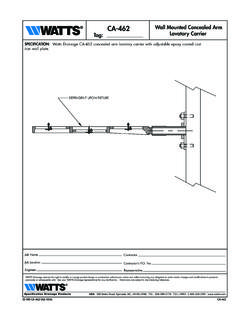
Transcription of LF856 and 856ST Series 850, LF850, 856, - Watts Water
1 Disassemble and clean b. Bypass line plugged mainline valve (DCDA). CODE REQUIREMENTS. CHECK WITH LOCAL. FRT. Disassemble and clean a. Mainline check fouled 2. Low flows passing through to local codes for actual requirements in your area. With Strainer). 175. These minimums do not apply to removable protective enclosures. Refer RWWP. With Strainer). 4. Disassemble and clean b. Leaking shutoff valve (Top View, Shown (Front View, Shown to exterior, interior and pit/vault installations and are only recommendations. Flow Disassemble and clean a.
2 Debris on seating surface 1. Check valve leaking 856, LF856 , 856ST . LF850 & DCDA Series 856ST testing and maintenance. Clearances shown in the installation views apply SOLUTION CAUSE PROBLEM Series 856, LF856 , THE DC Series 850, 3. The valve assembly must be installed where it is accessible for periodic INSTALLATION OF 850, LF850 & DCDA. Troubleshooting VERTICAL THE DC Series rotated as permitted by the flange bolt pattern on vertical installations only. INSTALLATION OF only in the orientation/flow direction as shown.
3 The gate valves may be the ASSE Series 5000 manual that is consistent with your local codes. piping and use VERTICAL. (DCDA), sizes 21 2" to 10" only (65 250mm). The valves may be installed FEBCO recommends the use of the appropriate annual test method presented in above all downstream 2. These instructions apply to Series 850, LF850 (DC), 856, LF856 and 856ST . 12" (300mm) minimum Test Procedure at least 20psi (133kPa). applicable to your area. It is recommended that system supply pressure be 5. Install the bolts and nuts and tighten.
4 1. Consult local codes for specific installation requirements and restrictions 12" Min (300mm). 6" Min (150mm). keep the O-ring in position while installing the cover. 6" Min (150mm). Installation Instructions Refer to Local Codes Refer to Local Codes Refer to Local Codes If necessary, apply FDA approved grease to the O-ring groove in the body to 18" Min (450mm). 4. Replace the cover, ensure the spring assembly is positioned in the pivot socket. Figure 4 Figure 3. parts as required. 3. Inspect/clean debris from the disc and seat ring.
5 Replace worn or damaged (TOP VIEW, SHOWN WITH STRAINER). (Top View, Shown With Strainer) HORIZONTAL INSTALLATION OF THE DC Series 850 helps assure maximum life and proper product function. 1 4 inch. LF850 & DCDA Series 856, LF856 , 856ST . retained and the cover should be pushed away from the body approximately damage. intended. Regular checking and cleaning of the product's internal components HORIZONTAL INSTALLATION OF THE DC Series 850, 18" min. (45mm) pressure situations must be eliminated to protect the valve and system from possible adjustments or repair could render the product ineffective for the service 2.
6 Remove the cover bolts/nuts and lift the cover from the body. The springs are Flow 18" Min (450mm). Flow Thermal expansion or Water hammer can cause pressure increases. These excessive nance has been performed. Corrosive Water conditions and/or unauthorized sequence. 7. The assembly must be protected from freezing and excessive pressure increases. as service conditions warrant. All products must be retested once mainte- pressure from the assembly by opening the #4, #3, and # 2 test cocks in this periodically in compliance with local codes, but at least once per year or more Representative.
7 DO NOT REMOVE THE VALVE ASSEMBLY FROM THE PIPELINE. Refer To Local Codes 1. Close the outlet shutoff valve, then close the inlet shutoff valve. Bleed residual 6" min. (150mm) In case of a possible warranty claim, contact your local supplier or FEBCO Need for Periodic Inspection/Maintenance: This product must be tested Disassembling the Check Valve Refer to Local Codes 6" Min (150mm) installation/start-up is not included in the factory warranty. ! WARNING. 6. After servicing, repressurize the assembly and test to ensure proper operation.
8 Figure 2 and cleaned. Any damage or improper operation caused by pipeline debris or improper the factory warranty. The valve cover(s) must be removed and the check seats inspected 5. Carefully inspect seals and seating surfaces for debris or damage. with governing authorities for additional local requirements. (FRONT VIEW, SHOWN WITH STRAINER) not pass the field test, it is most likely due to a fouled check valve. This is not covered by damage and render the assembly inoperable. (Front View, Shown With Strainer) HORIZONTAL INSTALLATION OF THE DC Series 850.
9 All assemblies are tested at the factory for proper operation and leakage. If the valve does building or plumbing codes, the local codes should be followed. Inquire LF850 & DCDA Series 856, LF856 , 856ST to installation. If the information in this manual is not consistent with local 4. Do not force parts. Parts should fit together freely. Excess force may cause HORIZONTAL INSTALLATION OF THE DC Series 850, NOTICE You are required to consult the local building and plumbing codes prior unless instructed to do so. Refer To Local Codes min.
10 (150mm). to Local 6"Codes Flow Refer Flow 3. DO NOT USE ANY PIPE DOPE, OIL, GREASE OR SOLVENT ON ANY PARTS. 6" Min (150mm) using the # 3 and # 4 test cocks. Test the valve assembly to ensure correct operation. ! WARNING. 2. Rinse all parts with clean Water prior to reassembly. 175 4 FRT. 6. After installation SLOWLY fill the assembly with Water and bleed air from the body RWWP. Keep this Manual for future reference. 175 4 FRT. tive. RWWP. OR STEMS. damage to the equipment. 1. Detailed maintenance manuals are available from your local Febco representa- NOT LIFT THE ASSEMBLY BY CONNECTING TO THE GATE VALVE HANDWHEELS result in death, serious personal injury, property damage, or Refer To Local Codes ments in your area.