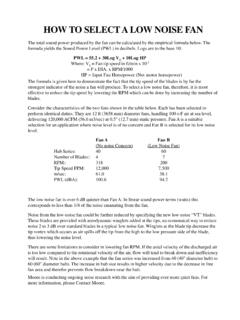
Transcription of TMC 647 RevD - Moore Fans
1 CLASS 5400 FANS OWNER'S MANUAL .. INSTALLATION INSTRUCTIONS .. GETTING STARTED .. INSTALL HUB .. FOR MANUAL HUBS INSTALLED ON QD BUSHING .. FOR SERIES 19 HUBS ONLY .. INSTALL AIR SEAL (IF REQUIRED) .. INSTALL PNEUMATIC TUBING .. INSTALL AND ADJUST BLADES .. START-UP PROCEDURES .. MAINTENANCE .. PERIODIC INSPECTION .. ANNUAL INSPECTION .. VIBRATION AND UNBALANCE .. BELT DRIVE UNITS .. OPERATION .. AERODYNAMIC ABUSE .. BLADE OVERLOAD .. CAUSES OF IMPROPER BLADE LOADING .. CHECKING BLADE LOAD .. DAMAGING OPERATING CONDITIONS .. WARRANTY .. DRAWINGS AND PARTS LISTS .. AUTOMATIC FANS: SERIES 33-60 3-8 BLADES .. AUTOMATIC FANS: SERIES 49-73 9-12 BLADES .. MANUAL FANS .. SERIES 19 PARTS LIST .. 22 MODEL 5400 FANSOWNER'S MANUALPage 1 Moore FANS LLC, Marceline, MO 64658 Phone (660 ) 376-3575 FAX (660) 376-2909 TMC-647-(Rev E) - 01/06 Page 2 TMC-647-(Rev E) - 01/06 Moore FANS LLC, Marceline, MO 64658 Phone (660 ) 376-3575 FAX (660) 376-2909years, reference to the Fan Specification Sheets provided willidentify the characteristics of each individual Moore Company keeps records indexed by serialand job numbers of all fans produced for at least forty yearsin order to provide proper maintenance advice and informa-tion on spare parts and PLANNING THE INSTALLATIONThe illustrations given in these Installation Instructionsassume that air flow is upward and that the drive shaft isbelow the fan.
2 This represents the most common arrange-ment. For inverted fans or for other arrangements, it will benecessary for the reader to visualize the illustrations re-oriented or sequence given for the installation may be changedif the conditions warrant. For example, the air seal may beinstalled on the hub before the hub is installed on the driveshaft. (In fact, for inverted fans, it is necessary to install the airseal first.) The installation should be planned before begin-ning so that the steps required are taken in the most conve-nient order. If you need information not found here, pleasecontact FAN IDENTIFICATIONE very fan, or group of identical fans, is assigned a JobNumber. This number will be found on Section FanSpecifications inserted in the envelope on the inside cover ofthis manual. If non-identical fans are shipped together, a JobNumber is assigned to each fan or group and a set of OrderInformation Sheets will be included for each Job Job Number is written in semi-permanent ink oneach blade, hub and air seal.
3 All fan parts bearing the sameJob Number are entirely interchangeable. (Blades of thesame Series and Diameter are also interchangeable betweenJob Numbers.)Fan components covered by more than one Job Num-ber may be crated together. The Job Number that is writtenon each part, however, will make sorting individual fan produced by Moore is assigned aSerial Number. This Serial Number is embossed on a perma-nent metal tag and attached to each fan hub. For automaticfans, the Serial Number tag will be found on the base of thehub plate. For manual fans, the Serial Number tag will befound on the side of the hub between two of the Fan Specification Sheet provided for each JobNumber lists all of the individual Serial Numbers of theidentical fans covered by that Job Number so that, in INSTALLATION GETTING CLASS 5400 FANS OWNER'S ABOUT THIS MANUAL .. Moore is as interested, as are its customers, thatMoore fans operate at top efficiency for many, manyyears.
4 This manual has been written to achieve thatresult and is based on more than fifty years of experienceas a manufacturer of axial flow fans. Moore fans represent the highest degree of axialfan development and are in all respects, regardless ofprice, the finest obtainable for their intended for any fine equipment, certain precautions are nec-essary and certain abuses must be avoided in order toinsure the best performance over the longest period oftime If you have any questions regarding the installa-tion or operation of your Moore fan(s), please contact theCompany for INSPECTION All Moore units are carefully balanced, inspected andpacked at the factory. If any damage is evident beforeor after unpacking, the delivering carrier should bepromptly notified so that an inspection may be madeby the claims adjustor. It is the responsibility of theconsignee to file damage claims with the carrier.
5 Al-though Moore will not be responsible for shippingdamage, it is requested that any damage, even of aminor nature, be reported to the factory at IDENTIFY YOUR FAN S FEATURESThe installation instructions which follow willinclude some steps for installing fans with features notprovided on you unis(s). Section 2 Getting Startedshould be read carefully before installation fans have several unique features. Those unfa-miliar with these units should read the short summaryof these important features on the last page of FANS LLC, Marceline, MO 64658 Phone (660 ) 376-3575 FAX (660) 376-2909 Page 3 TMC-647-(Rev E) - 01 INSTALL FOR MANUAL HUBS INSTALLED ON QD BUSHINGSHAFTSTAINLESSNUT(SpeciallyCoated )STAINLESS STEEL BUSHINGSTUDFAN HUBFAN HUBKEYAIRFLOW SHAFTHUB FOR MANUAL STRAIGHT BORE HUBS INSTALLED ON SHAFTHUBTUBEQ D BUSHINGBUSHING STUD WASHEROn Cast Hubs Only(14", 20" & 24" Hub Diameters)If the (3) stainless steel bushing studs are not alreadyinstalled in the fan hub, install them at this time.
6 Hand-tighten the bushing onto the shaft and check the key forproper fit. Be sure the shaft is completely through clean the bore of the hub and the outside ofthe bushing with a clean, dry cloth. Use no lubricants in thisinstallation. Use of lubricants can cause hub not clean or alter the lubricant coating on the the hub by grasping the clevises or hub tubes. Donot lift the hub by grasping the air the fan hub on the bushing with the studsextending through the bushing flange. Place the stud nuts onthe studs and tighten the nuts alternately, keeping the pullon all of them as nearly equal as possible while drawing thehub onto the bushing until the bushing tightly grips theshaft. Caution should be used to prevent the hub fromcocking on the the nuts to the torque shown in the table at not over-torque. Excessive torque can cause hub orbushing the drive shaft, then raise the hub assembly by liftingon the clevises or blade tubes.
7 Do not lift on the air seal if theair seal is installed on the the hub onto the drive shaft so that the drive shaftgoes completely through the hub. Secure the hub firmly tothe drive shaft by tightening the 12 mm socket head setscrews already in the hub. Three are provided: One islocated over the shaft key and two more approximately 90oaway from the the drive shaft is from above, use a positive retainerplate or ring or drill indentations in the shaft to engage thehub set screws to prevent the fan from dropping off the shaftin the event that the set screws Hub Only Without Air SealManual Hub Only Without Air TORQUEINSTALLATIONPage 4 TMC-647-(Rev E) - 01/06 Moore FANS LLC, Marceline, MO 64658 Phone (660 ) 376-3575 FAX (660) FOR AUTOMATIC HUBSFAN HUBSHAFTSTAINLESS NUT(Specially Coated)Q D BUSHINGSTAINLESS STEEL BUSH-ING STUDBUSHING STUD WASHERSTAINLESS NUT (Specially Coated)Q D BUSHINGSTAINLESS STEEL BUSHINGSTUDMAXIMUM HUBBLADE CLEVISAll Series 19 fans are manual tapered-bore hubs forinstallation on Size SF QD bushings.
8 They differ from theother series in two respects. Because of the small hub size, anair seal is not provided and blade tubes are not required Theblade clevises are threaded directly onto the the (3) stainless steel bushing studs in the fan huband hand-tighten the bushing onto the shaft and check the key forproper fit. Be sure the shaft is completely through the clean the bore of the hub and the outside of thebushing with a clean, dry cloth. Use no lubricants in thisinstallation. Use of lubricants can cause hub not clean or alter the lubricant coating on the the fan hub on the bushing with the studs extend-ing through the bushing flange. Place the stud nuts on thestuds and tighten the nuts alternately, keeping the pull on allof them as nearly equal as possible while drawing the hubonto the bushing until the bushing tightly grips the should be used to prevent the hub from cocking onthe the nuts to the torque shown in the table Do not over-torque.
9 Excessive torque can cause hubor bushing the (3) stainless steel bushing studs are not alreadyinstalled in the fan hub, install them at this time. the bushing onto the shaft and check the key forproper fit. Be sure the shaft is completely through the bushingbut not extending beyond it. The end of the shaft should beflush with the top of the clean the bore of the hub and the outside of thebushing with a clean, dry cloth. Use no lubricants in thisinstallation. Use of lubricants can cause hub not clean or alter the lubricant coating on the seals are installed by the factory whenever cratingrequirements permit. If the air seal is already installed, lift thehub by grasping the hub tubes or clevises. Do not lift the hubby the air the hub onto the bushing with the (3) stainlesssteel studs provided in the hub extending through the bush-ing flange. Place the stud nuts on the studs and tighten the nutsalternately, keeping the pull on all of them as nearly equal aspossible while drawing the hub onto the bushing until thebushing tightly grips the shaft.
10 Caution should be used toprevent the hub from cocking on the the nuts to the torque shown in the table at not over-torque. Excessive torque can cause hub orbushing FOR SERIES 19 HUBS ONLYINSTALLATIONMOORE FANS LLC, Marceline, MO 64658 Phone (660 ) 376-3575 FAX (660) 376-2909 Page 5 TMC-647-(Rev E) - 01 INSTALL AIR SEAL (IF REQUIRED)Air Seal Installed on Automatic Hub(Shown without Optional Positioner)Air Seal Installed on Manual HubALUMINUM NUTAIR SEALALUMINUM WASHERALUMINUM WASHERRESILIENT WASHERRESILIENT WASHERCLAMP STUDCLEVISALUMINUM NUTAIR SEALFAN HUBALUMINUM WASHERALUMINUM WASHERRESILIENT WASHERRESILIENT WASHERUPPER TO LOWER PLATEBOLTAIR SEAL INSTALLATION ON MANUAL HUBAIR SEAL INSTALLATION ON AUTOMATIC HUBHUBTUBEAll Model 5400 fans are provided with air seals exceptfor Series 19. Whenever practical, the air seal is installed at thefactory before shipment. On orders consisting of more thana small number of fans, however, the air seals are cratedseparately and must be installed in the field installed, the air seal may be installed on thefan hub before the hub is installed on the shaft or bushing ifit is more convenient to do so.