Transcription of VA-8020 Floating Valve Actuator Product/Technical Bulletin
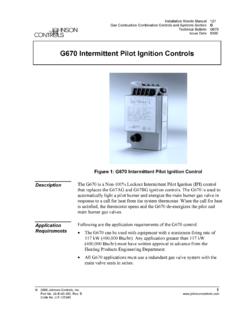
1 34-636-372, Rev. D FANs 977, Product/Technical Bulletin VA-8020 Issue Date 0216 2016 Johnson Controls, Inc. 1 Part No. 34-636-372, Rev. D Code No. LIT-977285 The VA-8020 synchronous motor-driven Actuator provides Floating (three wire) control of valves with up to 5/16 inch stroke in Heating, Ventilating, and Air Conditioning (HVAC) applications. This compact, non-spring return Actuator has a 22 lb minimum seating force in a compact, easy-to-install package. The VA-8020 can be ordered factory coupled to VB-5x39 Flare Valves or VG7000 Brass Trim Valves for water service only. Refer to the appropriate Valve literature for available configurations. Figure 1: VA-8020 Floating Valve Actuator Features and Benefits Simplified Setup and Adjustment Procedures Reduces installation costs Compact Assembly Size Fits most unit vent or baseboard applications Slotted Stem Valve Provides ease of attachment Synchronous Motor Meets a wide variety of small coil applications VA-8020 Floating Valve Actuator 2 VA-8020 Floating Valve Actuator Product/Technical Bulletin Operation The VA-8020 Actuator accepts a 24 VAC signal from a compatible controller.
2 The controller sends 24 VAC to either the up or down wires depending on the desired movement of the Valve . This signal drives the Actuator motor causing the Valve stem to move in the desired direction for the application. When the controller stops sending a signal, the Valve stem remains in position. The Actuator uses a reversible synchronous motor to accurately position the Valve . This can reliably generate 22 pounds of shutoff force in either the Drive Down or Drive Up direction. Once the Valve closes, a shutoff force builds up. When this force reaches 22 pounds, a lever within the Actuator operates a force sensor that stops the motor. The constant load at the end of travel ensures tight Valve seat shutoff and compensates for seat wear.
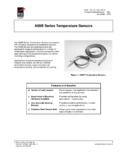
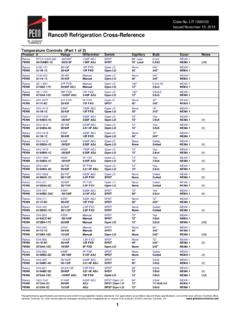
3 Field calibration of shutoff is not required. The Actuator maintains the shutoff force even if power to the Actuator is removed. Note: The Valve stem can be positioned manually by turning the adjustment knob shown in Figure 2. Rotating the knob counterclockwise moves the Valve stem up. LeverPlateDriveScrewStem Retainer/Position IndicatorManualAdjustmentKnobField Connections:White - CommonRed - DownBlack - UpCouplerYo ke /Set Screw Figure 2: VA-8020 Components IMPORTANT: There are no internal mechanical stops in the Actuator . Never drive the Actuator unless it is installed on the proper Valve body, or the Actuator may be damaged. The actual full stroke time of the Actuator in the system should be measured and entered into the controller.
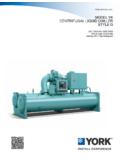
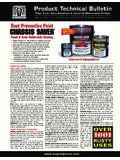
4 Note: There is no direct correlation between Valve position and controller output (0 to 100%) for Floating control. If correlation is important, use an Actuator with proportional control or position feedback. Dimensions See Figure 3 for Actuator dimensions. * Dimensions required for cover * * Figure 3: VA-8020 Dimensions, in. (mm) VA-8020 Floating Valve Actuator Product/Technical Bulletin 3 Installation IMPORTANT: Mount only on a Valve that is piped within 90 of the vertical position, so dripping water is prevented from entering the Actuator housing, since this could damage the Actuator . Do not cover the Actuator with thermal insulating material. Notes: Slotted stem VG7000 valves can only be ordered factory mounted to a VA-8020 Actuator .
5 No adaptor kits are available. The VA-8020 -100 kit (ordered separately) is required if mounting to a VT Series Terminal Unit Valve . Kit Includes VA-8020 Actuator VA-8020 -605 stem retainer and clip kit Wire nuts (3) Tools Required 5/16 inch (8 mm) nut driver or 3/16 (5 mm) flat-blade screwdriver needle-nose pliers crescent wrench (to fit 1-1/4 in. bonnet adaptor nut) Note: VA-8020 -100 kit may be required if mounting to a VT Valve . Mounting IMPORTANT: Do not use on valves having a stroke over 5/16 in. Travel beyond 5/16 in. will damage the Actuator or prevent complete shutoff. Note: In horizontal piping applications, it is recommended that the Valve be mounted within 85 of the upright position.
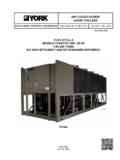
6 When mounted in vertical piping, the Valve must be protected from moisture. Unpack the Actuator and proceed as follows: 1. Remove the Actuator cover by pressing inward on the plastic tabs while sliding the cover up and forward. 2. Make sure that the lever plate is within 1/4 in. ( mm) of the upper stop. (See Figure 4.) Lever PlateApproximately1/4 ke /Machine ScrewManualAdjustmentKnob Figure 4: Plate Position 4 VA-8020 Floating Valve Actuator Product/Technical Bulletin 3. For VT valves, thread the bonnet adaptor nut (included in the VA-8020 -100 kit) onto the Valve bonnet shown in Figure 5, and tighten with a wrench until it is snug. BonnetAdaptor NutPackingNutVal veBonnetStem Figure 5: Valve Bonnet Adaptor 4.
7 Position the Actuator yoke on the bonnet adaptor nut, making sure the yoke is flush with the surface of the nut. Note: If the Valve stem is touching the coupler and preventing a flush contact, use the manual adjustment knob (shown in Figure 2) to reposition the coupler. 5. Secure the Actuator to the Valve bonnet by tightening the hex-head machine screw provided. 6. Place the stem retainer and coupling clip over the Valve stem, so the lower (shorter) portion of the coupling clip is positioned in the locking groove on the Valve stem as shown in Figure 6. Val ve St emCouplerCoupling ClipStemRetainerLower Portionof Clip Figure 6: VA-8020 -605 Stem Retainer and Clip Kit Note: The extended portion of the stem retainer must be located on the right so that it lines up in the window of the cover.
8 It may be necessary to pull the Valve stem up to meet the coupler or to rotate the manual adjustment knob (shown in Figure 2) clockwise to run the coupler down. 7. Push the white plastic stem retainer until the coupling clip moves forward into the groove, and the retainer locks the clip in place. 8. Verify that the Valve stem is located at the back of the groove by examining the connection. To remove the coupling clip, use pliers to grip the stem retainer and pull outward. (See Figure 6.) VA-8020 Floating Valve Actuator Product/Technical Bulletin 5 Wiring Input lines to the Actuator must be wired correctly for the Valve to move in the proper direction. (Refer to the specific controller wiring instructions as needed.)
9 Wire the Actuator as follows: ! CAUTION: Risk of Electric Shock. Disconnect the power supply before making electrical connections to avoid electric shock. MISE EN GARDE : Risque de d charge lectrique. D brancher l'alimentation avant de r aliser tout raccordement lectrique afin d' viter tout risque de d charge lectrique. ! CAUTION: Risk of Property Damage. Do not apply power to the system before checking all wiring connections. Short circuited or improperly connected wires may result in permanent damage to the equipment. MISE EN GARDE : Risque de d g ts mat riels. Ne pas mettre le syst me sous tension avant d'avoir v rifi tous les raccords de c blage. Des fils formant un court-circuit ou connect s de fa on incorrecte risquent d'endommager irr m diablement l' quipement.
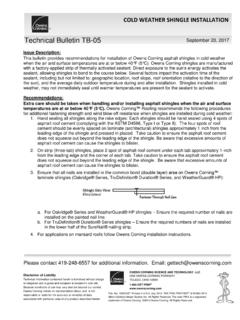
10 IMPORTANT: Make all wiring connections in accordance with the National Electrical Code and local regulations. 1. Push in the two tabs on the side of the cover, lift and remove the cover. 2. Locate the three wires with the stripped ends. 3. Use the wire nuts included to connect the leads from the Actuator to the controller wiring. 4. Wire the Actuator as shown in Figure 7. CommonWhiteRedBlackMUpDownFrom 24 VACP ower Supply Figure 7: Wiring for the VA-8020 Table 1: VA-8020 Action Energizing Wires Actuator Drive Screw White to Red Down White to Black Up Making contact to the down connection from the supply provides a signal path through the motor from the white and red wires, which will cause the Actuator drive screw to drive the coupling down, pushing the Valve stem down.