Transcription of DIGITAL VIDEO RECORDER H.264 - 120FPS ( 4/8/16 CHANNEL)
1 INSTALLATION/OPERATION DIGITAL VIDEO RECORDER - 120 FPS ( 4/8/16 channel ) DVR - Installation/ Operation Manual WARNING: To prevent a risk of fire of electric shock, do not expose this product to rain or moisture. This installation should be made by a qualified service person and should conform to all local codes. This is a Class A product. In a domestic environment this product may cause radio interference in which case the user may be required to take adequate measures. Copyright This manual is the intellectual property of Manufacturer and is protected by copyright. All rights are reserved. No part of this document may be reproduced or transmitted for any purpose, by whatever means, be they electronic or mechanical, without the express written permission of Manufacturer. Edition : Copyright 20 10 Manufacturer Note This Manual was compiled with the greatest of care and all information double checked.
2 At the time of printing the description was complete and correct. Because of the further development of products, the content of the manual might change without prior notice. Manufacturer will not be liable for damage which is directly or indirectly due to errors, incompleteness, or discrepancies the manual and the product described. Trade marks All names used in this manual for hardware and software are very probably registered trade marks and must be treated as such. DVR - Installation/ Operation ManualContents FOR THE SAFETY OF DESCRIPTION OF PARTS AND COMPOSITION OF FEATURES ..8 DESCRIPTION OF PARTS AND FUNCTION .. 9 Front Rear ..11 Connection IR Remote OSD MENU Main System ..23 Network ..30 Event ..32 Client Q & Appendix Appendix Appendix Appendix Appendix Appendix 6 (Mobile Phone Viewing).
3 86 Appendix 7 (Specification) ..88 Product DVR - Installation/ Operation Manual1. FOR THE SAFETY OF CUSTOMERS Caution before use Please read this manual for proper use. The caution described in this manual contains very important information for the safe use, so, please follow the instruction. Please keep it whether you could reach after read. For the safety and proper use, it marked various symbol. So, please read it to prevent your physical or financial loss. Tips for installation Please avoid water which could be the reason of firing or electric shock. Clean the plug and socket. Please keep the socket and plug clean so that you could avoid the fire. The plug should be tightly connected to the wall socket. Do not put the unit on an unstable place. Do not put the unit on an unstable place like rugged table or slope place. Be careful for the installation position. Don t put the device in humid, direct sunlight, dusty, hot, greasy condition.
4 DVR - Installation/ Operation Manual Caution for proper usage During use In following cases, please turn off the power and remove the plug then, please contact technical support. If you use it continually, it could be a reason for a fire or electric shock. If smoke comes out of the device or when you smell something burning. If a alien substance is split into the device. If the device is dropped or the case is damaged. If the power cable has been damaged ( ex. slipped etc.) No picture being displayed. Don t open the case or modify. There is the high voltage sector inside the unit so, if you open the case or modify it, it could cause the fire or electric shock. Don t put a cup containing water or juice and small material on the device If you spilt water or alien substance into the device, it could cause the fire or electric shock. Don t put any alien substance. Don t put alien substance through the fan.
5 Don t touch when lightning . When the lightning starts, don t touch the plug or cable. It could cause the electric shock. Don t touch the power plug with wet hand. Don t unplug with wet hands. It could cause a electric shock. Don t pull out the power cable. DVR - Installation/ Operation Manual Use the designated HDD Please use the designated HDD. Otherwise, recording may be operated improperly. Maker HDD Capacity Western DIGITAL Seagate 250,500,750GB, 1TB and 2TB (except. 4CH) is supported. HDD is available up to 1pcs for 4CH(Max 2TB), 8/16CH.(Max 2TB) Don t pull out the cable when plug out from the wall socket. It could damage the cable and cause the fire. Please pull out holding the plug. When you move, please remove plug. If you move the device while the plug is in the socket, it could cause a fire by damaging the cable. Don t block the ventilation window. When the ventilation window is blocked, it could cause the fire by the generation of Internal heat.
6 Don t put a heavy item on the device. When it looses the balance and falls down, the customer could be hurt. Keep the plug and socket clean. Regarding the cleaning, please contact your Installer. If there is too much dust inside the device, it could cause the fire or internal short. Clean the plug and socket. Please keep the socket and plug clean to avoid fire. The plug should be tightly connected to the wall socket. Caution when you don t use the device for a long time. If you don t use the device for a while, please switch off and unplug. DVR - Installation/ Operation DDEESSCCRRIIPPTTIIOONN OOFF PPAARRTTSS AANNDD FFUUNNCCTTIIOONN 2-1 COMPOSITION OF UNIT Standard When you have received a product without HDD , the accessories 1) Bracket & Cable for HDD installing 2) fixing screws will be supplied. Accessories are subject to change without notice. Power Cable CD(Client Software, User MlSf )Remote Controller Battery Quick Guide DVR - Installation/ Operation Manual 2-2 FEATURES Convenience - User-friendly GUI( Graphic User Interface) - Easy-to-use menu composition - Easy-to-use recorded data search (Time, Date, Motion, Alarm) - Easy-to use menu with USB Mouse.
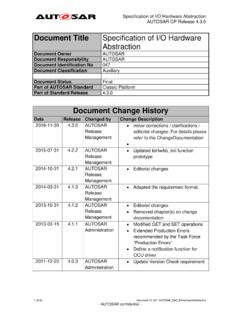
7 Stability - Auto restart after power interruption - DB structure offers data stabilization and best storage utilization Expandability -Various remote multi DVR s can be controlled by Web browser (PC Client System) Technology -Embedded LINUX OS -Totally maximum recording rate 120/100 fps -High-resolution & high-quality algorithm -Using Water marking & scrambling technologies, -Strong protection recorded data : 1 ~ 2 Kbytes per image with resolution 360x240 Functionality - Privacy Masking Set - Variable recording function (normal, alarm, motion, schedule, Duration) - Full channel real-time monitoring - Live monitoring, recording, playback, backup, remote access at the same time - Multi channel playback - Variable events notification to e-mail, buzzer or PC Client system DVR - Installation/ Operation Manual 2-3 DESCRIPTION OF PARTS AND FUNCTIONS 2-3-1 Rear Panel (1) VIDEO IN (BNC) - 4, 8, 16 Camera input ( p-p, 75 ) (2) VIDEO OUT - Composite / VGA / SPOT (3) AUDIO IN / OUTPUT - 1 Audio Input / Output (5) RS232 - 1 Serial Communication (6) Network Port (RJ-45) - Available to monitor live screen and recorded data on the HDD through Internet or LAN (7) MOUSE - Front : Port for both Thumbs drive and USB Mouse - Rear : This is for the PS2 mouse and may not support some USB mouse.
8 In this case, please insert the USB mouse into the front USB port. DVR - Installation/ Operation Manual (8) ALARM / SENSOR - ALARM / 1 SENSOR INPUT, OUTPUT PORT (9) RS485_CAMERA / KEYBOARD CONTROLER - 1 Serial Communication for Pan / Tilt Camera - 1 Serial Communication for P/T/Z Control Keyboard (10) DC POWER - AC 110~240 V (Free Voltage) / DC 12V 3A OVER AT T E N T I O N When the VIDEO format is changed, the system should be re-booted The VIDEO format should be selected before booting Default Passwords 00000000 8x Zero s. Password is required if you need to down-power or stop recording, prompt will be displayed asking for password. Web Client User ID admin (not case sensitive). Admin ID cannot be changed this is full administrator ID. Password 00000000 8x Zero s DVR - Installation/ Operation Manual 2-3-3 System Connection Diagram DVR - Installation/ Operation Manual 2-3-4.
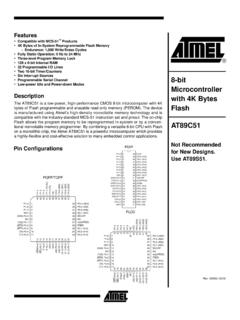
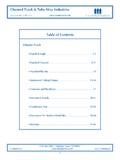
9 IR Remote Controller : Power ON/OFF 2. Rec : Start & Stop Recording 3. ~ :Key for figure and character 4. P/T/Z: Entering PTZ menu directly 5. OSD : Operating OSD ON/OFF 6. SEQ : Hot key for Spot(120/100fps) Key for SEQ operation(4808/400fps)7. LOG : Direct access Log list 8. INFO: Direct access system Info. 9. ID : Reserved. 10. MUTE : Audio Mute 11. AUDIO : Available audio switching when user select this key 12. MENU : Entering system menu 13. SEARCH : Entering search 14. ARROW & SPLIT : Key moving left, right, up and down. Also, Screen split display shows 15. VOL +,- : Up, down volume 16. CH +,- : Up, down channel (s) 17. ( ) : Play(or fast forward) 18. ( ) : Reverse play 19 II : Pause 20. : Stopping playback 21. Cam : Changing PTZ icon 22. P/T : Pan &Tilt 23. Z/F : Zoom/ & Focus 24. DIS : channel Division DVR - Installation/ Operation Manual 2-3-5. OSD Description-P : Status Bar is shown HDD capacity, Event, Network connection, Time, etc using by icons.
10 -HDD Capacity : 135GB is used out of 149GB -Event : Power Fail, VIDEO loss, etc will be shown when it is occurred. -Network connection : It is shown that admin or user is connected. -Date/Time *Others : -Backup -Mute -USB Stick: - Mouse DVR - Installation/ Operation MMEENNUU 3-1. Menu tree Display Recording System Spot Setting OSD Setting Camera Covert Camera Name Post Duration Quality Global Pre Resolution Basic Disk Account Program Update Main Menu HDD Overwrite Language Sensor Pre FPS Pre Duration Controller P. T. Z S e t u p Normal Alarm Motion Schedule Duration Priority ETC Resolution Frame Rate Sound On/Off Recording QualitySetup Schedule Auto Delete Mode Date Format Time/DST Set VIDEO Type System ID Deinterlace Level / ID New Password Confirm PW Camera Setting Setup Motion Live Setting Rights DVR - Installation/ Operation Manual Network SetDDNS IP SET E-Mail RegistrationEvent VIDEO Loss DDNS User ID User Password Domain Dynamic IP IP GateWay Netmask DNS Server DSL ID DSL PW DVR Port Web Port NTP E-Mail Out Beep Out Alarm Out Alarm Motion Power Loss Search Menu Archive Log All Power Record Operation Client Event Search Date/Time Event Calendar All Power Device From/ To/ ChannelSMTP Mode Smart Preview Duration Type/ Log / Config DVR - Installation/ Operation Manual 3-2 Main Menu NOTE Before use, be sure to setup the unit When MENU button is pressed, Password is required first.