Front bumper
Found 9 free book(s)
NO LESS THAN LEGENDARY
d3ggoe3aghc7um.cloudfront.netFront Bumper Aero Standard Rear Bumper Aero with Pintle Hook Standard with Pintle Hook Windshield Wiper Front Rear Rear Spoiler Side Step Full Cover + Illumination With Roof Rail Antenna Moon Roof With + Jam Protection - Seat Material Seat Type and Adjustment Front Rear #1 Rear #2 Seat Ventilation System (SVS) Front and Rear 1 - Meter Cluster

TYR0089 RUSH Brochure Update T-Move DIGITAL
d3ggoe3aghc7um.cloudfront.netFRONT BUMPER GARNISH - Take on the road with solid strength and dominating appeal. FOG LAMP COVER - Upgrade to the standard set-up of the Rush by adding a fog lamp cover. SIDE GARNISH - Adds flair while giving extra protection to the sides of the Rush. REAR BUMPER GARNISH - Journey without boundaries with an attractive rear bumper garnish.

POV INSPECTION CHECKLIST At least a ... - United States Army
api.army.milBumper Front Bumper Rear Missing, loose, broken Missing, loose, broken, bent in any way to cause a hazard Pass Fail Pass Fail BRAKES Brakes Foot pedal cannot travel more than half way to floor, does brake light stay on Pass Fail . Emergency Brake Properly adjusted, check emergency brake ...

FRONT LICENSE PLATE BRACKET INSTALLATION …
www.mycarworx.comFRONT LICENSE PLATE BRACKET INSTALLATION INSTRUCTIONS Using a top-mount sample – page 3 – 8) Push the 2 long mounting screws through the mounting holes and line them up with the dimple holes you made earlier in the front bumper. Screw the 2 mounting screws into the bumper until lightly tightened. At right is screw shown from back of bracket.
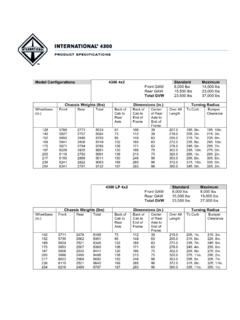
Model Configurations 4300 4x2 Standard Maximum Front …
alliancemotorsinc.comFront GAW 8,000 lbs 14,000 lbs Rear GAW 15,500 lbs 23,000 lbs Total GVW 23,500 lbs 37,000 lbs Chassis Weights (lbs) Dimensions (in.) Turning Radius Wheelbase (in.) Front Rear Total Back of Cab to Rear Axle Back of Cab to End of Frame Center of Rear Axle to End of Frame Over All Length To Curb Bumper Clearance 128 5760 2773 8533 61 100 39 207.0 ...

GENERAL MOTORS SERVICE REPLACEMENT FRONT & REAR …
www.genuinegmparts.comFRONT & REAR BUMPER FASCIA LIMITED LIFETIME WARRANTY Fascia Limited Lifetime Warranty Effective April 1, 2014. GeneralMotors Company;GM warrantsto the purchaser identified belowthat it willeitherrepair or replace,at its option the replacementGenuine GM Service Bumper Fascia identifiedbelowinthe

Nissan; Service Information for DTCs C1A12 and C1A16
static.nhtsa.govInspect the bumper fascia in the area in front of the ICC/distance sensor (see pages 2, 3, and 4). Check for stains and/or physical damage (for example, mud/dirt, road debris, dirty rain water, scrapes, punctures, misshapen surface). If there is physical damage but not severe, clean the area in front of the

Set includes: - Front Splitter - 14x bolt m6 - 14x secure ...
www.maxtondesign.eu- Front Splitter - 14x bolt m6 - 14x secure nut m6 - 14x washer m6 - Installation manual Always match the splitter to the bump Edge lined up to the bumper WARNING ! We strongly recommend to lea the installation to the specialist Splitter not mounted properly may fall off and cause serious damage. max. 3cm
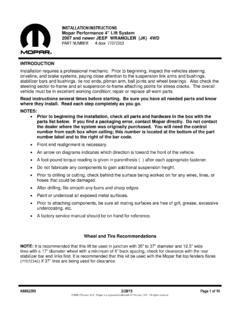
INSTALLATION INSTRUCTIONS Mopar Performance 4” Lift …
starparts.chrysler.comPlace vehicle in neutral. Raise front of vehicle with a jack and secure a jack stand beneath each frame rail, behind the front / lower control arms. Ease the frame down onto the stands, place transmission in low gear or “park”, and chock rear tires. Remove front tires. Position a jack so that it supports, but does not raise, the front axle.