Pico 4 Button Wireless Control
Found 4 free book(s)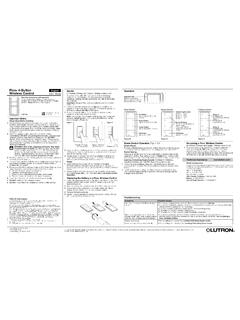
Pico 4-Button Wireless Control INSTALL (041481)
www.lutron.comsame response to each button press of the Pico ® 4-Button wireless control. • Scene Control: Each dimmer / switch can be set to unique levels for a personalized effect. For more information, see Scene Control Operation. Replacing the Battery in a Pico ® Wireless Control 1. Place a flathead screwdriver into the slot at the bottom of the Pico ®
Pico Wireless Control English - Lutron Electronics, Inc.
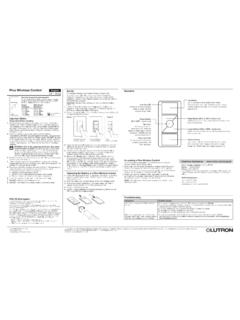
www.lutron.comPress and hold the Off button on the Pico wireless control (Figure 2) for approximately 6 seconds. 3. Once the dimmer / switch pairs with the Pico wireless control, the LED(s) on the dimmer / switch and the load will flash 3 times and they will exit Set-Up mode. 4. Repeat steps 1– 3 to pair multiple Pico wireless controls with a

Wireless
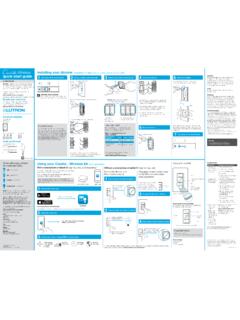
www.casetawireless.com4 ® Wireless 13 Connect the wires Ground 14 Attach the wallplate bracket and Pico remote control 15 Attach the wallplate ‘snap’ 16 Turn power on at circuit breaker 3-Way Installation - Caséta Wireless In-Wall Dimmer with Pico Remote Control Pairing the dimmer and Pico remote control 17 Press and hold "Off" button on dimmer 0 5 10 15 6 sec ...
Wireless Installing your dimmer Installation for lights ...
www.casetawireless.comPico ® remote controls. Wireless Pico ® remote control (sold separately) On Off Brighter (with raised icon) FASS™ Front Accessible Service Switch In-wall dimmer On Off Darker Brighter Favorite With a smartphone or tablet (Bridge required, sold separately) 1 Press and hold “off” button on dimmer 2 Press and hold “off” button on remote