Transcription of 048459b Maestro CL Advanced Programming Mode
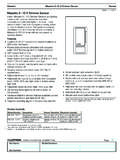
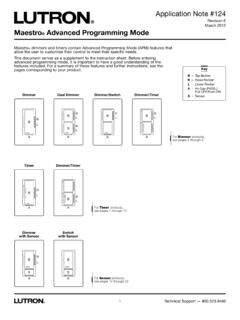
1 MaestroR C LR ModelsMACL-153 MOverviewThe MaestroR C LR dimmer features an Advanced Programming Mode (APM) that allows the user to customize their dimmer to meet their specific needs. This document serves as a supplement to the instruction sheet. Before entering APM, it is important to have a good understanding of the features included. DimmerTap ButtonRaise ButtonLower ButtonFASSTM FASSTM FASSTM FASSTM FASSTM FASSTM FASSTF ront AccessibleService SwitchIndicatorLights (IL)IL1 - IL7note: To replace fixture bulb(s), power may be temporarily disconnected at the light fixture by pulling the FASST OUT on the dimmer. For any procedure other than routine bulb replacement, power MUST be disconnected at the main electrical.
2 Page 2 How to Enter Advanced Programming Mode ..Page 3 How to Enter a Programming Option ..Page 4 APM Programing Options:Preset Light Level ..Page 5 Fade ON Time ..Page 7 Fade OFF Time ..Page 8 Delayed Fade to 9 Enable / Disable Indicator Lights ..Page 10 Low-End Trim ..Page 11 High-End Trim ..Page 12 Shortcuts and Additional Features:Low-End Trim Shortcut ..Page 13 Restoring Default Settings ..Page 14 Two-Location ApplicationsUsing an Existing Switch ..Page 1571 LrtMaestro C L Advanced Programming Mode Application Note #459 Revision BJune 20121 Technical Support - The light bulb(s) that the dimmer is - Tab at bottom of dimmer switch, required to be pulled out for light bulb(s) replacement and entering Advanced Programming Mode (APM); also known as Air Operation - Standard use of dimmer switch (ON / OFF, Raise / Lower).
3 Indicator Lights will not be Blink - Indication of entering APM, Indicator Lights (ILs) blink slowly at a rate of 4 flashes per Blink - Indication of entering Programming Options, Indicator Lights (ILs) blink quickly at a rate of 8 flashes per Preset - A light level setting that allows the dimmer to turn ON to the last dimmed Preset - A programmable light level setting to which the dimmer will always initially Trim - Ability to change the highest achievable light level to which the dimmer can be Trim - Ability to change the lowest achievable light level to which the dimmer can be Setting - Original preset Programming options that the dimmer is programmed to upon initial use, indicated by.
4 Factory Default - Original preset Programming options set up as a starting point for users that wish to customize settings; also known as default Note # to enter Advanced Programming Mode (APM)1. Pull the FASST into the OFF Position (OUT), and Wait 5 Press and Hold the tap button. While continuing to hold the Tap button, Push the FASST to the On Position (IN) and continue to Hold the tap button for approximately 5 Once the bottom Indicator light (IL1) begins to slowly blink, indicating that you have entered Advanced Programming Mode, release the tap : If there is no activity for 1 minute, the dimmer will automatically exit APM and return to Normal Note #459 3 Technical Support to enter a Programming Option1.
5 While in Advanced Programming Mode (APM) as shown on page 3, Press the Raise / Lower button to select the desired Programming Option. The slow blinking Indicator Light (IL) will indicate which Option you have to enter the desired option, Press the tap button. Proceed to the specific Programming Option page to view Programming instructions for desired : High-End TrimIL6: Low-End TrimIL5: Enable/Disable Indicator LightsIL4: Delayed Fade to OFFIL3: Fade OFF TimeIL2: Fade ON TimeIL1: Preset Light LevelOrrLnote: If there is no activity for 1 minute, the dimmer will automatically exit APM and return to Normal Note # Option 1: Preset Light LevelWhat Does It Do:If it is preferred that the dimmer turns ON to the same light level every time you turn it ON, choose the Locked Preset.
6 Double tapping the Tap button in Normal Operation Mode will always bring the light level to maximum intensity. If it is preferred that the dimmer turns ON to the light level previously used, choose the Unlocked Preset are 2 settings in Option 1: Preset Light Level. Locked Preset: When programmed for a Locked Preset, the dimmer will always turn ON to the predetermined locked level anytime the dimmer is turned ON with a single tap of the Tap button. Unlocked Preset: When programmed for an Unlocked Preset, the dimmer will turn ON to the light level that it was adjusted to the previous time that the light was ON. note: Default Setting is Unlocked Locked Preset1.
7 While in Advanced Programming Mode (APM), Press the Raise / Lower button to select the first option, Programming Option 1: Preset Light Level. Once Indicator Light (IL1) is blinking, Press the Tap button. The IL will then switch tothe current setting and begin blinking rapidly or turn OFF, indicating that the Programming option has been When entering the Preset Light Level option for the first time upon installing, the default setting is "Unlocked." note: Unlocked Preset is indicated by NO Indicator Lights turned ON while in Programming Option 1: Preset Light Level. Press the Raise / Lower button to choose desired light intensity. The light will become brighter or dim, reflecting the Locked Preset level as the this feature is adjusted.
8 (Continued on next )OrrLnote: If there is no activity for 1 minute, the dimmer will automatically exit APM and return to Normal Operation. To save and exit immediately out of APM to Normal Operation, Press and Hold Tap button until Indicator Light stops Note #459 5 Technical Support Option 1: Preset Light Level (continued)3. to Save the desired light intensity, Press the tap button. This will immediately exit out of the Programming Option 1: Preset Light Level and return to APM main menu. Your default light setting has now been redefined. A single tap of the Tap button (when in Normal Operation, not APM) will now always return the dimmer to this selected light setting until preset is deactivated or reset.
9 A double tap will always bring the lights to full Unlocked Preset1. To deactivate a Locked Preset setting so that the dimmer will turn On to the light level that it was last set to while in Normal Operation, the Unlocked Preset must be activated. While in Programming Option 1: Preset Light Level, Press the Lower button until the bottom Indicator Light is quickly flashing (IL1). release the Lower button and Press and Hold the Lower button again for approximately 3 seconds or until all Indicator Lights turn OFF. note: The light will remain at its minimum output when you perform this to Save the Unlocked Preset, Press the tap button. This will immediately exit out of the Programming Option 1: Preset Light Level and return to APM main : If there is no activity for 1 minute, the dimmer will automatically exit APM, however settings will not be saved.
10 To save and exit immediately out of APM to Normal Operation, Press and Hold Tap button until Indicator Light stops Note # Option 2: Fade On timeWhat Does It Do:Quicker fade times are more practical and slower fade times are thought to be more elegant. If the room that is controlled by the dimmer is the first or only light that will be turned ON in a particular room, most people find it advantageous to use a faster time so that the room is immediately illuminated. Art lighting or other accent lighting is often more pleasing with a slower fade ON Time allows for control over how quickly the lights will fade up when the dimmer is turned ON.