Transcription of 048480 Maestro Occupancy/Vacancy Sensor CL Dimmer ...
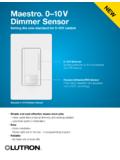
1 Maestro Occupancy/ Vacancy Sensor C L Dimmer Additional Programming, Installation, and Troubleshooting HelpApplication Note #480 Revision BFebruary 20151 Technical Support Maestro Occupancy/ Vacancy Sensor C L Dimmer ModelsMSCL-OP153M; MSCL-OP153MH; MSCL-VP153M; MSCL-VP153 MHOverviewThis document serves as a supplement to the Maestro Occupancy/ Vacancy Sensor C L Dimmer instruction Sensor DimmerNotes: To replace fixture bulb(s), power may be temporarily disconnected at the light fixture by pulling the FASSTM OUT on the Dimmer . For any procedure other than routine bulb replacement, power MUST be disconnected at the main electrical .. 2 Sensor Coverage .. 3 Sensor Features in Programming Mode.. 4 Dimming Features in Advanced Programming Mode .. 6 Programming Mode ..7 Timeout .. 7 Sensitivity.
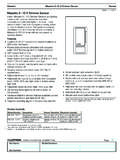
2 8 Auto-ON ..8 Occupied Level.. 8 Advanced Programming Mode .. 9 Preset Light Level .. 10 Manual Fade ON Time .. 12 Manual Fade OFF Time .. 13 Delayed Fade to OFF.. 14 Nightlight Mode .. 15 Low-End Trim .. 16 Low-End Trim Shortcut .. 16 High-End Trim .. 17 Restoring Default Settings.. 18 Two-Location Applications Using an Existing Switch .. 19 Ambient Light Detection (ALD).. 21 How it Works.. 21 FAQs.. 21 Troubleshooting .. 22 Bulb Compatibility.. 247654321 Indicator Lights (IL) 1 7 FASSTM Front Accessible Service SwitchFASSS ensor LEDTTap ButtonRaise ButtonLower ButtonLens2 Application Note # GlossaryAuto-ON.. Setting to adjust how the Dimmer responds to initial occupancy of the : ALD .. Setting in which the Dimmer turns ON upon initial occupancy of the room only if there is not enough ambient light.
3 Based on the user s interactions with the T button, the Maestro Sensor Dimmer will learn the user s preference for when it should turn ON once motion is detected. (Also called Ambient Light Detect mode.)Auto-ON: Disabled .. Setting where the Dimmer will turn ON only when the T button is pressed, but will still turn OFF automatically when the room is vacated. (Also called Vacancy mode.)Auto-ON: Enabled.. Default setting for the Maestro Sensor Dimmer . The Sensor automatically turns ON upon initial occupancy of the room, and turns OFF when the room is vacated. (Also called Occupancy mode.)Auto-ON: OWO .. Setting in which the lights remain OFF even as the room continues to be occupied. (Also called OFF While Occupied mode.)Default Setting .. Original preset options to which the Dimmer is programmed before initial.
4 Front Accessable Service Switch is the tab at bottom of Maestro Sensor Dimmer , required to be pulled out before replacing light bulb(s) and entering all programming modes. (Also called Air Gap.)High-End Trim.. An adjustable feature that allows the user to set the brightest achievable light level in the Lights (ILs).. LEDs on Dimmer that show current light level and are also used to indicate programming Trim .. Dimmest stable light level to which the Dimmer can be .. The light bulb(s) that the Dimmer is Preset.. A programmable light level to which the Dimmer will illuminate with a single press of the T Level .. A programmable light level to which the Dimmer will illuminate once occupancy has been Level: 100% .. The default set point for occupied level in which the Maestro Sensor Dimmer turns ON all lights to 100% of the dimmable light Level: 50%.
5 The setting in which the Maestro Sensor Dimmer turns ON all lights to 50% of their dimmable light Level: Preset.. Setting in which the Maestro Sensor Dimmer achieves a customized light level when the T button is .. Setting to adjust the level of motion needed to trigger the Maestro Sensor LED .. LED that glows when motion is detected; positioned next to Maestro Sensor Dimmer Mode .. A temporary, short timeout (less than 15 seconds) that can be used to test the Maestro Sensor Dimmer coverage while in the Programming .. Setting that determines how long the lights will remain ON after motion is no longer Preset .. Setting in which a single press of the T button turns the Dimmer ON to the last light Note #4803 Technical Support Maestro Sensor Dimmer Coverage AreaHorizontal Beam Diagram (for reference only)NEMA WD7 Test Grid Coverage (High Sensitivity Setting)Major motion coverage: 900 ft2 (81 m2)Minor motion coverage: 400 ft2 (36 m2)30 ft(9 m)25 ft( m)20 ft(6 m)15 ft( m)10 ft(3 m)5 ft( m)05 ft( m)10 ft(3 m)15 ft( m)20 ft(6 m)25 ft( m)30 ft(9 m)4 ft( m)35 ft( m)30 ft(9 m)25 ft( m)20 ft(6 m)15 ft( m)10 ft(3 m)5 ft( m)015 ft( m)10 ft(3 m)5 ft( m)05 ft( m)10 ft(3 m)15 ft( m)05 ft( m)10 ft(3 m)15 ft( m)20 ft(6 m)25 ft( m)30 ft(9 m)Vertical Beam Diagram Test Room Dimensions: 37 ft 38 ft ( m m) Test Floor Surface Material: Carpet Sensor Coverage Angle: 180 Major motion coverage.
6 Initial trigger motion detection Minor motion coverage: Maintained motion detection4 Application Note # Maestro Sensor Dimmer Features in Programming ModeThis Maestro Sensor Dimmer has features that allow you to customize the unit to achieve your individual needs. The following is an overview of these features: Timeout Sensitivity Auto-ON Occupied LevelNote: Programming Mode instructions can be found on pages 6 and approximate time in minutes after which the lights will turn OFF after the last motion is detected. The default setting timeout is 5 minutes but can be adjusted to 1, 3, 15, or 30 setting determines how sensitive the PIR Sensor will be. Lowering the sensitivity will cause the Maestro Sensor Dimmer to respond only to larger movements. High Sensitivity: This is the most sensitive setting and will detect very slight motions.
7 This is the recommended setting because it will work well for nearly all applications. Low Sensitivity: This is the least sensitive setting and can be used in areas of major or large on next Timeout Setting do I want?Shorter timeouts are best in areas where occupants are generally moving around. Laundry rooms, foyers, kitchens, and closets are typically good applications for shorter timeouts. Longer timeouts are better for areas where occupants move less frequently, such as in an office. Using a timeout of 15 minutes or more may increase bulb life in fluorescent bulbs. Consider using a longer timeout if you are controlling a dimmable Sensitivity Setting do I want?High sensitivity is typically the best setting. If the Maestro Sensor Dimmer is turning on too often due to unintended interference from the environment ( , heating or cooling vents near the Maestro Sensor Dimmer , moving draperies), low sensitivity may be Note #4805 Technical Support Maestro Sensor Dimmer Features in Programming Mode (continued)Auto-ON (Occupancy Version only)The automatic functionality of the Maestro Sensor Dimmer can be adjusted to control how the lights respond upon initial occupancy.
8 There are four available Auto ON settings: Enabled, Disabled, Ambient Light Detect (ALD), and OFF While Occupied (OWO). The default setting is Enabled. Auto-ON: Enabled: The lights will always turn ON when occupancy is detected. When the user manually turns OFF the light, the light will remain OFF for 25 seconds. After this time, the Maestro Sensor Dimmer will turn lights ON if motion is detected. Auto-ON: Disabled: This setting converts the Maestro Sensor Dimmer to Vacancy mode. The lights will not automatically turn ON but will still automatically turn OFF after vacancy. The lights must be manually turned ON by pressing the T button on the Dimmer or switch. Auto-ON: Ambient Light Detect (ALD) Mode: The lights will turn ON when occupancy is detected and ambient light is too low. If lights turn ON when there is enough natural light, press the T button within 5 seconds of entering the room.
9 If lights do not turn ON when there is not enough natural light, press the T button within 5 seconds of entering the room. Over time, this interaction will teach the Maestro Sensor Dimmer your preferred setting. Auto-ON: OFF-While-Occupied (OWO) Mode: The lights will always turn ON when occupancy is detected. If lights are manually turned OFF, Maestro Sensor Dimmer will keep lights OFF as long as room is LevelThis setting determines how much light will be automatically turned ON when motion is Setting: 100% 100%: The lights will always turn on to 100% of the dimmable light level. 50%: The lights will always turn on to 50% of the dimmable light level. Preset: The lights will turn ON to the last level that was used on the Maestro Sensor Dimmer . If you select a Locked Preset in Advanced Programming Mode, you will be able to lock this light level so that other adjustments will not change this presetWhat Occupied Level Setting do I want?
10 Preset mode allows for full customization of preferred light level. 100% will ensure that the lights are turned on to the brightest level available upon entering a room. 50% is the default light level for manual operation of Maestro products. To synchronize the default setting levels of all Maestro products in the house, this is the best Auto-ON Setting do I want? If you want the lights to automatically turn ON when someone enters the room, the Auto ON setting should remain enabled. If you want the lights to turn ON automatically when someone enters the room, but also want the Dimmer to keep the lights OFF after it has been manually turned OFF, you should select OFF While Occupied mode. If you want the lights to turn ON only when the T button is pressed, choose Auto ON: Disabled. This is Vacancy mode, and the unit will turn OFF automatically only when occupancy is no longer detected.